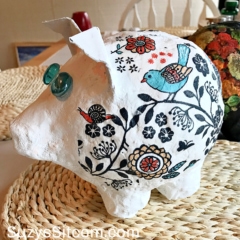
Create a Pretty Paper Mache Piggy Bank
Create a pretty paper mache piggy bank with just paper, glue and a few other simple supplies. Add some color and design to your finished piggy bank using an easy decoupage technique with napkins! The result is a sweet little piggy made with paper!
Servings 1 Piggy Bank
Cost 20
Equipment
- Paintbrushes
- Pair of scissors
Ingredients
- 1 ea Balloon
- 1 ea Egg Carton
- 1 ea Painters Tape Masking tape would also work.
- 1 ea Low Temp Hot Glue Gun and Glue Be sure that it is low temp
- 1 ea Packing Paper or Newspaper
- 1 ea Mod Podge
- 1 box Instant Paper Mache Mix
- 1 ea Acrylic Paint
- 1 pk Decorator Napkins
Instructions
- Cut the egg carton apart for the legs and nose. Cut the ears from the egg carton lid. Blow up the balloon.
- Add the legs, nose and ears to the balloon using a low temp hot glue gun.
- Use painters tape to cover any spaces and seams.
- Cut up strips of packing paper or newspaper. Use Mod Podge and a brush to layer the strips of paper over the entire piece, covering the balloon and all egg carton pieces. Allow to dry overnight.
- Mix the instant paper mache mix with water (1 part water to 2 parts paper mache). Cover the piggy bank with a layer of instant paper mache. Smooth with wet fingertips. Allow to dry overnight.
- Use a craft knife to cut a slit into the top of the bank.
- Choose your background color and paint the bank with acrylic paint.
- Use designer napkins and Mod Podge to decoupage the piggy bank.
- Add button eyes or use glass cabachons attached with low temp hot glue.