
DIY Father's Day Mug - #1 Dad
Learn just how easy it is to make your own #1 Dad Father's Day mug using infusible ink transfer sheets, a Cricut Mug Press and Cricut Design Space.
Servings 1 mug
Equipment
- Cricut Joy
- Cricut Explore Air 2
- Cricut Maker
- EasyGrip Mat
- Weeding Tool
- Cricut Mug Press™
- Heat Resistant Mat
Ingredients
- 1 Cricut Mug (or a sublimation mug)
- 1 lint roller
- 1 infusible ink transfer sheet
- 1 heat resistant tape
- 1 #1 Dad SVG Cut File (or design of your choice)
Instructions
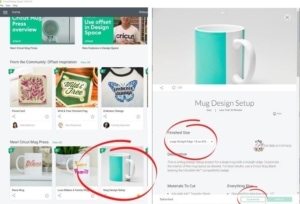
Step One: Open Mug Design Setup Project
- From Design Space, click on the Mug Design Setup project. The project details page will pop up. From here, select the Finished Size from the drop-down menu. There's a straight, ripped, scallop, wavy and zig zag edge to choose from, as well as 12 oz (small) and 15 oz (large) mug blanks for each. Then click on Customize. The mug design setup project that you selected will open in Design Space.
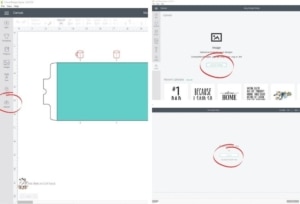
Step Two: Upload SVG Cut Files
- Click on the Upload icon in the menu bar on the left-hand side of Design Space. Then select Upload Image, then Browse. Locate the SVG cut file that you want to upload, then click on Open.
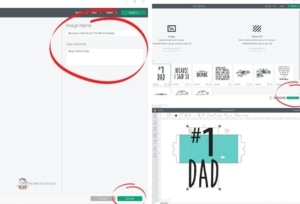
- At this point you can change the name of your image and add any applicable tags. Then click on Upload. Select the image you just uploaded by clicking on it and then click on Insert Images.
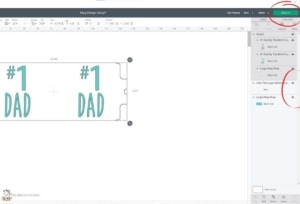
Step Three: Edit/Resize Your Design
- Use the red mug guides from the mug design setup project to line up your design elements on the canvas. Please note that your design must be inside the green/blue rectangle. Anything outside of the rectangle will not transfer to your mug.
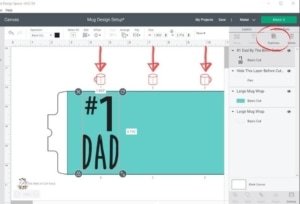
- If you want the same design on the front and back of your mug, just duplicate the image. Again, use the red mug guides to help you get everything lined up perfectly.
- Be sure to hide the guide and maybe the green rectangle if you're not using it with your design. For my #1 Dad mug, I did not use the green rectangle. However, if you want to have solid color or design to wrap around your mug and have the lettering for "#1 Dad" to be white, then you will want to use the green rectangle.
- Click on "Make It" when you're ready to continue.
Step Four: Cut Out Your Design
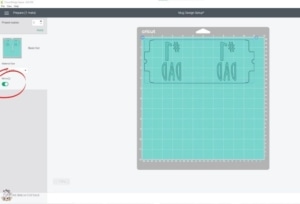
- Next you're ready to cut out your design. Load the infusible ink transfer sheet on the light grip mat and load in your cutting machine.
- Be sure to mirror your image. Then follow the prompts in Design Space. When the design is finished cutting, remove from the cutting mat.
Step Five: Press the Mug
- Heat up the Mug Press.
- Use the lint roller brush to remove any debris from your clean sublimation mug.
- Line up the design against the mug and use the heat resistant tape to secure in place.
- Load the mug into the Mug Press with the handle in the slot and press the lever to secure in place.
- When the mug is finished, release the lever and remove the mug carefully by the handle to a heat resistant surface. Allow the mug to completely cool before revealing your beautiful new design!

Notes
In Design Space, there is a free Mug Design Setup project, which makes it easy to complete Infusible Ink transfer sheet projects. Your resulting cut will be a perfectly sized, easy-to-weed design with convenient sticky tabs that secure your design to your mug for the transfer.