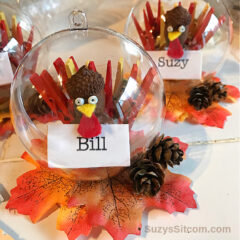
Fun Turkey Thanksgiving Place Settings
Create cute wooden turkeys in a clear ornaments using mini clothes pins, wooden balls and acorns. These Turkey Thanksgiving Place Settings will be a hit this year for your holiday table!
Servings 4 Turkey Place Settings
Cost 20
Equipment
- Hot Glue Gun
Ingredients
- 4 ea. 1.25" Unfinished wood balls
- 4 ea. 80mm Clear Fillable Plastic Ball Ornaments
- 24 ea. Mini clothespins- 1-7/8"
- 4 ea Acorns
- 8 ea. Faux Fall Leaves
- 8 ea Miniature pinecones
- 4 ea Unfinished Wooden Rectangles 1-1/2" x 3/4"
- 4 ea. Canning lids
- 1 set Acrylic paint
- 1 set Assorted Beads
- 2 scraps yellow and red felt
Instructions
- Use hot glue to attach five clothespins together to create the tail
- Attach the wooden ball to the tail with hot glue
- Attach the acorn to the top of the ball with hot glue to create the head
- Paint the turkey using acrylic paints
- Cut out beak and wattle from felt pieces, attach with white glue
- Attach eyes using white beads and white glue.
- Create name tag by printing out names and gluing to the wooden rectangles with white glue.
- Use hot glue to attach the name tag to each turkey body.
- Place the finished turkeys inside of each clear ornament.
- Use hot glue to attach two fake leaves to each canning lid, and each clear ornament/turkey on top of that.
- Use hot glue to add a couple of mini pinecones to finish.