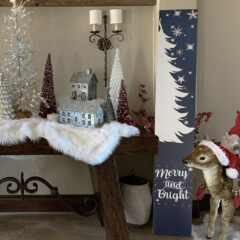
How to Make a Holiday Merry and Bright Porch Sign
Follow this tutorial to make your own 66" - 72" tall Christmas Porch sign to greet your guests every holiday season.
Servings 1 Sign
Cost $35
Equipment
- 1 Drill
- 1 13/64" drill bit for wood
- 1 15/32" drill bit for wood
- 1 Paint brush or foam roller
- 1 Rag
- 1 12x24 cutting mat If you have 2 12x24 and 1 12x12 you can set all of your cutting mats up at once
- 1 Electronic Cutting Device Cricut or Silhouette
Ingredients
- 60 inch Adhesive vinyl 12" x 60" Any color Reposition-able/Removable vinyl
- 8 oz Stain Provincial or Special Walnut; enough to coat your board on all four side. I used about 2 tablespoons
- 8 oz Navy Paint Sample pint from the store will work great
- 1 pint White paint Sample pint from the store will work great
- 1 piece 120 or 150 grit sand paper Sanding between paint coats. Optional to distress the edges of the board
- 1-2 strings Christmas tree lights clear - soft white light or warm white light
- 1x12x66" board Wood board 1x12 (true dimensions are .75" x 11.5" x 66") I used white wood but any inexpensive wood will do. Make sure your board is straight. My board came 72" long and I ended up keeping it this length. I added space to the design at the top and bottom. The zipped folder has additional snowflakes to fill in any extra spaces if necessary.
- 1 roll Transfer tape At least 11.5" wide x 60" long
- 1 roll Duct tape Brown or black
Instructions
- Prepare The Merry and Bright Holiday Porch Sign
- Have your board cut to 66" long if it isn't already. My store had boards 72" long. You can ask someone at the store to cut the board if you don't have a saw at home. Or you can keep it 72" if you want a taller board.
- Stain your board using a rag by rubbing it on, letting it sit for a couple of minutes, then removing the excess stain. Let the stain dry. Generally 2 hours.
- When the stain is dry, paint the front of the board white. You can use a brush or a roller. Let the board dry.
- Download and unzip the cut files. There will be three separate files labeled top, middle and bottom. The top two will need to be cut on 12x24" pieces of vinyl. The bottom 12x12".Cut two pieces of 12"x24" vinyl. Cut one piece of 12x12" vinyl.
- Upload the design files into your design software. Place all three layouts onto one canvas. Weld the third section together so that the letters cut out correctly. Join the Top section to itself, and same for the Middle section so that the design software doesn't separate the snowflakes from the design when cutting, but instead cuts each section of the design together.
- Cut your Merry and Bright Holiday Porch Sign File according to your machine's directions for vinyl material.
- Weed your vinyl and place transfer tape over the designs.
- Transfer your design onto your board pressing all the edges down as you go. Work from the top down: the design is based off of starting at the top and lining to the left side of the board.
- Paint over the front of the board with navy blue paint, covering as much of the white as you can and dry brushing the edges with navy blue paint.
- Remove the vinyl from the board. It is easier to remove when the paint is dry. Wait at least three days before attempting to remove the vinyl from the board. If you have weeding tools use those. I have a metal dental tooth pick and it worked great. You can also use a large needle.
- If needed, lightly sand the board to add distressing. Touch up paint if necessary, but the distressing is part of the charm.
- Add the Christmas Lights to your Merry and Bright Porch Sign
- Using a 13/64" drill bit, drill holes in your sign. I placed mine in the tree branches and centers of the snowflakes.
- Flip your board over and drill 1/4" down into the center of each hole with the 15/32" drill bit. Marking the drill bit with a piece of tape 1/4" in from the end can help you not drill too deeply.
- Take your Christmas tree light string and press the lights through each of the holes, working top to bottom. Make sure the plug will be at the bottom of your sign.
- Secure the end of your light string to your board with duct tape. you can also place tape on either side of each light if you like.
- Optional: You can seal the board with polyurethane. This will also protect it from the elements and make it last longer.