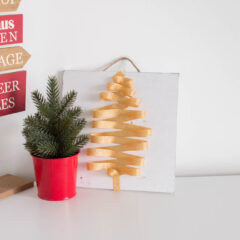
Christmas Door Hanger
This DIY Christmas Door Hanger only takes a few minutes to whip-up and requires very little supplies - even a beginner crafter can put this together, with no issues!
Servings 1 door hanger
Equipment
- Craft Scissors
Ingredients
- 10 x10in blank wooden door hanger
- Crafter's tape
- 1/2 inch-wide gold ribbon
Instructions
- Begin by adding crafter's tape down the center of the door hanger. You will want it to be about 1 1/2 inches in size.
- Start at the top of the wooden door hanger (ie.: the tip of the tree), and work your way down by criss crossing the ribbon, making sure to press in the center so that it adheres to the strip of crafter's tape. As you work your way down, be sure to loop at each end.
- As you get to the bottom of the tree, be sure to make each layer wider and wider.
- Once you are one inch away from the bottom of the door hanger, pull your ribbon down straight and press into the center, right on the crafter's tape, to make the "trunk" of the tree.