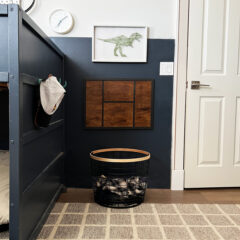
DIY Basketball Hoop Laundry Hamper
Want a fun way to get your kids to place their clothing in their hamper? This Basketball Hoop Laundry Hamper is sure to be a hit!
Cost 20
Equipment
- 1 Drill
- 1 Miter box or miter saw
- 1 Table saw (optional see tips)
- 1 Nail gun (optional see tips)
Ingredients
- 1 sheet 1/2" plywood cut to 22" x 16" a 2' x 4' project panel is easy to find.
- 1 8' 3/4" pine square stock
- 1 8 ounce Black paint
- 1 can Stain small can
- 1 tube Caulk paintable
- 1 roll Painter's tape
- Wood glue
- 1 inch Brad nails (optional see tips)
- 1 quart Polyurethane Satin finish
- 1 Picture hanging supplies such as PicGenie 123 or OOK D-ring hangers
Instructions
Cut your wood
- Cut your project panel to 22" x 16"
- Cut 3/4" square stock to 2 - 22" (short side) and 2 - 16" (short side) with 45 degree cuts on either end.
Paint your wood
- Use painters tape to create your design or square on your project panel. Seal the seam with caulk. Paint the design with black paint.
- Paint the 3/4" square stock with the black paint.
Stain your project panel
- Once your paint has dried, remove the painter's tape. Stain your project panel.
Assemble your backboard
- Place a bead of wood glue along the outer edge of the plywood project board. Add glue on the ends of your 3/4" - completely covering the ends. Wrap your 3/4" wood stock around the edge of the plywood board. Use tape to hold the corners together.
- Make sure you are assembling this on a flat surface. The 3/4" stock should sit above the project panel by 1/4" making a nice reveal around the frame.
- If you have a nail gun you can nail the corners together. You can also place two or three nails through the 3/4" stock into the 1/2" plywood. This will hold the wood together until the glue cures. Other wise you can use books, clamps or other heavy objects to hold the wood together until the wood glue cures.
Seal with polyurethane
- Fill your nail holes with filler if desired, sand, touch up and let it dry.
- Seal your stain and protect your paint with two coats of polyurethane.
Hang on the wall
- Hang the backboard over your basket on the wall using your favorite picture frame hanging tools. I like the Pic Genie 123 but the OOK D-ring hangers work really well too.