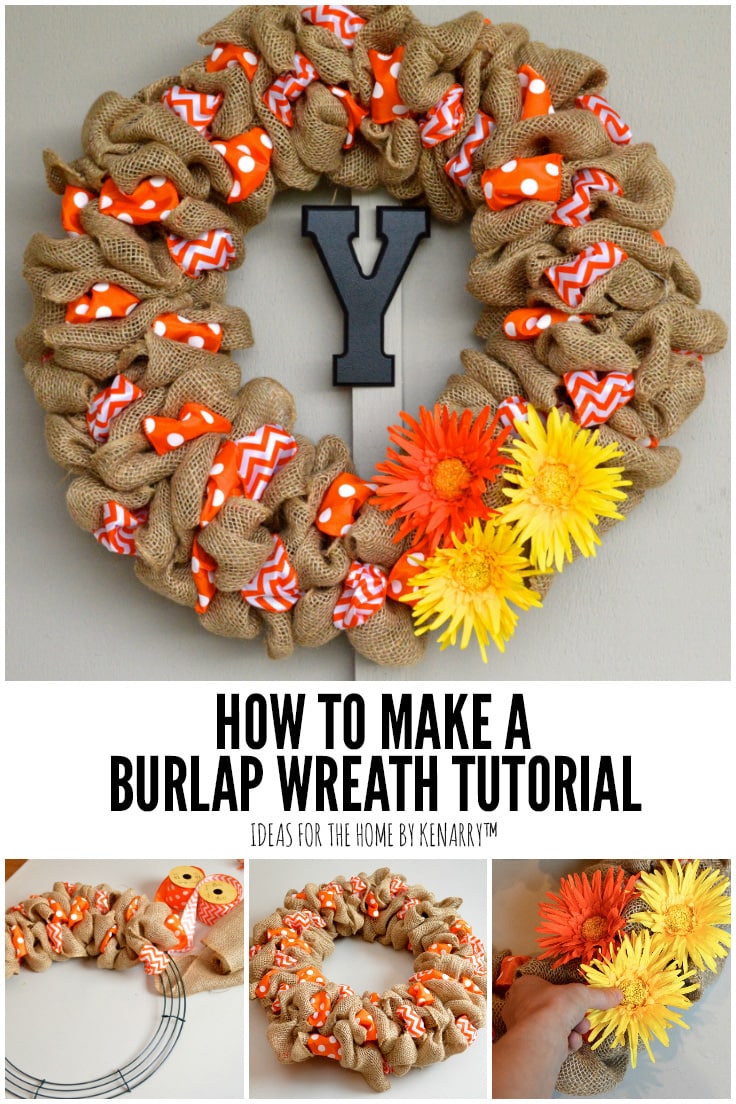
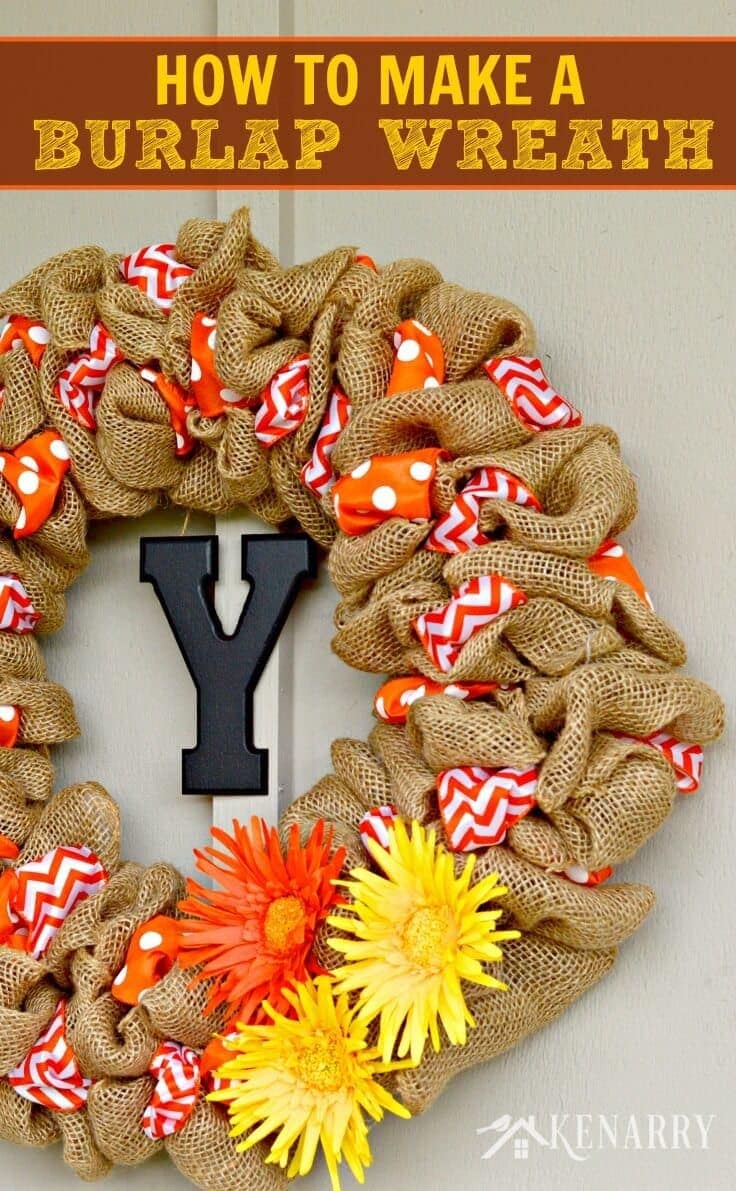
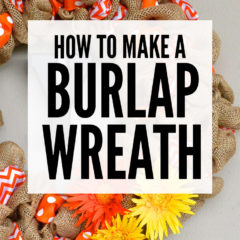
How to Make A Burlap Wreath With Accent Ribbon
THIS POST MAY CONTAIN AFFILIATE LINKS. PLEASE SEE OUR FULL DISCLOSURE POLICY FOR DETAILS.
Learn how to make a burlap wreath by weaving ribbons with rustic burlap in this easy step-by-step tutorial. You’ll have a pretty wreath in just a few hours!
If you’ve been wondering how to make a burlap wreath, you’ve come to the right place. Today, I’ll show you step-by-step how to make this easy craft, plus I’ve even included a video tutorial.
Want more ideas like this? Subscribe today to get our weekly Ideas in Your Inbox newsletter plus other exclusive gifts and offers — all for FREE!
Burlap – Trendiest Fabric For Home Decor
If you’re following home decor trends, you know burlap has been the “IT” fabric for the past few years. It has even shown up in wedding decorations; that’s how popular it has become. Everywhere I look on Pinterest, blogs and other internet sites, I keep seeing these amazing wreaths made of burlap. I also happen to have a nail in the outside wall just to the left of my front door that is begging for some summer decor. A bright, cheerful DIY burlap wreath would be perfect there to greet visitors who arrive at our home.
Burlap Wreath – Perfect Project for Parties
The DIY Burlap Wreath is a quick project that is easy to make. It would be a great project to create with friends or for a girls’ night with a glass of wine. I actually talked my sister, who was visiting, into making one of her own too. We made our wreaths side by side one afternoon while watching a chick flick during the boys’ rest time — it’s THAT easy and fast to make a DIY Burlap Wreath. The only part of the project that took any length of time was waiting for the paint to dry on the wooden letter “Y” I wanted to hang in the center of my wreath.
Get our e-book The Ultimate Guide to Making a Burlap Wreath when you sign up below. It’s totally FREE!
Your privacy is important to us. We promise not to spam you or share your information. You can opt-out at any time. See our privacy policy for more information.
Once you’ve confirmed your e-mail address, we’ll send you the free digital eBook in addition to the coupon code. Plus you’ll have the opportunity to get our weekly Ideas In Your Inbox newsletter as well as access to our resource library stocked with free printables, product discounts and other content that is EXCLUSIVE for Idea Insiders only.
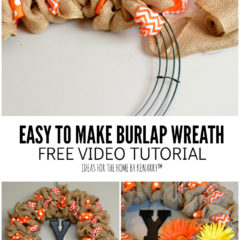
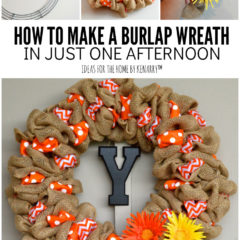
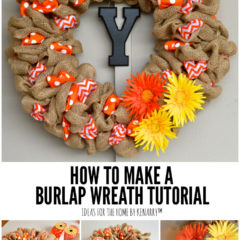
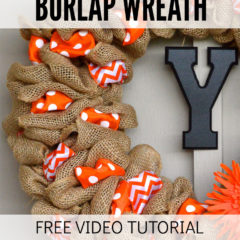
How to Make a Burlap Wreath
Follow this super easy tutorial and you’ll have your own personalized wreath to hang on your door.
What you need:
- 16″ wire wreath (You could also use an 18-inch wire wreath, but I would add at least a few more yards of burlap if you want your wreath to have a fuller appearance like mine.)
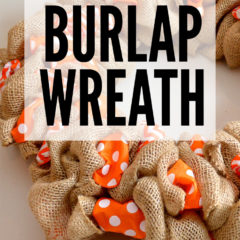
- 1 – 18-foot spool of 2″ wide orange polka dot wired accent ribbon (6 yards) or similar
- 1 – 18-foot spool of 2″ wide orange chevron wired accent ribbon (6 yards) or similar
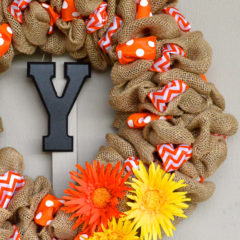
- 3 artificial accent flowers
- Twine
- Wooden initial letter
- Black spray paint
- Clear sealer spray paint
- High-temperature glue gun
- Glue sticks
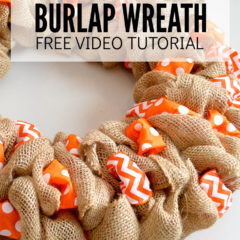
Video Tutorial:
Watch our video tutorial to learn how to make a burlap wreath with two different accent ribbons:
Step-by-step Instructions:
Here are the step-by-step instructions, with pictures. Don’t forget to pin this post to your craft board or share it on Facebook so you can find this tutorial again.
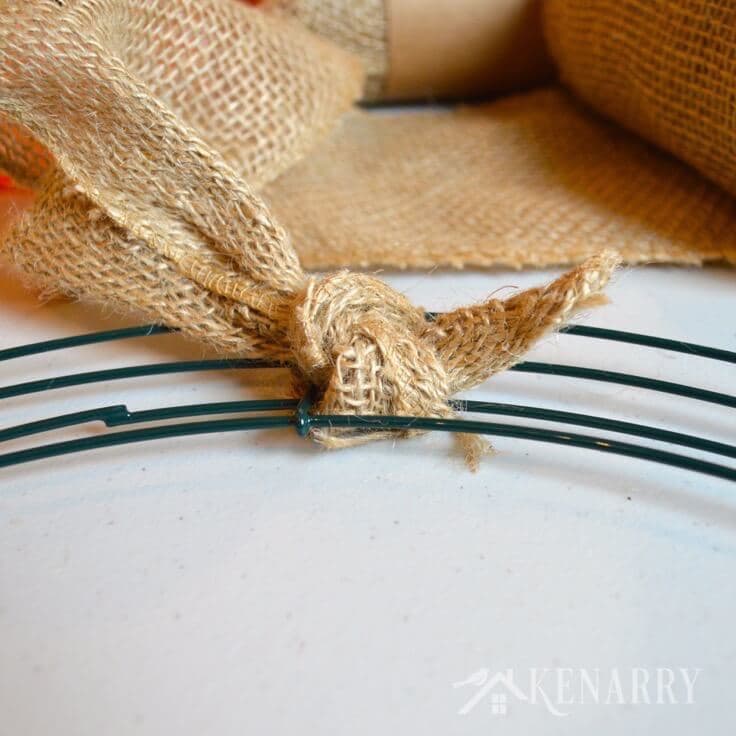
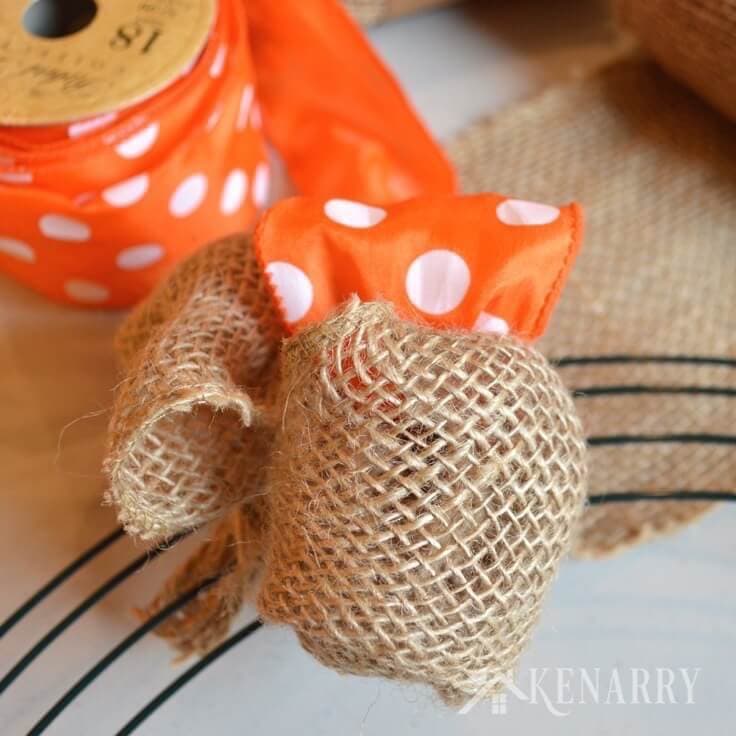
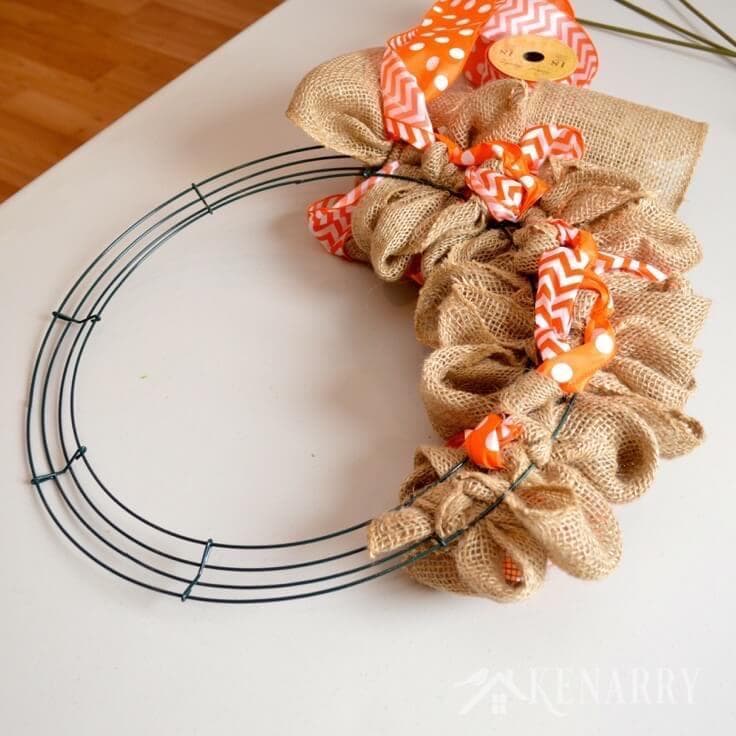
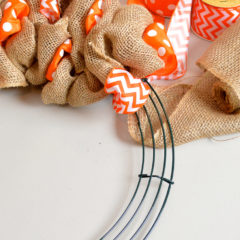
1. Start the wreath with a knot
Turn the wire wreath frame upside down. Wrap a small amount of burlap ribbon around one of the center wires in the wire frame and tie a knot as tight as you can leaving only a small tail remaining.
2. Begin weaving the burlap ribbon through the wire frame
Flip the wire frame around so the top faces you now and the knot you just made is in the back. Gather a small amount of burlap ribbon, like 6-7 inches, into a loop and push it up between two of the wires in the frame.
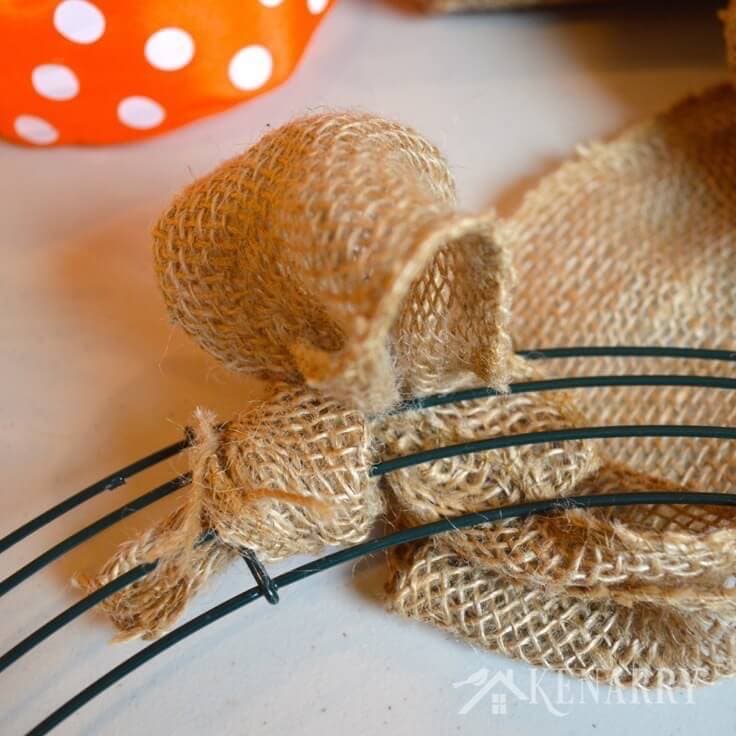
Next, take another 6-7 inches of burlap ribbon, create a loop and twist it once to change the direction. You’ll then push the loop between two of the other wires in the wreath frame so it’s not right next to the first one you pushed through. If you want a full wreath like mine, press your burlap loops together as closely as possible.
3. Add the first accent ribbon
As you did in step one with the burlap ribbon, tie the end of one of your accent ribbons to the wire frame so the knot is on the back side of the DIY Burlap Wreath. Now create a loop using 6-7″ of accent ribbon and push it up between two of the wires in the wreath frame that you haven’t used yet. Press the accent ribbon as closely as you can to your burlap loops.
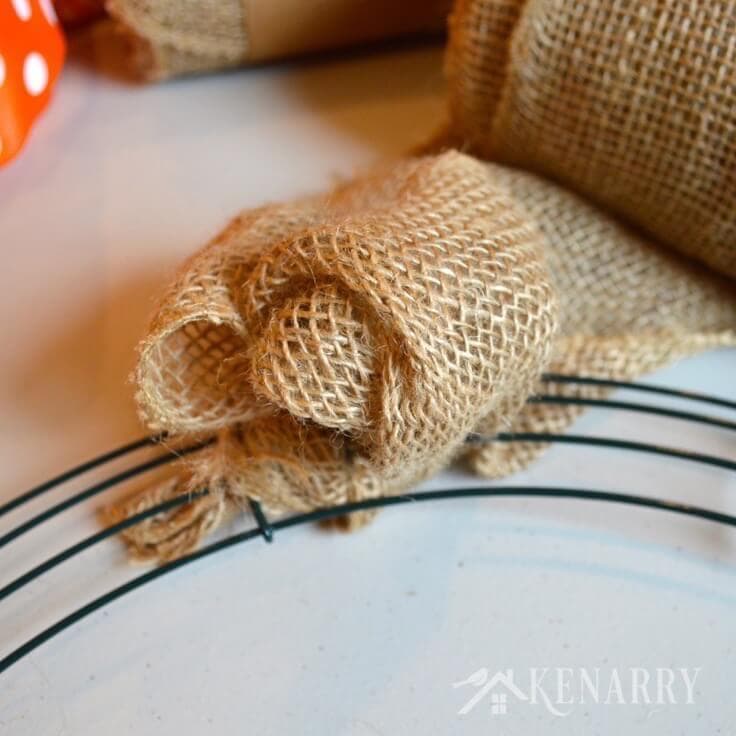
4. Start weaving loops and add your 2nd accent ribbon
Create your third loop of burlap ribbon, twist it to change directions and push it up from the back side through two wires in the frame you haven’t used in a while. Repeat this process for your fourth loop of burlap ribbon, remembering to twist the loop to change directions and choosing to push it through two different wires than you just used for the previous loop. As in step three, tie your second accent ribbon to the wire frame so the knot is on the back side of the wreath. Create a loop of accent ribbon and press it up through two different wires than you just used for the burlap loops.
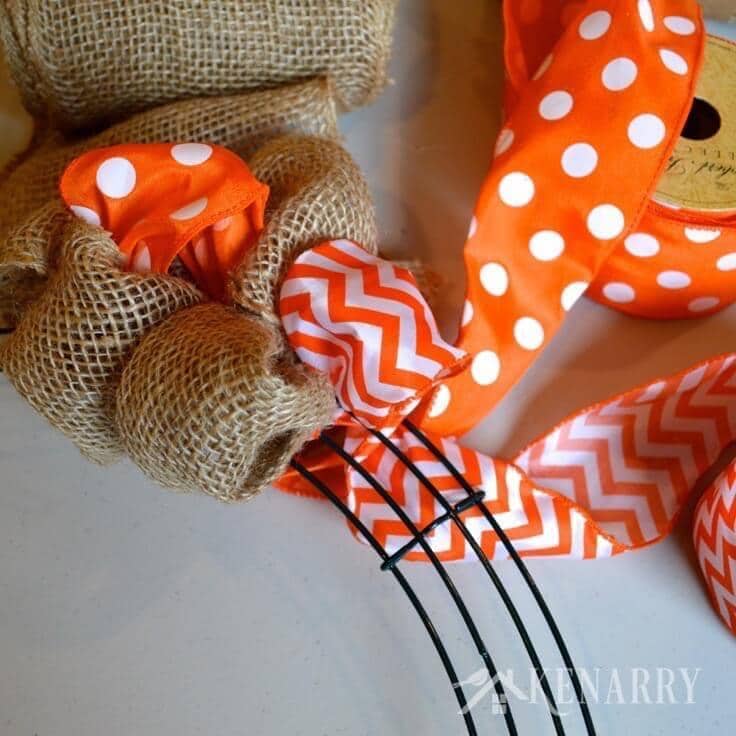
Add a fifth and sixth loop of burlap ribbon to your DIY Burlap Wreath using the same process as before. Each time you’ll twist the loop prior to pushing it up through the wire frame so your loops are constantly changing direction. You’ll also keep changing which wires you’re pushing the loop through so that no two loops are immediately next to each other. After the fifth and sixth loop of burlap ribbon, insert a loop of your first accent ribbon. In my case, it’s the orange polka dot ribbon. You’ll see in the photo I made sure to push it through two wires that were opposite of where my first polka dot ribbon loop was.
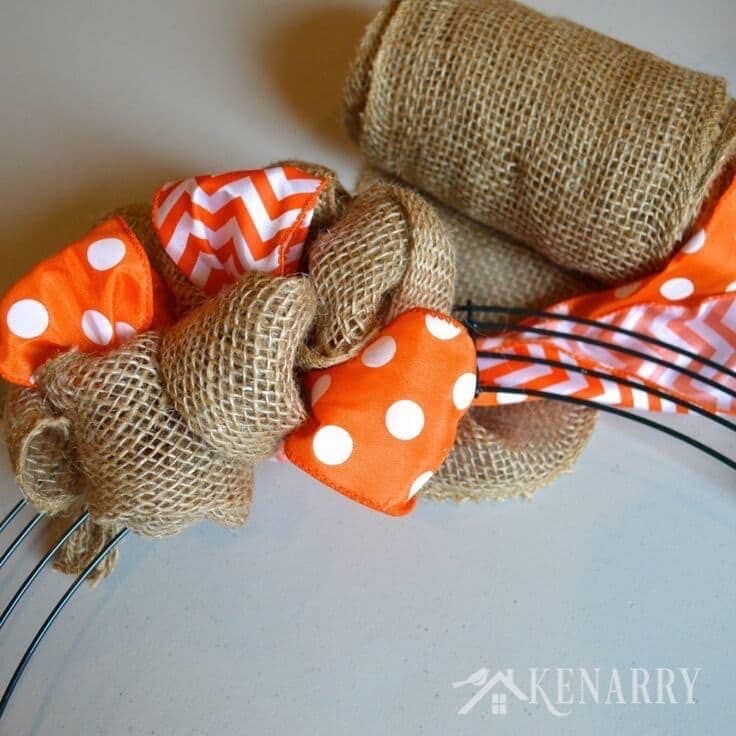
5. Continue weaving loops of ribbon through the wire frame
Continue the process of weaving loops through the wire wreath frame. Following the pattern of two burlap loops, then one loop of the 2nd accent ribbon, two more burlap loops and then one loop of the first accent ribbon.
Repeat this process over and over again as you make your way around the wire wreath frame. Continue to twist the ribbon each time before you push it up between the wires so the loops change direction.
To maintain the fullness of the DIY Burlap Wreath, press the loops together after every 3-5 loops. I used 15 feet of burlap ribbon per quarter of the 16″ wire frame to get the fullness you see in the pictures.
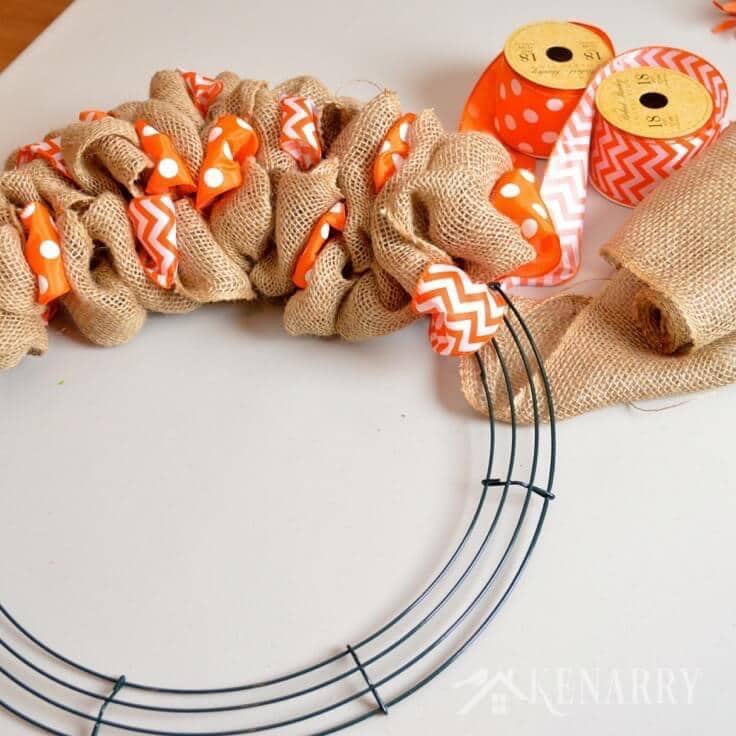
What do you do if a spool of burlap runs out?
When one of your spools runs out of burlap ribbon, tie the end of the next spool to the previous one and hide the knot to the back of the wreath. After a while, the back of the wreath doesn’t look very pretty, but it doesn’t matter since no one sees that side anyway!
6. Tie the last knot and fluff your DIY Burlap Wreath
Once you’ve worked your way all the way around the entire wire wreath frame, tie the last end of the burlap ribbon and the two accent ribbons to the wire frame so the knots again are to the back of the wreath. Now fluff and rearrange your loops until it appears as full and colorful as you’d like.
Remember the ribbon loops are only woven in and out of the wire frame, so be extra careful not to pull any of the loops out of the frame as you fluff.

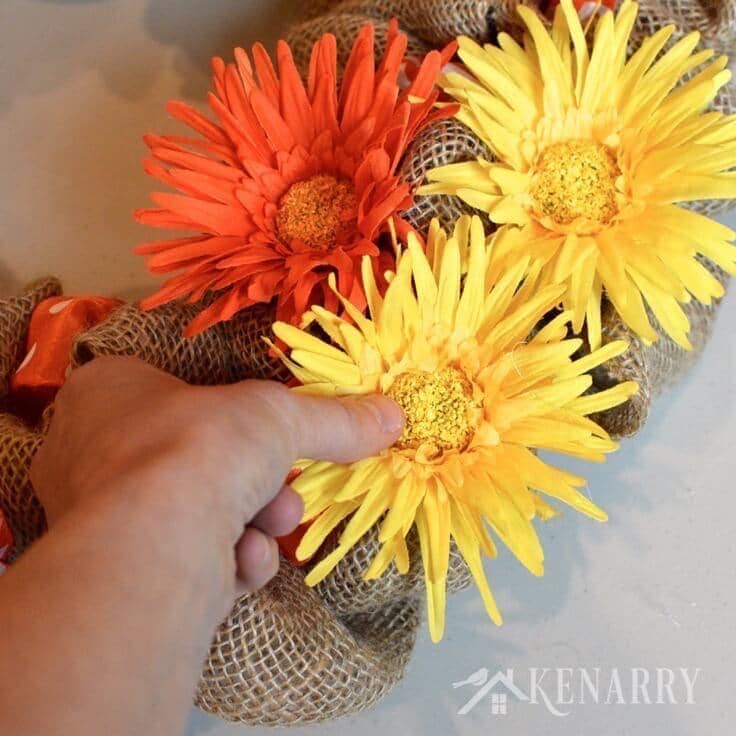
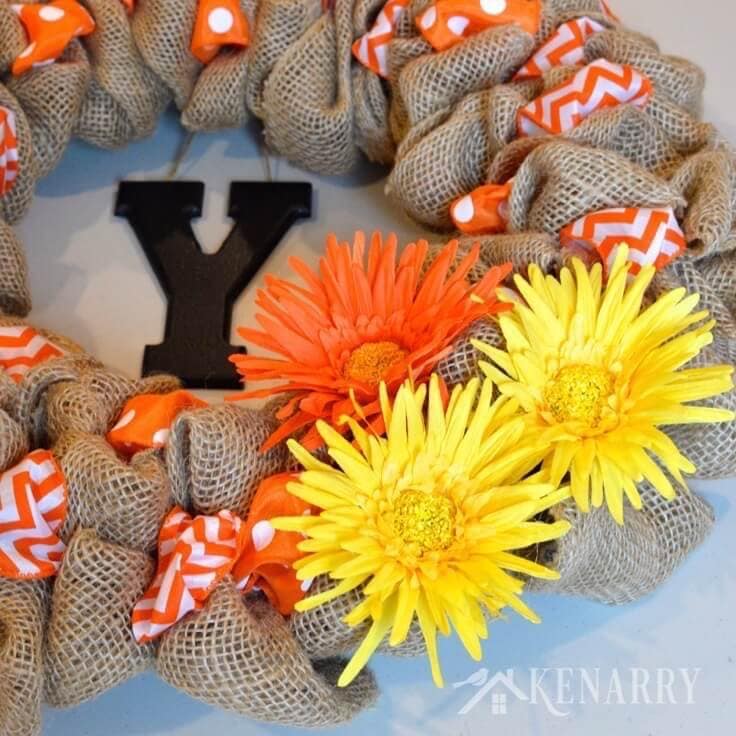
7. Embellish your DIY Burlap Wreath
Use hot glue to add flowers or other accents to your wreath to give it more character. For flowers, use wire cutters to remove the stems from artificial flowers. Now put a large dollop of hot glue on the back of the flower.
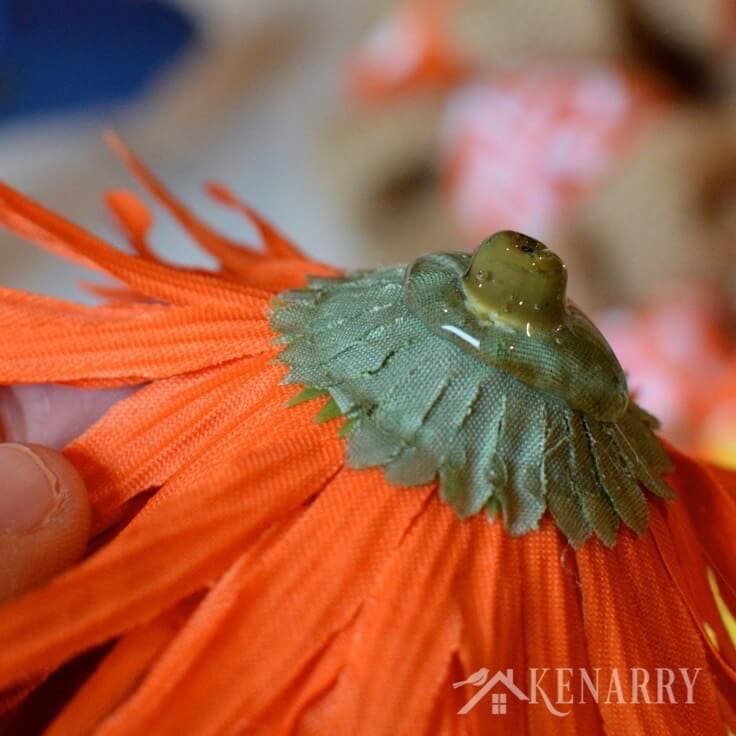
Carefully place the flower where you want it on the wreath. Use your fingers to pinch the burlap ribbon around the back of the flower so it adheres to the glue. Repeat with any additional flowers and then allow the glue to dry.
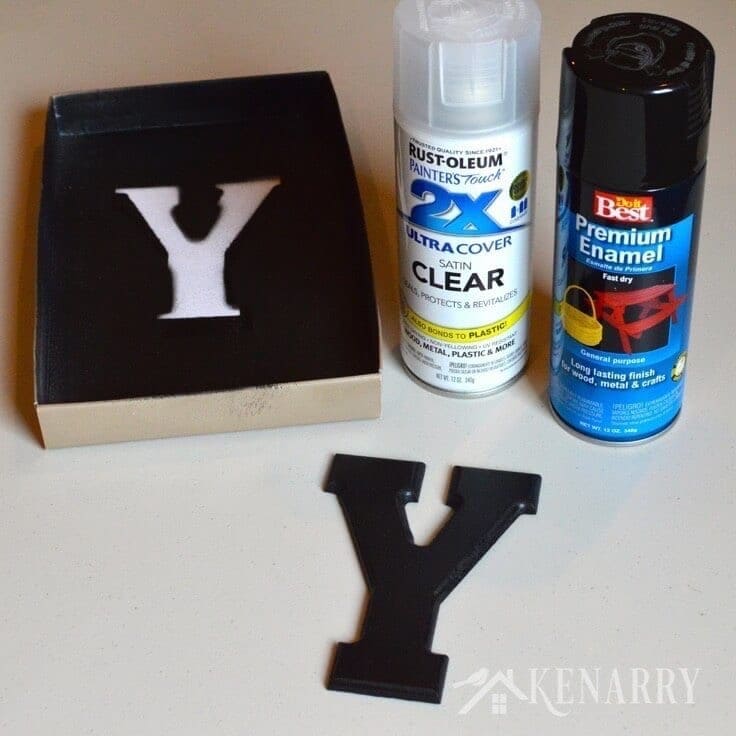
8. Paint and prepare your wooden initial for outdoor use
In a well-ventilated area, spray the front and back side of a wooden letter with two coats of black premium enamel spray paint. I sprayed ours outside on the lid of a shoe box, so I could easily move it into our garage to dry between coats. If you’re going to hang your DIY Burlap Wreath outside like I did, you’ll want to also spray the front and back side of the letter with a clear protective sealer to prevent water damage.
9. Glue twine to the wooden letter
Cut two 10 inch long pieces of twine. Tie a knot in one end of each piece. Hot glue the knot to the back of the letter.
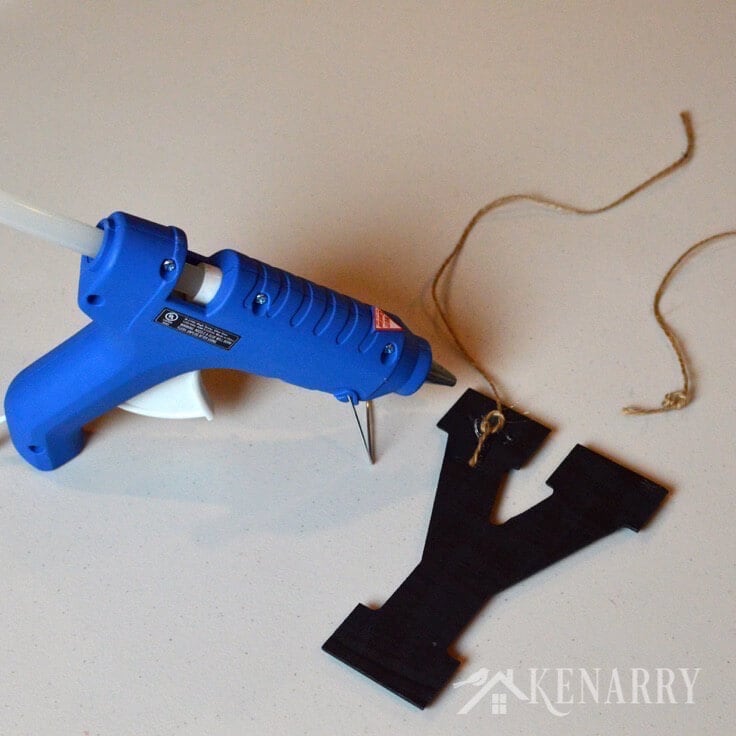
Glue the knot of the second piece of twine to the back of the letter and allow time for the glue to thoroughly dry.
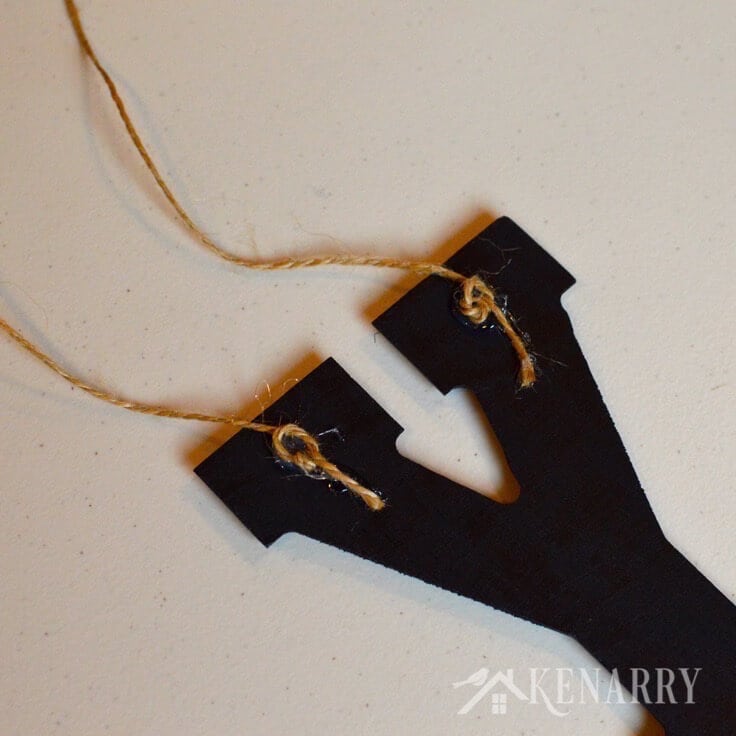
10. Tie the wooden letter to the DIY Burlap Wreath
Center the wooden letter in your wreath. From the back side of the wreath, tie the two pieces of twine around one of the wires in the frame. Knot the twine to hold the letter securely in place.
11. Hang the wreath and enjoy!
You can use a wreath hanger to display the DIY Burlap Wreath on your front door. Or do like I did and hang it directly on a long nail next to the door.

I love how the DIY Burlap Wreath turned out. It makes me smile every time I pull in our driveway. I was apprehensive at first about hanging it outside. I was worried rain and high winds might ruin it or that the sun would fade the flowers or ribbons. Our front door faces east and is protected from the elements by a roof so it’s done great so far. I’ll let you know if that changes, though, as the summer goes on.
Love the ideas you see here on Ideas for the Home by Kenarry®? Subscribe today to get our FREE DIY & Craft Planning Calendar, plus our weekly Ideas in Your Inbox newsletter filled with creative tips and exclusive offers!
What’s next?
Want more craft ideas like this? Subscribe to get Ideas in Your Inbox and receive a free thank you gift. We also have a few other burlap wreaths that might spark your creative juices, so while you’re here be sure to check out:
If you like this tutorial for how to make a burlap wreath, please share it with your friends or pin it for later:
Do you have a wreath or welcome sign hanging outside your front door to greet guests? Do you change it seasonally or to coincide with holidays? Please comment below to share. We’re always looking for new ideas for the home!


Thanks for the great compliment, Angela! So glad you stopped by.
Hi Carrie,
Am I understanding correctly that you are just pulling the ribbon and burlap through in a loop and not making any knots (except the first one) or using any wire to make it stay? I wish you could come to Riverside, CA and have a demonstration night with my sisters and me!!
Hi Robyn, it would be so fun to crash your craft night with your sisters to teach you how to make burlap wreaths in person. It is one of my all-time favorite crafts to make. You’re going to love it. Unfortunately Michigan is no where near California so you’ll have to have the next best thing — my video tutoria!. After you pour your glasses of wine and set up your craft stations, you could watch it a time or two on your iPad or a TV and maybe it will feel like I’m there? LOL!
Your understanding is spot on correct though. You’ll see in the video, I only tie the burlap ribbon and accent ribbons to the wreath frame at the beginning and the end of each roll. There are no other knots or wire to make it stay in place. When you give it a try, you’ll find that the burlap is really a pretty stiff material. It wedges through the bars in the wire wreath frame fairly tightly. It really won’t move once you push the loops through unless you intentionally tug on it or something.
Best wishes and happy crafting!
Carrie
Can you show me how to make the wreath pictured in the blog? The wreath in your video was not the one you made? I love the blue one. Can you make a turorial? I can’t figure it out?
Hi Anne, thank you for reaching out to us. I’m sorry to hear you’re having trouble getting started with your burlap wreath. Here’s the link to the written tutorial for the blue one like you see in the video — https://kenarry.com/teacher-appreciation-burlap-wreath/ We’ve actually made several burlap wreaths with accent ribbons. The technique is the same as you see in the video; just with different ribbons each time.
Best wishes,
Carrie
Hello! I love this tutorial and idea! I’m trying to make a wreath for my sister’s new house. The accent ribbon pattern I would like to use only comes in non-wired. Do you think that would be ok?? Thank you in advance
Meghan
Hi Meghan,
Yes, non-wired ribbon will work. The burlap is stiff enough to hold it up/in place, but you won’t be able to spread the ribbon to fluff it up wider if that makes sense. Let me know how it turns out. I would love to see photos of how it turns out for you.
Happy crafting!
Best wishes,
Carrie
Ideas for the Home by Kenarry
What a fabulous technique! I think I could manage that! What a great project, Carrie.
Thanks, Tasha. It really is SO easy to do – you could totally do it!
I must say using the rack is a clever idea! Thanks for sharing.
I absolutely love this wreath! I am going go get the materials and make one right away. Thank you so much for the inspiration!
Yay! I’m so glad we could inspire you to start a project, Vickie! Let me know how it works out for you.
Very cute wreath – I love making them with those wire wreath frames. I have not tried mixing in the ribbon like that before – pinning this so I remember to give it a try.
Thanks for pinning, Kimberlee! Hope the method works well for you. I’d love to see what you create.
This is beautiful!
Come link up with me today!!
http://thediaryofarealhousewife.blogspot.com
Thanks for the invitation, Jennie!
SO pretty!! I love the look of the chevron and the polka dots! A perfect fall wreath. 🙂
Thanks, Amanda! I actually made this as my summer wreath because the bright orange was so cheery, but I haven’t had the heart to take it down yet. The orange ribbons with the black initial in the center DO make it great for Halloween too. 🙂
Thanks, Stephanie! What a great idea to pin flowers onto the wreath rather than hot glueing them on so you can change it out for different seasons/holidays! You’ll be amazed at all the burlap ribbon options available these days at Hobby Lobby and other craft stores. Have fun!
Love your tutorial for this wreath. I have looked at several other tutorials on how to make these wreaths and did not fully understand, buy now I do!! Thank you so much and for the links on where to buy the materials, I love it when you bloggers do that for us!
Oh Sherri! You made my day. I’m so glad you found the tutorial helpful. Amazon is the least expensive place we’ve found to buy the burlap. I’d highly recommend it. Also, do you have a Costco membership? You can buy large rolls of wired ribbon there for the accent ribbons. I just picked up some great holiday ones a few days ago to make a new burlap wreath for Christmas!
Just found your tutorial….after I had made my first burlap wreath, which turned out really pretty. BUT I had an accent chevron ribbon I wanted to put in it and could not figure out how to get it in! Did not realize you needed to do it all at the same time…bummer! Not going to re-do. Lesson learned! Now I’m trying to figure out how to use this accent ribbon on it…..Thank you for showing me how (for the next one..).
Hi Paula, I’m so glad you found our tutorial. Now if only you’d found it sooner, right? Did you use the same method I used for weaving your burlap in and out of the frame? If so I wonder if you could still go back and poke the chevron ribbon back through in places, working your way around the frame? It might be a little more challenging than doing it at the same time as the burlap, but if your burlap is loose enough I wonder if you could still pop it back through? Let me know if you try and whether it works for you. Otherwise, you could use the chevron ribbon to make a big cool bow for it? Have a great weekend! Carrie
I am absolutely thrilled to have found this. I am going to make one in my daughter’s school colors (which happen to be orange and black!). Cannot wait to get it done. Hopefully I can do it! Thanks so much.
I’m thrilled you found us too. What a fun idea to make the wreath in your daughter’s school colors. That sounds fantastic, Carla! I’d love to hear how it turns out for you and see pics. If you share on FB or something, be sure to tag me so I can see it!
Thanks Carrie! I will.
I would love that! Happy Valentine’s Day, Carla!
Thank you!! Best tutorial I have read to make a wreath with a wire frame. Easy to understand Can’t wait to try mine!
Oh yay! We’re so glad to hear you found our tutorial to be helpful. We’d love to see how your wreath turns out. Feel free to tag us @kenarryideas on Instagram or Facebook if you share a photo of it!
I have taken a lot of interest into wanting to make wreaths myself, I have never done it before, but I’d like to turn this into a new hobby. A hobby that could make me extra money to help with tuition costs. I absolutely LOVE the way you can explained everything thoroughly, it makes complete sense of makes it look so easy. Thank you very much for sharing!
Taylor, glad we could help inspire your new business venture. Good luck with wreath making and your college classes. Best wishes, Carrie
When making your wreath did you use wired burlap? I can’t really tell from the video if it’s wired or not. Thanks!! Looks super cute and can’t wait to get started!
Hi Kim, great question. The burlap I use to make burlap wreaths like this is NOT wired. It just has a sewn finished edge to reduce or minimize the fabric ribbon from fraying. This is the kind here. That being said though I think you probably could use wired burlap. It would just look a little different. The edges would be more defined/rigid, not as soft and loopy or bubbly as this style of burlap wreath. I’d love to see how yours turns out. Post a pic on Facebook or Instagram and tag me @kenarryideas so I can see!
Best wishes,
Carrie
Hey there, I can’t seem to find the video tutorial on how to make the wreath. Please help:)
Kelly, thank you for reaching out to let us know the video tutorial was down on this post. It should be all fixed now. You can view it at https://kenarry.com/diy-summer-burlap-wreath/
We’re so glad you told us! We wouldn’t have known there was a technical problem otherwise so THANK YOU! THANK YOU!
Best wishes,
Carrie at Ideas for the Home by Kenarry®
I watched your video and I understand the burlap vs accent pattern. I know there are 4 slots to pull the ribbon through. Is there a pattern for which slots to pull which (burlap or accent) through?
Great question, Kennah! There’s no particular pattern. I just typically alternate two loops of burlap, then one loop of accent ribbon, then two loops of burlap, then a loop of the other accent ribbon and I randomly alternate between which two wires I poke through in the frame. The burlap tends to be so filling within the wreath that a set pattern isn’t necessary. Let me know if that makes sense! Enjoy making your wreath!
Best wishes,
Carrie
Hello. I live in Ontario, Canada. If you can teach me how to make this wreath I will be exceedingly grateful . I wish to have it ready for our Ladies Night Out on Nov.2. I will let you know how I make out with your instructions. After the night is over I want to give it to our daughter for Christmas. Wish me luck, thanks
Hi Barb,
You should have no problem getting your burlap wreath ready by November 2. They’re quick and easy to make if you’ve got your flowers or other embellishments ready to go. I think a Christmas version would be perfect. I hope your daughter loves it! Give me a shout if you have any questions as you’re putting it together.
Best wishes,
Carrie from Ideas for the Home by Kenarry®
Hello dear friends! I am live in Sweden, I cant get this steal ring in SwedenAny one give a tips? thanks a lot!
regards /Geetha
Hi Geetha,
It looks like Amazon offers these wire wreath frames with International shipping. I’m not sure exactly how that works, but if you give it a try let me know! For a DIY way, you may be able to bend wire or wire hangers into circles to create a similar frame to use as your base. Here’s an example of a yarn wreath I made with a wire hanger – Winter Yarn Wreath.
Happy crafting!
Best wishes,
Carrie
Hi! Wanted to say what a beautiful wreath & tutorial! Idk if I seen it correctly but are you staying in the same row on the wreath with all the ribbons & burlap?
Hi Mary,
Great question! No, I’m not staying in the same row. When I make the burlap wreaths, I alternate between each row in the wire wreath frame. Each time I also give the burlap a small twist so that the loops change direction randomly. Hope that helps! Let me know if you have any other questions. I’m here to help!
Best wishes,
Carrie from Ideas for the Home by Kenarry®
I love the look of this wreath! I’ve had it pinned for quite awhile and have been looking for just the right color combination to make it. I finally found some ribbon that i really like. I’m curious how easy it would be to modify this and use 3 ribbon plus the burlap. Do you think that would work?
Hi Becky,
Great question! I don’t see any reason why you couldn’t do it with 3 ribbons! I bet it will be gorgeous. Send me a photo when you’re done. I would love to see how it turns out!
Happy crafting!
Best wishes,
Carrie
Hello!
I came across this and think it’s a great idea! I have 21 inch deco mesh, do you think that is too big for this method?
Thanks!
Hi Rebecca,
I’ve never tried it with 21 inch deco mesh. There may be a way to make a wreath with that, but you would need to use a different method. To get this effect, you’d want your deco mesh or burlap ribbon to be only 4-6 inches wide.
Best wishes,
Carrie
Ideas for the Home by Kenarry
Hi,
Absolutely gorgeous burlap wreath! My question is “do you have a tutorial without the accent ribbon”? I do love the accent ribbon but for my first try I want to only do the burlap.
Thank you for your tutorial to make a wreath and also all your ideals for many clever projects.
You’re welcome, Linda!