• About Us
    • Contact Us
    • Work With Us
    • The Creative Team
    • Disclosures
  • Subscribe
  • Shop Our Products
  • My Account
  • Cart
  • Nav Social Menu

    • Facebook
    • Instagram
    • Pinterest
    • Twitter
  • DIY & Decor ▾
    • Crafts
    • Home Decor
    • Home Improvement
    • Technology
  • Recipes ▾
    • Breakfast
    • Appetizers
    • Side Dishes
    • Easy Dinner Ideas
    • Slow Cooker
    • Fun Food
    • Desserts
  • Clean/Organize
  • Kid Ideas ▾
    • Birthdays
    • Castle Playroom
    • Outer Space Bedroom
    • Teacher Appreciation
    • Travel Tips
  • Free Printables
  • Holidays ▾
    • New Year’s
    • Valentine’s Day
    • St. Patrick’s Day
    • Easter
    • Cinco de Mayo
    • Mother’s Day
    • Memorial Day
    • Father’s Day
    • Independence Day
    • Halloween
    • Thanksgiving
    • Christmas
    • Gift Ideas

Ideas for the Home

You are here: Home / Craft Ideas / How To Make An Easy Jewelry Box With A Cute Label

By Jennifer and Kitty O'Neil on November 7, 2018 Leave a Comment

How To Make An Easy Jewelry Box With A Cute Label

Craft Ideas· Gift Ideas

  • Share
  • Tweet

Make an Easy Jewelry Box with a cute label. We’ll show you how to decoupage a box with scrapbook paper and a cute downloadable “Blingy Things” label.

Hi Kenarry Readers! We’re Jennifer and Kitty (the O’Neil Sisters from RunningWithSisters.com), and we have a pretty decoupage project to share with you: How To Make An Easy Jewelry Box!

Make an Easy Jewelry Box with a cute label. We'll show you how to make a DIY decoupage wooden jewelry box with scrapbook paper and a cute downloadable

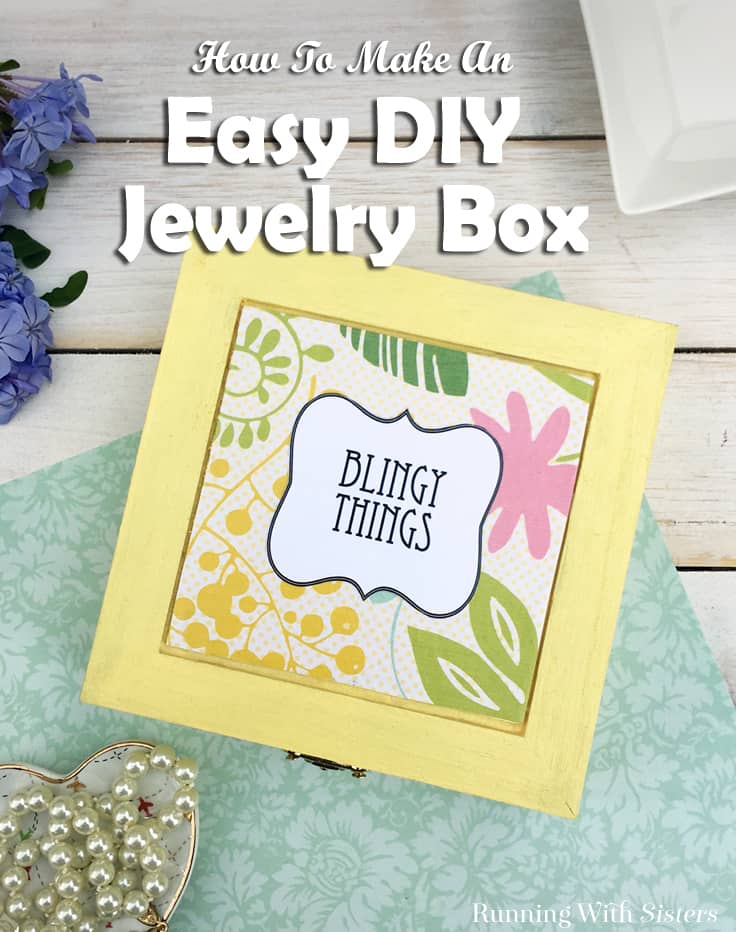
We’ve always been big fans of decoupage––it’s just so magical to transform something plain like a wooden box into something as pretty as this Easy Jewelry Box. In this project, colorful scrapbook paper and a little paint go a long way! We made a step-by-step video that shows you exactly how we did it, including how to add the cute “Blingy Things” label. (You can download the label below!) Follow along with us in the video, then refer to the instructions below while you make your Easy Jewelry Box.

How To Make An Easy Jewelry Box

Materials To Make The Easy Jewelry Box: 

Disclosure: This blog post contains affiliate links for products or services we think you’ll like. This means if you make a purchase from one of these links, Ideas for the Home by Kenarry® will make a small commission at no additional cost to you so we can keep the great ideas for the home coming your way. All opinions expressed are derived from personal experience.

  • Unfinished wooden box with hinged lid  (ours was 5½”x5½”)
  • Scrapbook paper (We used a page from DCWV Fresh Floral Stack)
  • White paper
  • Craft paint, yellow
  • Mod Podge Gloss
  • Laser printout of “Blingy Things” jewelry box label
  • Brayer roller
  • Craft paintbrush
  • Scissors
  • Ruler
  • Pencil

Steps To Make The Easy Jewelry Box

Make an Easy Jewelry Box with a cute label. We'll show you how to decoupage the box with scrapbook paper and a cute downloadable
Right-click to download the label. Print on a laser printer.

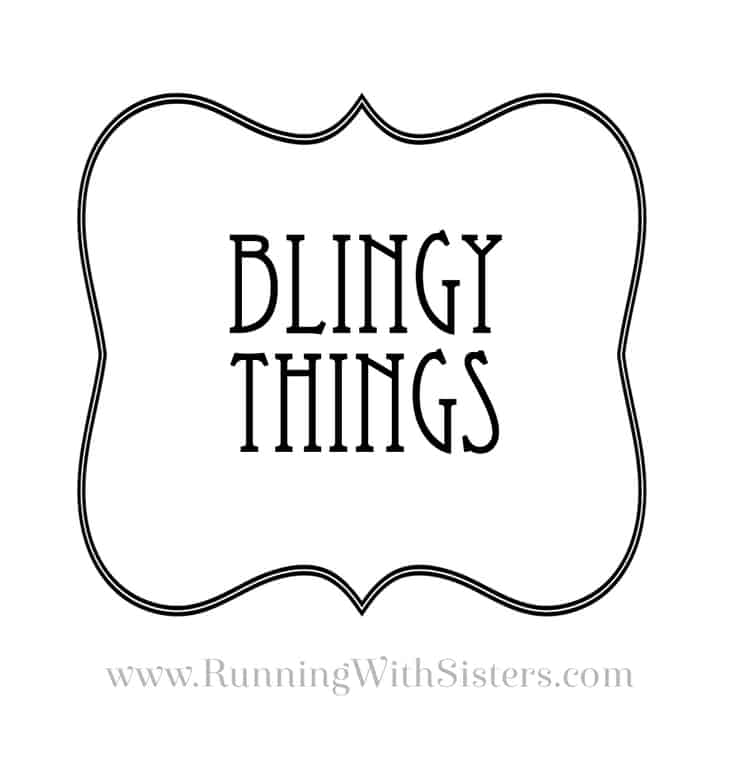
Before you get started, download the Blingy Things label.  Then have it printed on a laser printer. This is important because Mod Podge is water based and will smear inkjet prints. We had our label printed at FedEx Kinkos on 60lb cover stock.

1. Paint The Box

Paint the inside and outside of the plain wooden box with the yellow craft paint. Let it dry, then apply a second coat. (Be sure to prop the lid open so the paint doesn’t seal it shut!)

Make an Easy Jewelry Box with a cute label. We'll show you how to decoupage the box with scrapbook paper and a cute downloadable

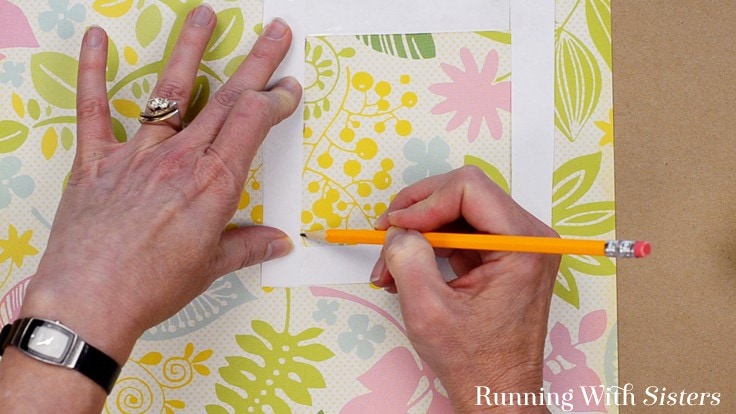
2. Cut Out The Scrapbook Paper

To find a section of scrapbook paper you’d like on the top of your jewelry box, make a frame out of the white paper. To do this, trace the lid of the box on the white paper, then measure in about 1” all the way around. Cut out that frame. Move that frame around over your scrapbook paper like a window until you find an area you like. Draw inside the frame corners on the scrapbook paper with a pencil. Then use the ruler and pencil to draw straight guidelines. Cut out your square. (Our square was 4”x4”.)

Make an Easy Jewelry Box with a cute label. We'll show you how to decoupage the box with scrapbook paper and a cute downloadable

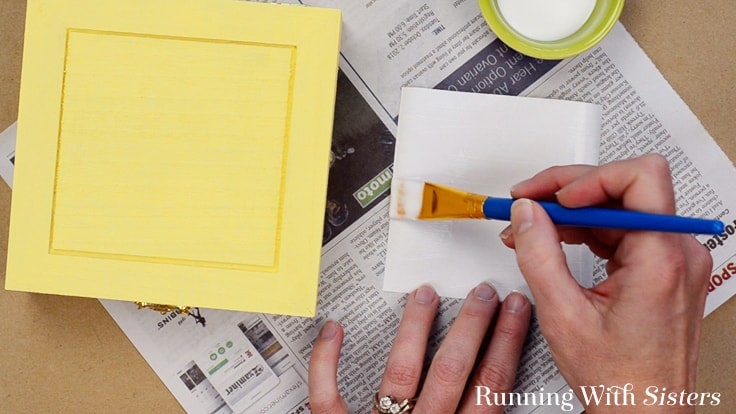
3. Decoupage The Paper To The Box

Decoupage your square of scrapbook paper onto the center of the box lid using Mod Podge and a craft paintbrush. To do this, paint a medium-thick layer on the box and a medium-thick layer on the back of the scrapbook paper. (Don’t worry if the paper curls a little. It will flatten out in the next step.) Press the scrapbook paper square onto the center of the box. Rub it down with your fingers.

Make an Easy Jewelry Box with a cute label. We'll show you how to decoupage the box with scrapbook paper and a cute downloadable

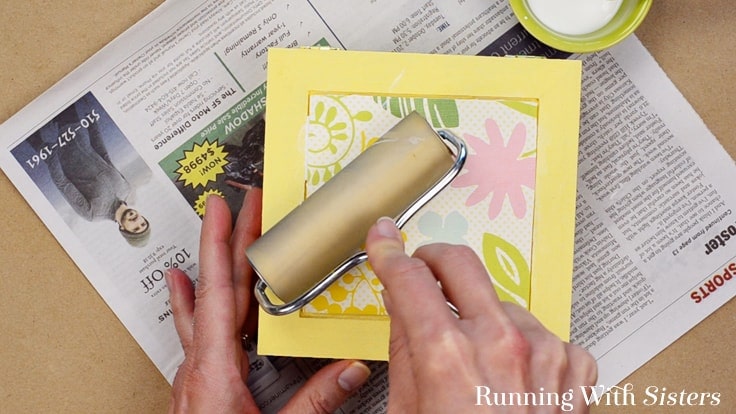
Use the brayer to press the paper down and smooth out any wrinkles. Brush off any excess Mod Podge that squeezed out the sides. Let it dry.

Make an Easy Jewelry Box with a cute label. We'll show you how to decoupage the box with scrapbook paper and a cute downloadable

4. Decoupage The Blingy Things Label To The Box

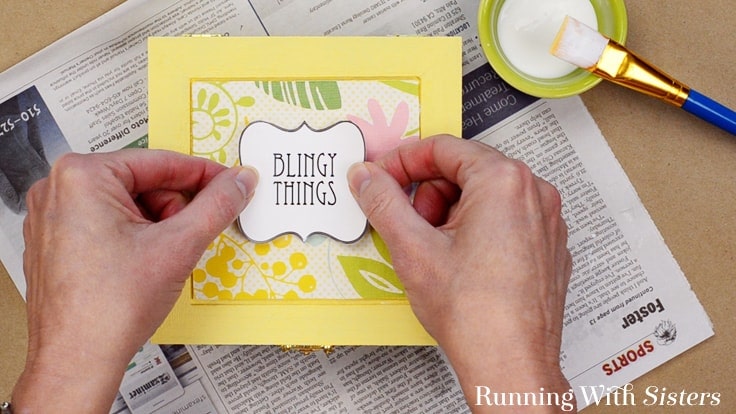
Cut out the “Blingy Things” label. Decoupage the label onto the center of the box lid on top of the scrapbook paper square. To do this, paint a medium-thick layer on the box and a medium-thick layer on the back of the label. Press the label onto the center of the box. Rub it down with your fingers. Then use the brayer to press the label down and smooth it out. Brush off any Mod Podge that may have squeezed out of the sides. Let it dry. 

Make an Easy Jewelry Box with a cute label. We'll show you how to decoupage the box with scrapbook paper and a cute downloadable

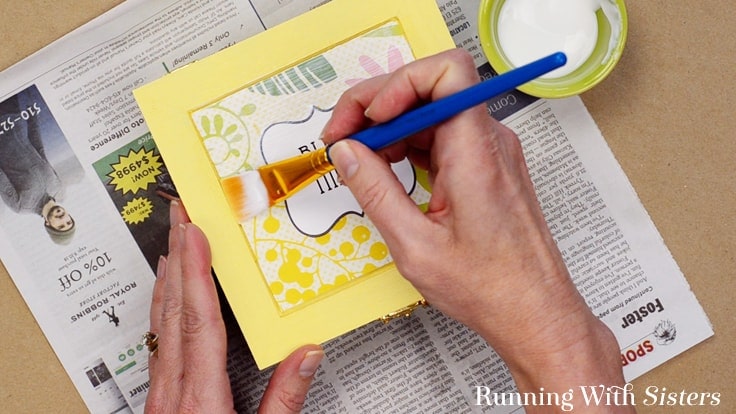
5. Coat The Whole Box

When the label has completely dried, apply a coat of Mod Podge to the entire box to seal it and give it an even finish. For extra shine, apply another coat once that coat has dried. 

Make an Easy Jewelry Box with a cute label. We'll show you how to make a DIY decoupage wooden jewelry box with scrapbook paper and a cute downloadable

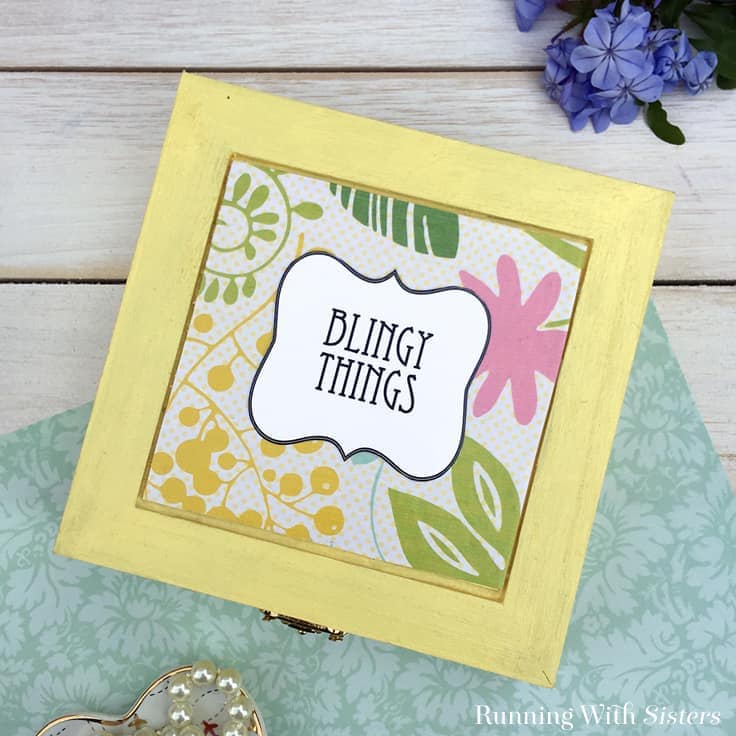
Wasn’t that fun? It’s definitely an Easy Jewelry Box to make! And we think it’d be a wonderful little gift for a friend. Who wouldn’t want a cute box to stash their Blingy Things in?! This DIY Polymer Clay Ring Holder is a cute gift idea, too.

Have you decoupaged a keepsake box before? Let us know! And write in with any questions you may have while you’re working on your jewelry box. We’d love to hear from you!

Looking for more crafty things to make for your home? Check out 25 of our favorite Home Craft Ideas That You Can Make Today!


Happy Crafting,
Jennifer & Kitty

French Hat Boxes

Faux Quilted Pumpkin

Pretty Paper Mosaic Vase

You may also enjoy these decoupage ideas on Ideas for the Home by Kenarry® –

  • Faux Ceramic Mosaic Using Paper
  • Decoupage A Letter
  • Turn A Book Into A Jewelry Box
  • Share
  • Tweet

Craft Ideas· Gift Ideas

About Jennifer and Kitty O'Neil

Jennifer and Kitty O’Neil are sisters and authors of several books including Steampunk Chic: Vintage Flair From Recycled Finds. Their crafting, decorating, and jewelry designs have appeared in Woman’s World, Craft Ideas, and Create and Decorate magazines and on the web sites of Better Homes and Gardens, Family Circle, and HGTV. Their detailed craft videos can be found on Curious.com and on their YouTube channel, which has over 2.2 million views. The O’Neil Sisters share their enthusiasm and their fresh approach to crafting and decorating on their blog, RunningWithSisters.com.

The O'Neil Sisters shared their great ideas on Ideas for the Home by Kenarry® from June 2015 - May 2019. Follow the O’Neil Sisters on Facebook, Pinterest, and Instagram.

In this ultimate guide, you'll learn how to make a burlap wreath with ribbon for your home. The FREE eBook includes easy step-by-step instructions plus inspiring craft and decor ideas to make wreaths for fall, Christmas, Easter and other holidays.

Subscribe today to get ideas in your inbox plus FREE exclusives only for Idea Insiders!

Almost there! Now just check your email to confirm your e-mail address and get your free eBook.

There was an error submitting your subscription. Please try again.

You're already signed up! YAY! As an Idea Insider you have instant access to our Kenarry Idea Insider Resource Library with exclusive printables, offers and other freebies as soon as you confirm your subscription.
Previous Post: « Quick and Easy Hand Lettered Drink Coasters (FREE DOWNLOAD)
Next Post: Simple DIY Cloth Napkins You Can Whip Up Quickly »

Reader Interactions

Leave a Reply Cancel reply

Your email address will not be published. Required fields are marked *

Recipe Rating


This site uses Akismet to reduce spam. Learn how your comment data is processed.

Primary Sidebar

Welcome

Carrie Ypma from Ideas for the Home by Kenarry®Hello, I'm Carrie! I'd love to personally welcome you to Ideas for the Home by Kenarry® where we curate and share great ideas you can create at home. Whether you're cooking, crafting or creating for your family, you're bound to find inspiration. Please pour yourself some coffee and stay awhile. We're glad you're here! Read more...

Sign Up and Get a Free Gift

Subscribe to become an Idea Insider. You'll get our weekly newsletter plus special deals and other resources that are only for subscribers -- all for FREE!

Almost there! Now just check your email to confirm your e-mail address and get your free eBook.

There was an error submitting your subscription. Please try again.

You're already signed up! YAY! As an Idea Insider you have instant access to our Kenarry Idea Insider Resource Library with exclusive printables, offers and other freebies as soon as you confirm your subscription.
In this ultimate guide, you'll learn how to make a burlap wreath with ribbon for your home. The FREE eBook includes easy step-by-step instructions plus inspiring craft and decor ideas to make wreaths for fall, Christmas, Easter and other holidays.
  • About Us
  • Subscribe
  • Shop Our Products
  • My Account
  • Cart

Footer

Disclosure: Posts may include affiliate links for your convenience. As an Amazon Associate I earn from qualifying purchases. All opinions are our own. You are reading and following advice from Kenarry, LLC at your own risk. Always use safety precautions. You should read and follow manufacturer’s directions for the products and tools you use. Read more.


Privacy Policy: The privacy of your personal information is important. We make every effort to safeguard your information and will never sell it to third parties. Read more.

Terms of Use: You are welcome to link to this site or use a single image and brief description to link back to any post. Republishing posts in their entirety is prohibited without permission. All images are property of Kenarry, LLC. Do not crop or remove watermark. Do not reproduce without link back or permission. If you do link to this site, please contact us to let us know. All free printables offered are for personal use only. Pinning is always welcome and appreciated. Thank you!

As it relates to comments and content posted on this blog by those other than the owners, any such content that contains the copyrighted and/or proprietary work of others is expressly prohibited and will be removed. Repeated posting of such content by the same user may result in that user being banned from this site.

Copyright © 2021 Kenarry LLC Powered by Captivating Theme on Genesis Framework WordPress Log in