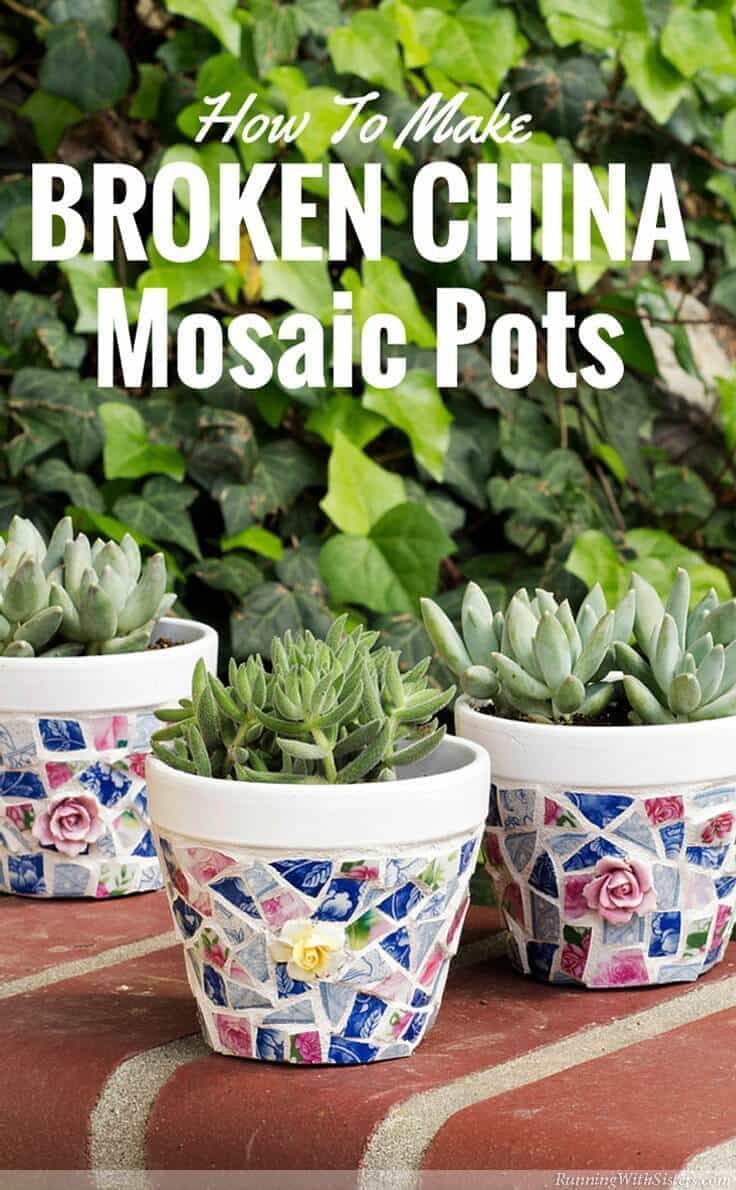
Mosaic Flower Pots: How To Make Broken China Mosaics
THIS POST MAY CONTAIN AFFILIATE LINKS. PLEASE SEE OUR FULL DISCLOSURE POLICY FOR DETAILS.
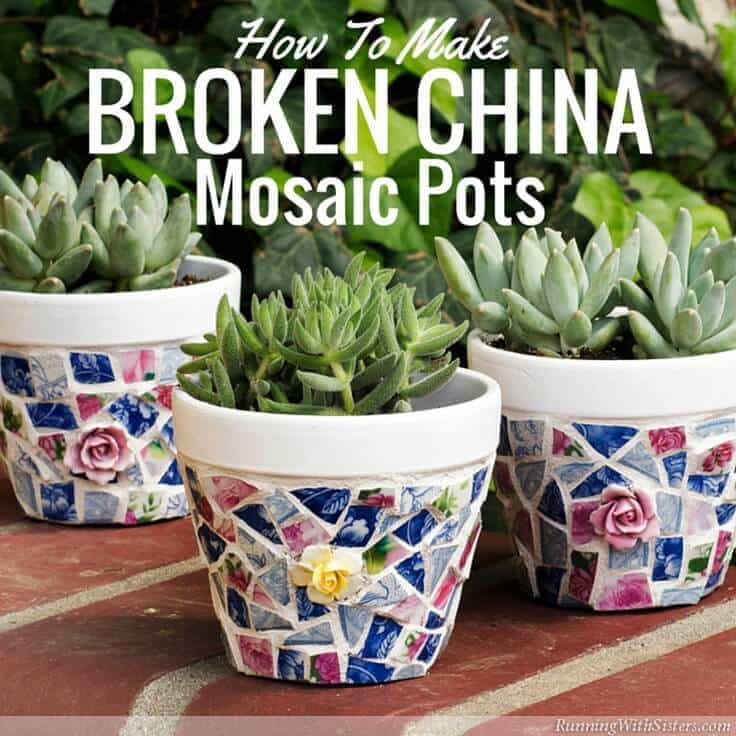
Learn how to make broken china mosaics using old plates. This step-by-step tutorial shows how to create mosaic flower pots for succulents.
Hello Kenarry readers! We are Jennifer and Kitty from Running With Sisters, and we are super excited to share one of our favorite crafts – making mosaics with broken china!
We love to mosaic. It really feels like we’ve made something when we’re through. And our favorite thing to mosaic with is broken china. For us, it combines crafting and flea market shopping! Dream date!
Where to Buy Broken China for Mosaics
The best place to look is the flea market!
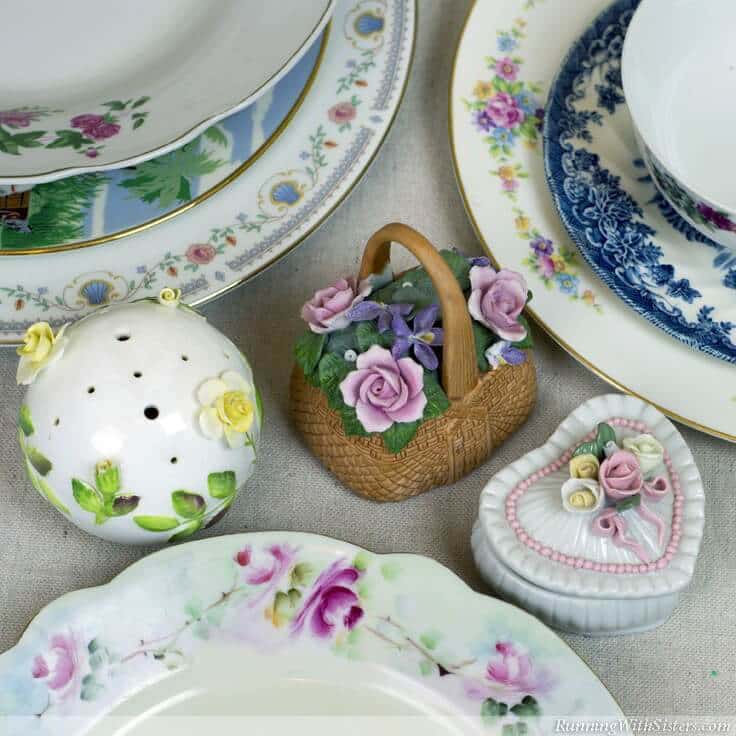
The last time we went to the flea market we stocked up on old china plates. We looked for pretty plates with flowers and patterns around the outside edge and on the bottom. Teacups and plates are cute, but they can be too curved to make nice flat tiles. While we were shopping, we also found some inexpensive knick-knacks topped with little roses. They look like birthday cake flowers made out of china. We thought they’d be cute embedded in our mosaic!
If you’ve never done it before, china mosaic might seem daunting. How do you cut plates? What kind of grout do you use? Well, once you see how it’s done, it’s not that hard. And the finished mosaics are amazing! So here’s how we did it. (And remember if you have any questions while you’re working on your pots, just ask us in the comment form. We’re here to help!)
How To Make Mosaic Flower Pots
Disclosure: This blog post contains affiliate links for products or services we think you’ll like. This means if you make a purchase from one of these links, Ideas for the Home by Kenarry® will make a small commission at no additional cost to you so we can keep the great ideas for the home coming your way. All opinions expressed are derived from personal experience.
Materials
- 3 terra cotta pots, 4″ diameter
- Spray paint, white
- 5-7 china plates
- China knick-knacks with 3 roses
- 1 lb. sanded grout, white
- 8 oz. mosaic grout sealer
- Permanent craft adhesive glue (choose a viscous and fast-drying glue)
Tools & Materials for Breaking China and Chiseling Roses
- Chisel
- Hammer
- Tile nippers or wheel cutters (these are made and sold for mosaic crafting)*
- Large resealable zipper storage bags
- Protective leather gloves
- Safety glasses
- Bubble wrap
- Rag
*We have both tools and use the nippers to get big cuts and the wheel cutters for more precise cutting.
Other Tools
- Latex or nitrile gloves
- Dropcloth
- Disposable mixing container
- Wooden stir stick
- Sponge
- Putty knife
- Paper towels
- Face mask (optional)
- Cup for water
- Pail for rinsing sponge
- Paintbrush
Broken China Mosaics Step-By-Step Pictures
Here is the entire process in step-by-step pictures. Follow along and make your own DIY mosaic flower pots out of broken china.
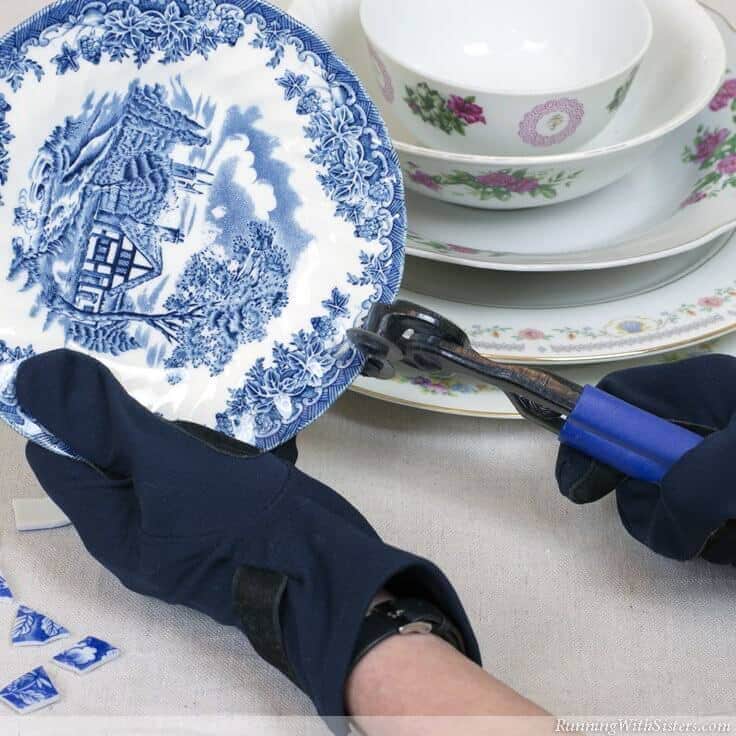
1. Break The China
To do this, wear your leather gloves and glasses and place a plate inside a zipper bag. (This will catch and contain any sharp little chards.) Use the nippers or wheel cutters inside the bag.
Grip the edge of the plate with the nipper blades perpendicular to the edge of the plate. The nippers only need to nip ¼” to ½” into the plate. Squeeze the nippers onto the china. They will create a crack and break the china into two pieces.
Here’s a little video we made to show how to cut a china plate with both tile cutters and wheel nippers. (We were making a different project, but the cutting technique is the same.)
Repeat the cutting process to cut the larger pieces into smaller tiles. We aimed for tiles around ½” square (although none ended up square, of course!). We ended up using about 90-100 cut tiles per pot. So we cut a lot!
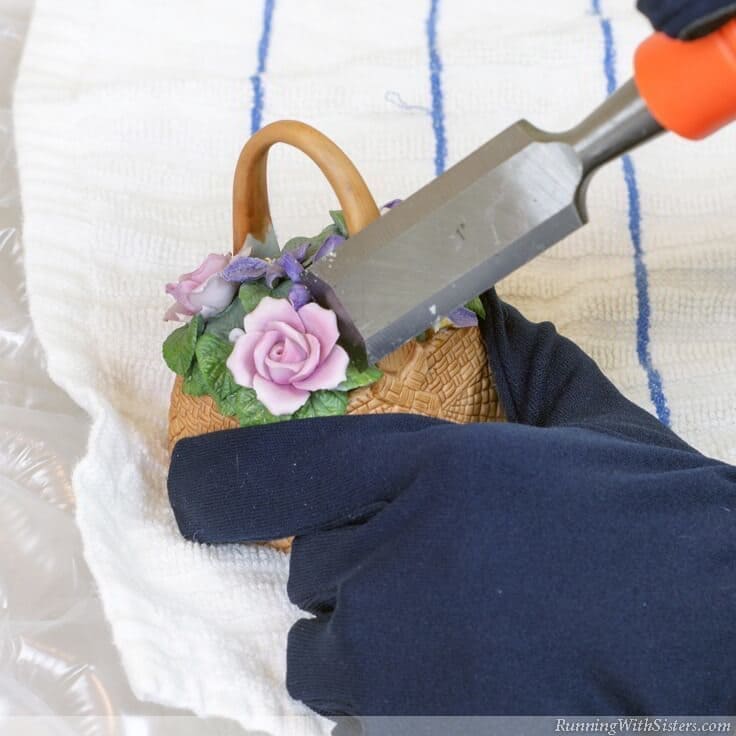
2. Chisel The Roses
To chisel the roses off your knick-knacks, make a bed of bubble wrap and cover it with a rag. Wear your safety gloves and glasses. Nestle the knick-knack into the towel. Set the chisel edge under the rose.
Strike the end of the chisel with the hammer. It may take more than one blow. (We broke the petals of one of our roses, but we just glued them back on when we put it on the mosaic. No one will know!)
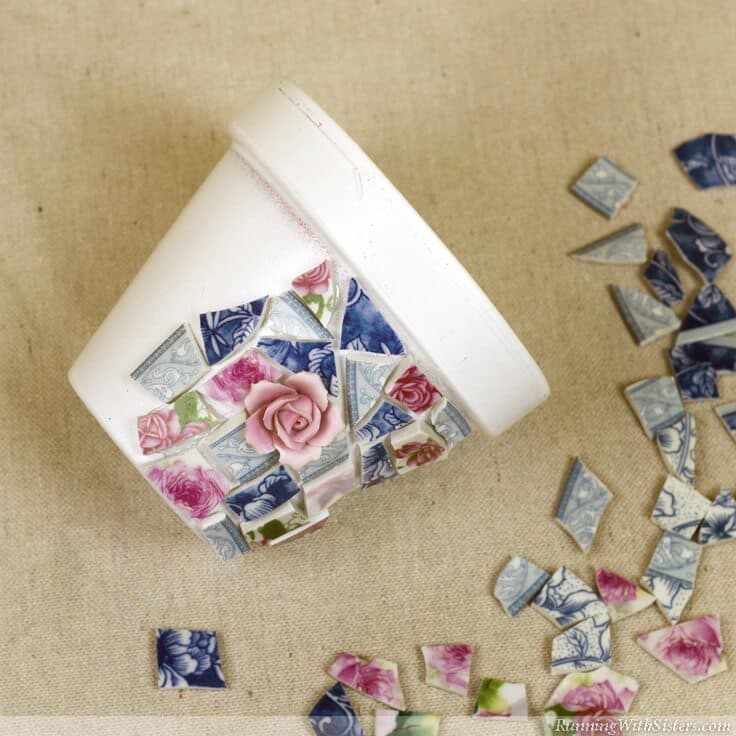
3. Arrange And Glue The China Pieces On the flower pots
Paint the pots (including the inside lip) and let them dry. This next part is like doing a puzzle, so we like to start by laying out all our tiles on the table face up.
Start by gluing a rose to the front of a pot. Next select tiles to tuck under the rose and attach them with a dab of glue on the back of each tile. Leave about 1/8″ between each tile for the grout. Choose straight edge tiles for the bottom and top of the mosaic.
Fill in the spaces by scanning your table full of tiles for just the right shape. If you can’t find it, use your tile cutters to create the perfect tile (just be sure to put your safety gloves and glasses back on!). Repeat to mosaic the other two pots.
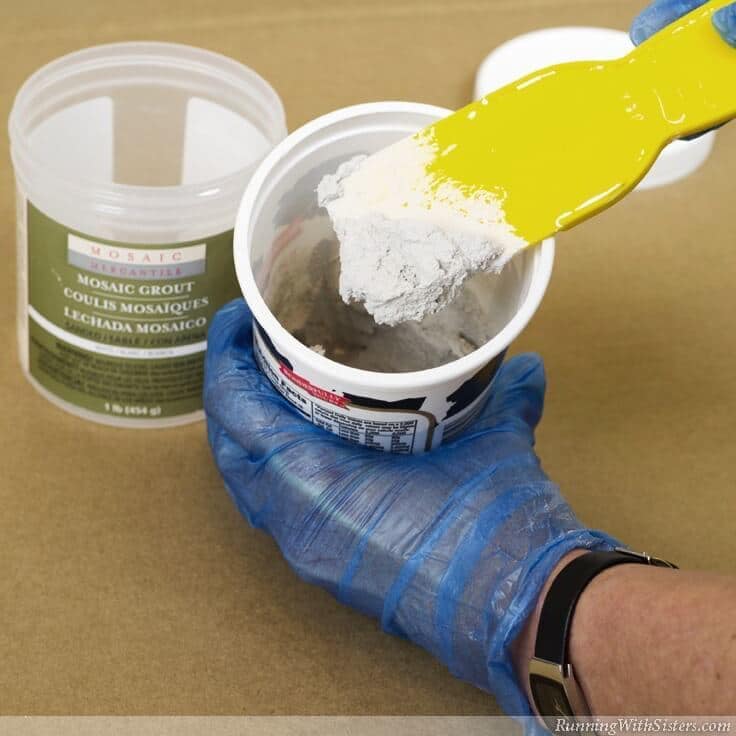
4. Mix The Grout
Wear a mask if desired and don your latex-type gloves. Mix half the grout package according to the directions on the label. (Ours took one part water to seven parts grout, so we used a little more than one ounce of water for half the 16-ounce bag.)
Add less water than you need at first. Stir and add more water if the mixture is too dry. Mix until the grout is the consistency of natural peanut butter. The grout stays workable for about 15 minutes, so be ready to grout the mosaic before you mix the grout.

5. Spread The Grout
Spread the grout onto the surface of the mosaic pot right over the china pieces. Use a damp sponge or putty knife to spread the grout around all the china pieces and roses. (Confession. We also use our gloved fingers to spread the grout. But we are super careful since there are a lot of sharp edges on broken china tiles!) Make sure the top edge and bottom edge of the mosaic are grouted.
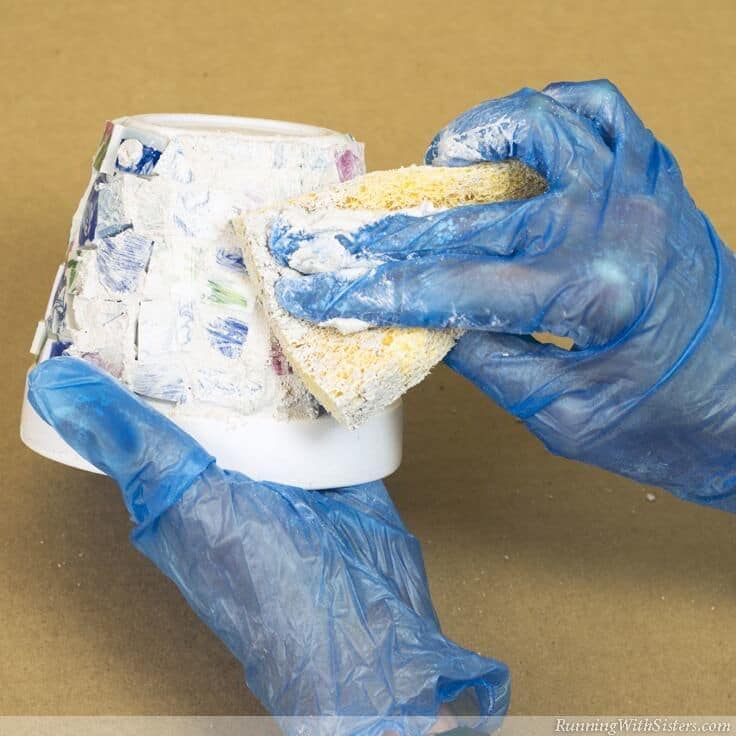
As you are finishing, go over the pot with a damp sponge lightly cleaning the grout off the tiles without removing the grout from between the tiles. Clean the lip of the pot with a damp sponge to remove any grout before it sets up. Repeat to grout each pot, mixing up more grout as needed. Let dry for 30 minutes.
6. Buff the Tiles
After 30 minutes, use a paper towel or damp sponge to wipe the grout haze off the china pieces. Be careful not to remove the grout from between the tiles. Wait another 30 minutes and buff the haze again. Repeat if necessary.
7. Seal the Mosaic
Let the grout dry for 24 hours, then seal the surface of the tiles and grout with a grout sealer and a paintbrush. Let dry. (Sealant makes the mosaic water-resistant, but not waterproof.) Now plant a trio of succulents and sit back and enjoy your little garden!
How do you smooth the edges of the broken china?
Since we published this article, we kept getting asked about smoothing out the edges of the broken china. Yes, you really do have to be careful when you use broken china – it is sharp! But you don’t have to smooth them out before you put them on the flower pots.
Just make sure you are using enough grout. The grout covers the sharp edges and creates a smooth feeling around the pot.
We hope you have fun doing your mosaics. And we’d love to hear from you! Let us know how your pots turned out! And if you’ve done mosaic projects before, we’d love to hear about that, too! What did you mosaic? Please share with us below!
Happy Crafting,
Jennifer & Kitty
More Craft Tutorials
Want to see more crafts from the O’Neil Sisters? You might like…
Love the ideas you see here on Ideas for the Home by Kenarry®? Subscribe today to get our FREE DIY & Craft Planning Calendar, plus our weekly Ideas in Your Inbox newsletter filled with creative tips and exclusive offers!
What’s Next?
While you’re here, be sure to check out other craft projects on Ideas for the Home by Kenarry® –
Thank you so much. I have always wanted to do this but didn’t know how to use the nippers. The video was great about how to cut the rose out and keep it together at the same time. You did a fantastic job.
You’re so welcome, Summer! The O’Neil Sisters did a great job explaining it step-by-step.
Thanks for the kind words, ladies! The nippers are really fun to use once you try them. They make cutting the china so easy!
Does it have to be ” china” plates? Can you use regular dollar store plates?
That is a great question, Michelle! We have never tried plates from the Dollar Store for mosaics before, and we’re not sure how they would break. But for only a dollar a plate, it sure would be worth a try! Will you let us all know how it goes?! Hope it works well and that your project turns out great!
Jennifer & Kitty
I haven’t done mosaic in a long time but, going to pin this for when I’m ready to try it again. Feel free to share it at the party!
Thanks for pinning, Theresa! We appreciate it! 🙂
Ooohhh my goodness Carrie, I LOVE these!! So unique and gorgeous!! I have a ton of random china that was given to me that I have no idea what to do with, and this would be perfect! 🙂
This would be a GREAT way to use all those mix and match china pieces, Amanda! I can’t wait to see how your DIY mosaics turn out. DO send or post pictures and let me know so I can see them, okay?
Oh, my goodness… I love these! Well done, ladies!
I’m so excited about making my first mosaic flower pots. Thank you so much for your excellent directions and videos. I do have a question, as a sealer can I use Mod Podge? Somewhere in all my readings I saw you could, but for the life of me I can not find it. Thank you again for your beautiful work!
Diana
Hi Diana,
We’re so excited that you want to make the pots! We love ModPodge and have used ModPodge Outdoors to seal birdhouses and other outdoor projects, but we haven’t tried it on grouted mosaics. We think it should work, but you may have to water it down a bit. The grout sealer is watery like milk and ModPodge Outdoors is thicker like a paste. Maybe test an area first to see how it goes. And please come back and let us know if it works!
Happy Crafting,
Jennifer & Kitty
do have instructions for Mosiacs for a small table
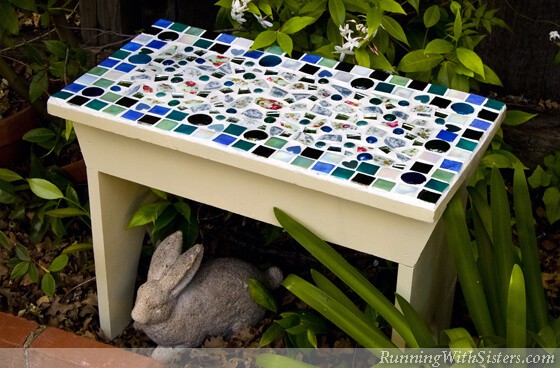
Hi Clara, thank you for reaching out to us. There are several mosaic tutorials here on Ideas for the Home by Kenarry®. You’ll find a full list of all of them here. For each of the mosaic projects the technique is very similar and would work well on a small table. The O’Neil Sisters have a few additional posts that specifically focus on tables that you might want to check out as well —
How to Mosaic a Table
Smashing Tile Table
Good luck with your mosaic project! We’d love to see photos when you’re finished.
Best wishes,
Carrie
Awesome instructional video! I have been on the search for china plates and flowers, but wasn’t sure how to attack nipping everything. Thanks so much!
The O’Neil Sisters did a fantastic job explaining how to nip everything, didn’t they? The video makes it look doable so long as you have the right tools. Thanks, Christi!
Oh my gosh I really love this site. I stumbled upon it by accident and the creativity abounds. I consider myself an artist but sometimes I need a nudge you all give me inspiration when Im stuck. Been doing some biologics chemo and it takes its toll on my creative spirit lately, thank you for the wonderful colors and the happy feeling of your site, really took me out of a funky day .
Hi Geraldine — we’re so thrilled you found our site and that it was able to lift your spirits! Happy crafting and hoping you feel better soon.
Hi, I am enjoying reading your blog. I am working on a project using pottery shards and shells. The shards are thicker than the shells, and I am trying to figure out a way to “raise”the shells so they are at least at a similar level and not partially buried by the grout. Do you have any suggestions? I would really appreciate your input. Thanks!
Hi Deb — So sorry for the delayed response! We were celebrating the holiday weekend with family. You ask a great question! It definitely would help to have all the embedments — the shells and shards — the same level when you go to grout. Depending on the type of shells you’re using and how much you need them raised up, you could apply a thicker dollop of glue behind the shells. Or you could glue each shell onto something else, like a small mosaic tile, to lift it up to the height of the shards. You could then glue the shell-topped tile to your substrate. Once you apply the grout around the shell, the item you glued the shell to should be hidden. Hope that helps!
That is a great question, Michelle! We have never tried plates from the Dollar Store for mosaics before, and we’re not sure how they would break. But for only a dollar a plate, it sure would be worth a try! Will you let us all know how it goes?! Hope it works well and that your project turns out great!
Jennifer & Kitty
You used the nippers on one and the wheel cutter on the other. What exactly is the difference between the two?