• About Us
    • Contact Us
    • Work With Us
    • The Creative Team
    • Disclosures
  • Subscribe
  • Shop Our Products
  • My Account
  • Cart
  • Nav Social Menu

    • Facebook
    • Instagram
    • Pinterest
    • Twitter
  • DIY & Decor â–¾
    • Crafts
    • Home Decor
    • Home Improvement
    • Technology
  • Recipes â–¾
    • Breakfast
    • Appetizers
    • Side Dishes
    • Easy Dinner Ideas
    • Slow Cooker
    • Fun Food
    • Desserts
  • Clean/Organize
  • Kid Ideas â–¾
    • Birthdays
    • Castle Playroom
    • Outer Space Bedroom
    • Teacher Appreciation
    • Travel Tips
  • Free Printables
  • Holidays â–¾
    • Valentine’s Day
    • St. Patrick’s Day
    • Easter
    • Cinco de Mayo
    • Mother’s Day
    • Memorial Day
    • Father’s Day
    • Independence Day
    • Halloween
    • Thanksgiving
    • Christmas
    • New Year’s
    • Gift Ideas

Ideas for the Home

You are here: Home / Craft Ideas / How to Marble a Vase With Nail Polish – Suminagashi Style

By Jennifer and Kitty O'Neil on February 7, 2018 Leave a Comment

How to Marble a Vase With Nail Polish – Suminagashi Style

Craft Ideas· Gift Ideas· Home Decor Ideas

  • Share
  • Tweet

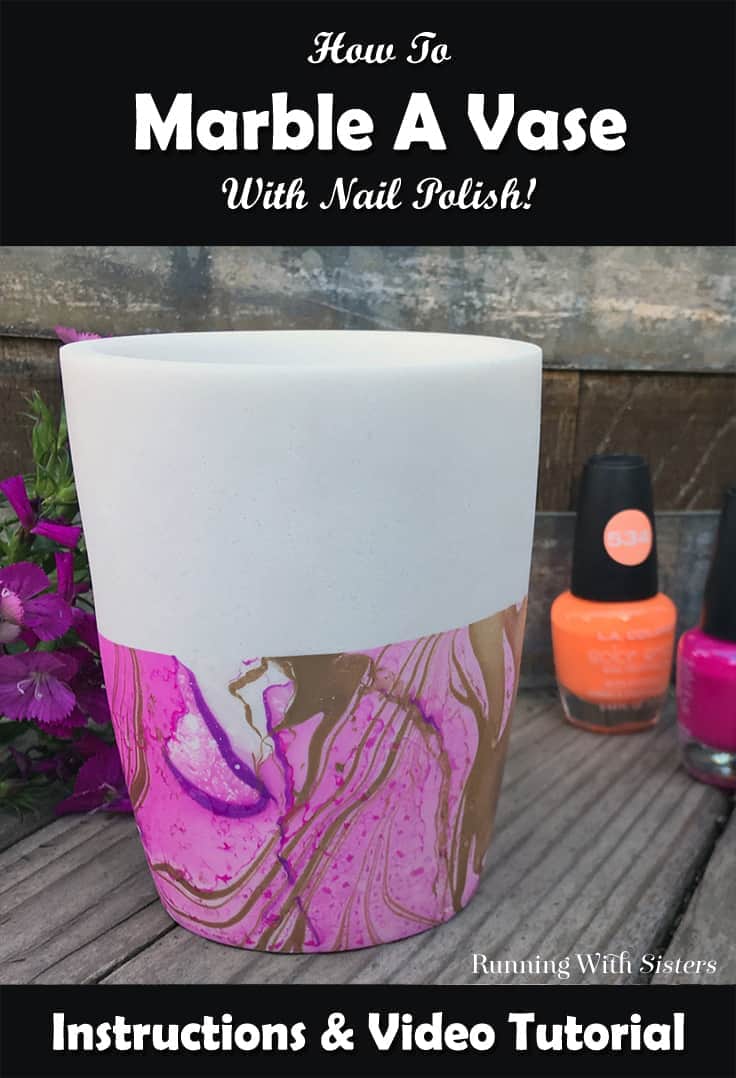
Learn to marble a vase using nail polish and water with suminagashi. Watch a how-to video plus step-by-step instructions.

Hi Kenarry readers! It’s Jennifer and Kitty (the O’Neil Sisters, from RunningWithSisters.com), and we have a magical DIY vase project to share with you: how to marble a vase with Suminagashi!

Learn to marble a vase using nail polish and water! It's called suminagashi and we'll show you how to do every step! We've got a how to video plus step by step instructions. This one is fast and fun!

What is Suminagashi?

Suminagashi is the Japanese art of marbling, traditionally done on paper. It works by drizzling paints or inks that aren’t water-based onto water, swirling the paints, then dragging the item you want to marble through the colorful swirls. The result is amazing! And it’s so fast and easy to do!

For this marbling project, we’re transforming a plain white vase using dollar-store nail polishes! It works because nail polish is essentially enamel paint – which isn’t water-soluble. Thus the magic! We’ll show you how to drizzle and swirl the nail polishes onto plain tap water. Then we’ll show you how to apply the swirled paint to marble a vase. It happens so fast, if you blink you might miss it!

We’re also sharing a video showing what materials you’ll need for this project and how to make it step by step. You can watch us do a test run first, then we’ll marble a vase before your very eyes. After you watch our demo, you can hit the ground running and marble your own vase in a flash!

How to Marble a Vase With Nail Polish – Suminagashi Style

Disclosure: This blog post contains affiliate links for products or services we think you’ll like. This means if you make a purchase from one of these links, Ideas for the Home by Kenarry® will make a small commission at no additional cost to you so we can keep the great ideas for the home coming your way. All opinions expressed are derived from personal experience.
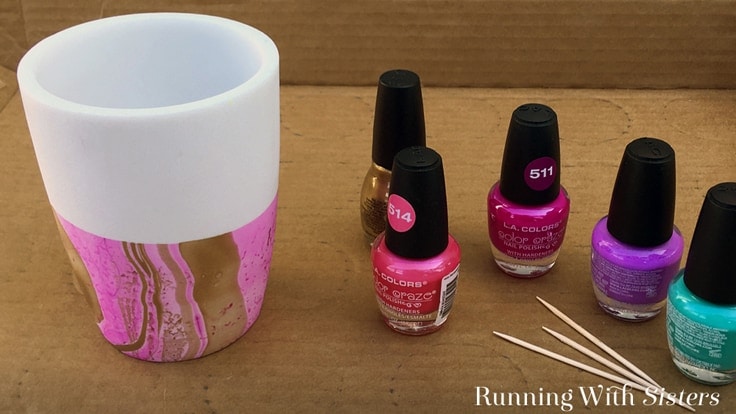
Materials & Tools

  • White ceramic vase
  • Disposable tub or plastic container (deep enough to submerge at least half of your vase)
  • Nail polishes, various colors
  • Nail polish, metallic gold
  • Toothpicks
  • Wooden craft sticks (to test with)
  • Paper towels

Steps

1.) Prepare the vase

Wash and dry your vase to remove any fingerprints or oils from the surface.

2.) Fill a tub with water

Fill a disposable tub or plastic container with room temperature tap water. Make sure the water is deep enough to submerge at least half of your vase without the vase touching the bottom of the container.

Learn to marble a vase using nail polish and water! It's called suminagashi and we'll show you how to do every step! We've got a how to video plus step by step instructions. This one is fast and fun!

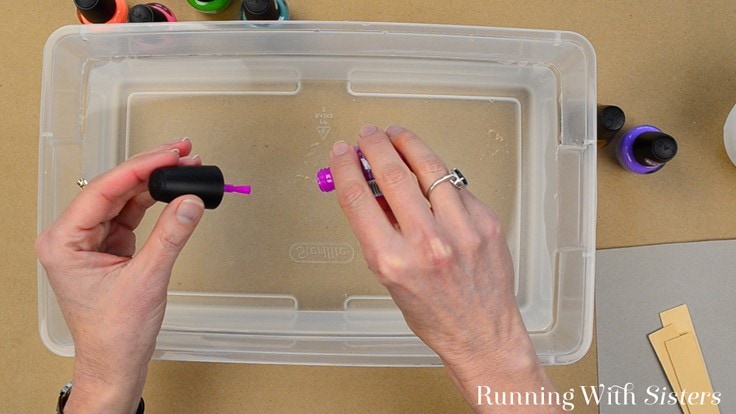
3.) Do a quick test first

We recommend doing a test or two before you marble your vase so you can see how much paint to use, how to swirl the paints, and how best to dip the item you’re marbling. To do your test, drizzle several drops of nail polish onto the surface of your water.

Learn to marble a vase using nail polish and water! It's called suminagashi and we'll show you how to do every step! We've got a how to video plus step by step instructions. This one is fast and fun!

Add a second color, then add the gold paint. Work very quickly –– the paints start to dry as they spread out on the water’s surface, so speed is key!

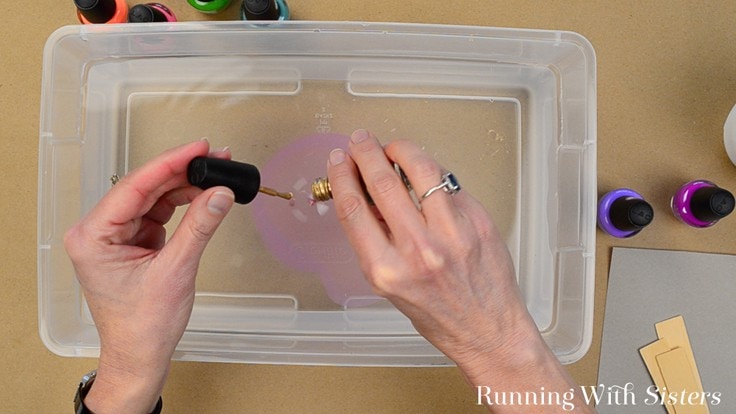
4.) Swirl the paints with a toothpick

Immediately swirl the paints with a toothpick. Don’t mix them too much or the colors will get muddy. Just drag a toothpick through the paints two or three times to create the swirled look.

Learn to marble a vase using nail polish and water! It's called suminagashi and we'll show you how to do every step! We've got a how to video plus step by step instructions. This one is fast and fun!

5.) Test on the Craft Stick

Dip a craft stick straight down into the tub then lift it straight out.

Learn to marble a vase using nail polish and water! It's called suminagashi and we'll show you how to do every step! We've got a how to video plus step by step instructions. This one is fast and fun!

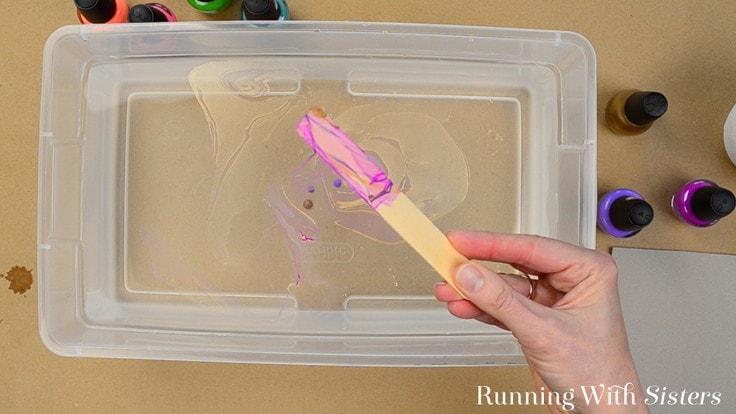
The swirled nail polishes will cling to the craft stick and look marbled.

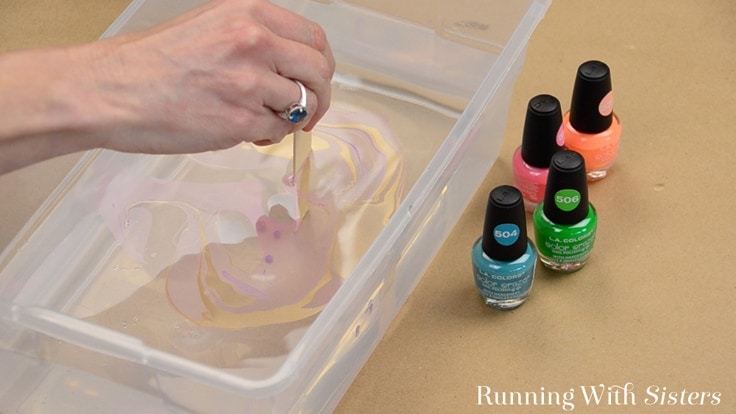
6.) Test again on a paper towel

To test again, drag a paper towel through the water in the tub to pull out any paint still floating on the surface. Then use this same technique above with a new craft stick. And do as many tests as you like until you get the marbled effect you’re looking for. (The nail polishes are cheap!)

7.) Make a fresh tub of water for the vase

When you’re ready to marble your vase, make sure you have a fresh tub of water with no paint left at the bottom. (We fished out all remaining paint from our tests with a craft stick, then dumped the water in our utility sink in the garage.)

Learn to marble a vase using nail polish and water! It's called suminagashi and we'll show you how to do every step! We've got a how to video plus step by step instructions. This one is fast and fun!

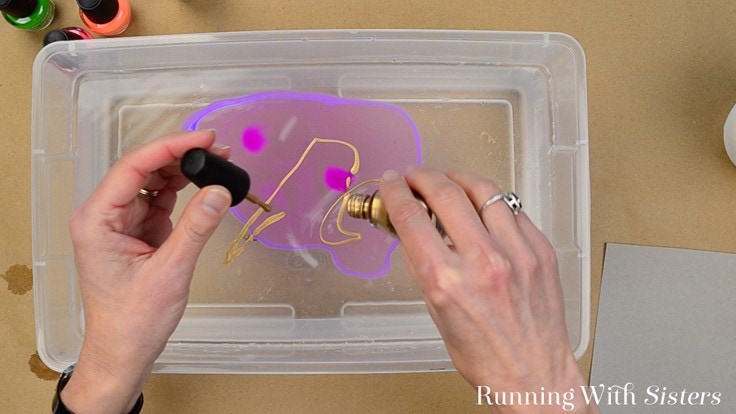
8.) Drizzle more nail polish onto the water

Working quickly, drizzle each nail polish color onto the surface of the water in the tub.

Learn to marble a vase using nail polish and water! It's called suminagashi and we'll show you how to do every step! We've got a how to video plus step by step instructions. This one is fast and fun!

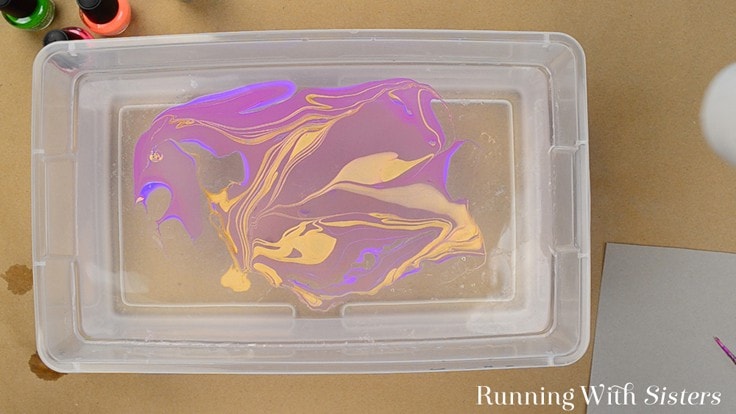
Then use a toothpick to create your swirl.

Learn to marble a vase using nail polish and water! It's called suminagashi and we'll show you how to do every step! We've got a how to video plus step by step instructions. This one is fast and fun!

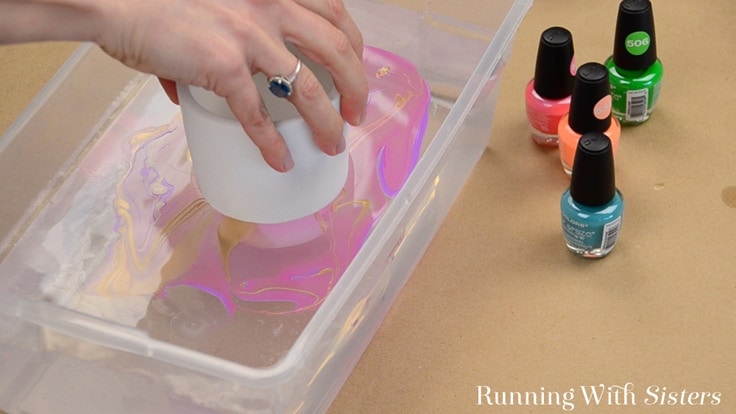
9.) Dip the vase into the tub

Lower your vase straight down into the tub, making sure you don’t touch the bottom of the container.

Learn to marble a vase using nail polish and water! It's called suminagashi and we'll show you how to do every step! We've got a how to video plus step by step instructions. This one is fast and fun!

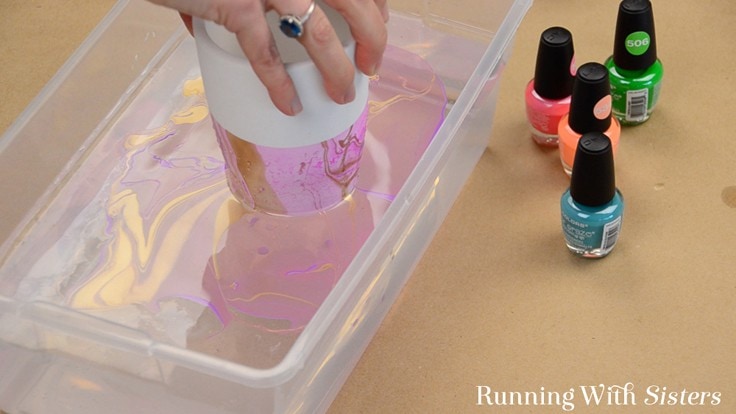
10.) Lift it back out quickly

Quickly lift the vase straight back out and admire your marbling magic! To let the vase dry, turn it upside-down on a paper towel. The water will drip down the vase, but the enamel paints will not.

Learn to marble a vase using nail polish and water! It's called suminagashi and we'll show you how to do every step! We've got a how to video plus step by step instructions. This one is fast and fun!

We love marbling with Suminagashi. Have you ever tried this technique before? What have you marbled? We’d love to hear your ideas. Leave us a comment! And write in with any questions you may have as you work on your project.

You may also want to try these Easy Decorative Pens Made with Polymer Clay for another marbling idea!

Happy Crafting,
Jennifer & Kitty

More DIY Craft Ideas

Like this project? You should check out these DIY marbleized wine glasses! You might also like these crafts from the O’Neil Sisters:

Decoupage plates with colorful butterflies !

Easy Butterfly Plates

Turn dollar store vases into colorful candle holders using nail polish!

Upcycle Candleholders With Nail Polish

Decoupage glass jars with Mod Podge! We'll show you every step!

Pretty Decoupaged Jars

What’s Next?

While you’re here, be sure to check out other craft projects on Ideas for the Home by Kenarry® –

  • DIY Mason Jar Pencil Holder
  • Washi Tape Ideas: Thanksgiving Vase Craft + More
  • How To Make Nail Polish Dipped Christmas Ornaments
  • Share
  • Tweet

Craft Ideas· Gift Ideas· Home Decor Ideas

About Jennifer and Kitty O'Neil

Jennifer and Kitty O’Neil are sisters and authors of several books including Steampunk Chic: Vintage Flair From Recycled Finds. Their crafting, decorating, and jewelry designs have appeared in Woman’s World, Craft Ideas, and Create and Decorate magazines and on the web sites of Better Homes and Gardens, Family Circle, and HGTV. Their detailed craft videos can be found on Curious.com and on their YouTube channel, which has over 2.2 million views. The O’Neil Sisters share their enthusiasm and their fresh approach to crafting and decorating on their blog, RunningWithSisters.com.

The O'Neil Sisters shared their great ideas on Ideas for the Home by Kenarry® from June 2015 - May 2019. Follow the O’Neil Sisters on Facebook, Pinterest, and Instagram.

In this ultimate guide, you'll learn how to make a burlap wreath with ribbon for your home. The FREE eBook includes easy step-by-step instructions plus inspiring craft and decor ideas to make wreaths for fall, Christmas, Easter and other holidays.

Subscribe today to get ideas in your inbox plus FREE exclusives only for Idea Insiders!

Almost there! Now just check your email to confirm your e-mail address and get your free eBook.

There was an error submitting your subscription. Please try again.

You're already signed up! YAY! As an Idea Insider you have instant access to our Kenarry Idea Insider Resource Library with exclusive printables, offers and other freebies as soon as you confirm your subscription.
Previous Post: « Robot Valentine Cards: Free Printable Cards for Kids
Next Post: How To Make Cappuccino Milk Bath »

Reader Interactions

Leave a Reply Cancel reply

Your email address will not be published. Required fields are marked *

Recipe Rating


This site uses Akismet to reduce spam. Learn how your comment data is processed.

Primary Sidebar

Welcome

Carrie Ypma from Ideas for the Home by Kenarry®Hello, I'm Carrie! Welcome to Ideas for the Home by Kenarry® where we want to help you create a home you love. We're glad you're here! Read more...

Sign Up and Get a Free Gift

Subscribe to become an Idea Insider. You'll get our weekly newsletter plus special deals and other resources that are only for subscribers -- all for FREE!

Almost there! Now just check your email to confirm your e-mail address and get your free eBook.

There was an error submitting your subscription. Please try again.

You're already signed up! YAY! As an Idea Insider you have instant access to our Kenarry Idea Insider Resource Library with exclusive printables, offers and other freebies as soon as you confirm your subscription.
In this ultimate guide, you'll learn how to make a burlap wreath with ribbon for your home. The FREE eBook includes easy step-by-step instructions plus inspiring craft and decor ideas to make wreaths for fall, Christmas, Easter and other holidays.
  • About Us
  • Subscribe
  • Shop Our Products
  • My Account
  • Cart

Footer

Disclosure: Posts may include affiliate links for your convenience. As an Amazon Associate I earn from qualifying purchases. All opinions are our own. You are reading and following advice from Kenarry, LLC at your own risk. Always use safety precautions. You should read and follow manufacturer’s directions for the products and tools you use. Read more.


Privacy Policy: The privacy of your personal information is important. We make every effort to safeguard your information and will never sell it to third parties. Read more.

Terms of Use: You are welcome to link to this site or use a single image and brief description to link back to any post. Republishing posts in their entirety is prohibited without permission. All images are property of Kenarry, LLC. Do not crop or remove watermark. Do not reproduce without link back or permission. If you do link to this site, please contact us to let us know. All free printables offered are for personal use only. Pinning is always welcome and appreciated. Thank you!

As it relates to comments and content posted on this blog by those other than the owners, any such content that contains the copyrighted and/or proprietary work of others is expressly prohibited and will be removed. Repeated posting of such content by the same user may result in that user being banned from this site.

Copyright © 2021 Kenarry LLC · Powered by Captivating Theme on Genesis Framework · WordPress · Log in