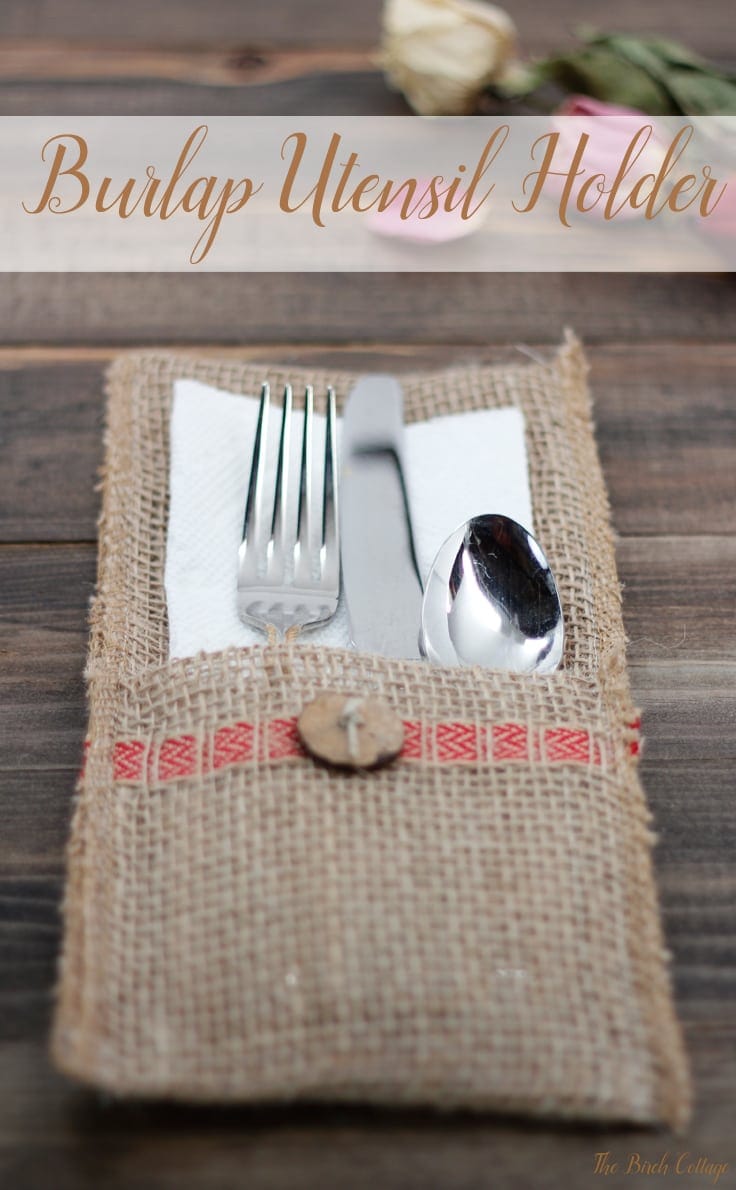
Make A Burlap Utensil Holder From Burlap Ribbon
THIS POST MAY CONTAIN AFFILIATE LINKS. PLEASE SEE OUR FULL DISCLOSURE POLICY FOR DETAILS.
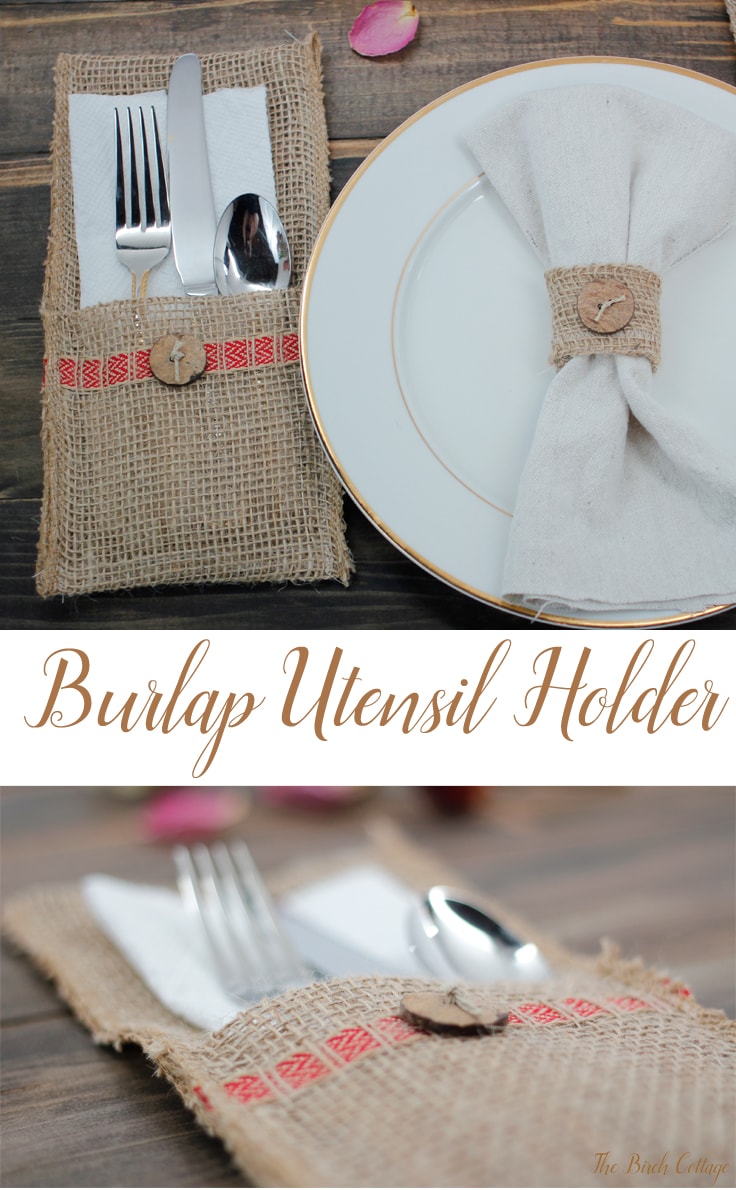
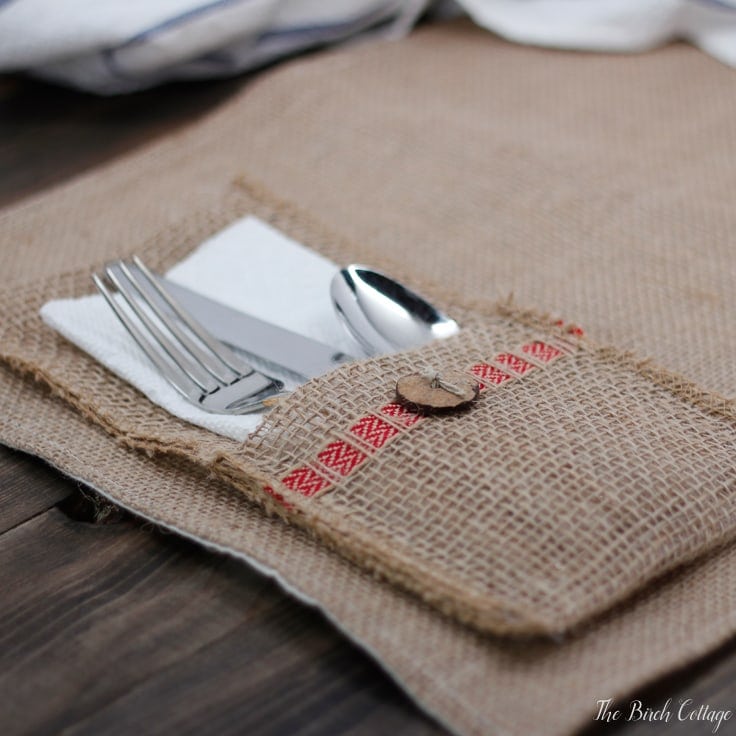
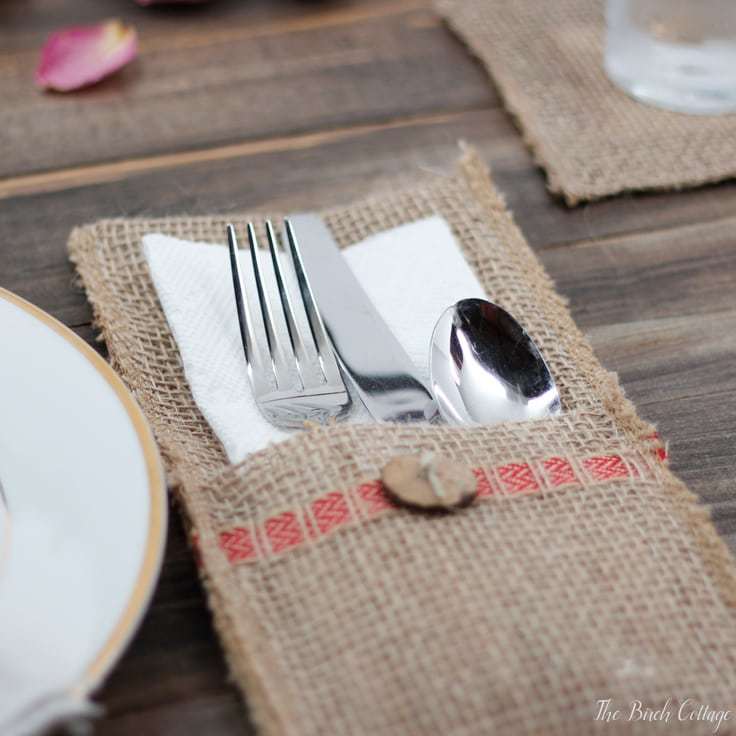
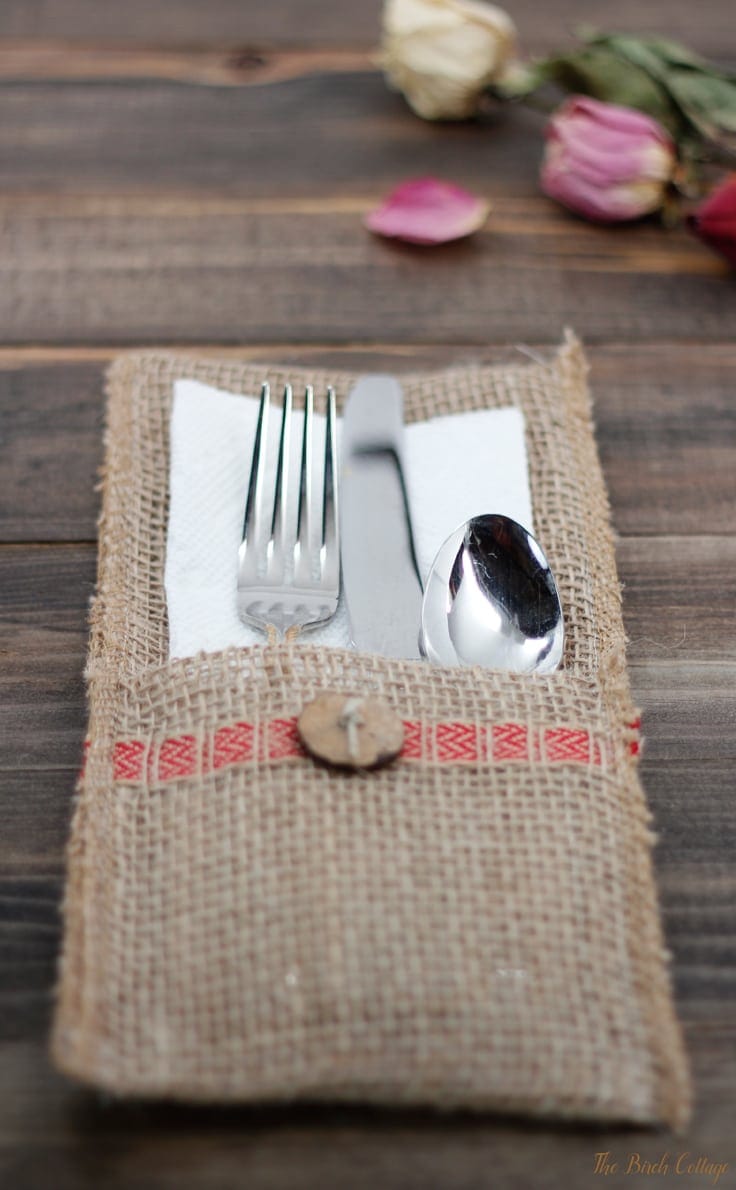
Make this burlap utensil holder from burlap ribbon. Burlap utensil holder adds the perfect amount of rustic charm to your tablescape.
This Burlap Utensil Holder adds the perfect rustic touch to your tablescape. Hello, Ideas for the Home by Kenarry® friends! I’m Pam from The Birch Cottage and I’m back again this month to share another DIY burlap project with you.
These Burlap Utensil Holders are the third in a series of burlap ribbon projects that I’ve shared on Kenarry over the summer. I first shared my Loopy Burlap Flower tutorial. These flowers are super simple to make and add a nice rustic, but feminine touch to your DIY projects. There are all kinds of uses for these burlap flowers. I share a few ideas here.
Loopy Burlap Flowers
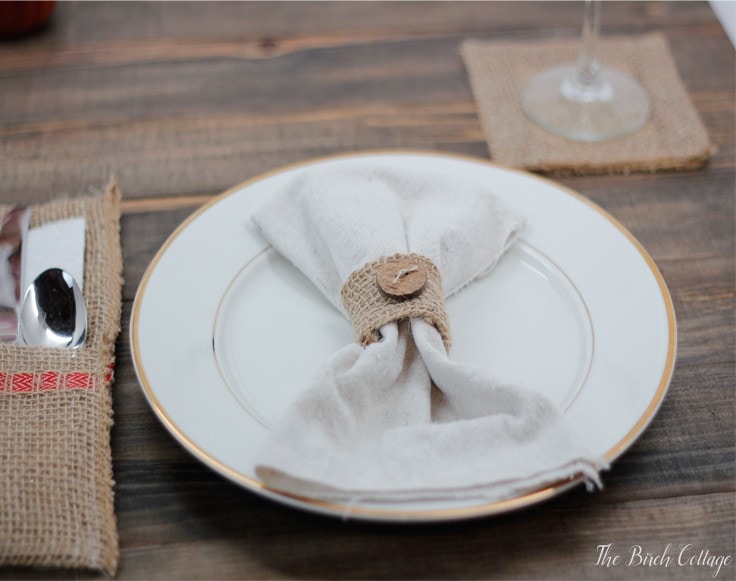
Burlap Napkin Rings
Besides the Loopy Burlap Flowers, I also share a tutorial using burlap ribbon for Burlap Napkin Rings. Again, another easy project that adds another touch of rustic charm to your tablescape.
Burlap Project Ideas
If you like burlap or are looking for burlap inspiration, then you’ve come to the right place! There are all kinds of burlap ideas right here on Ideas for the Home by Kenarry®. In fact, I think we could probably even credit Kenarry for the beautiful burlap wreath craze.
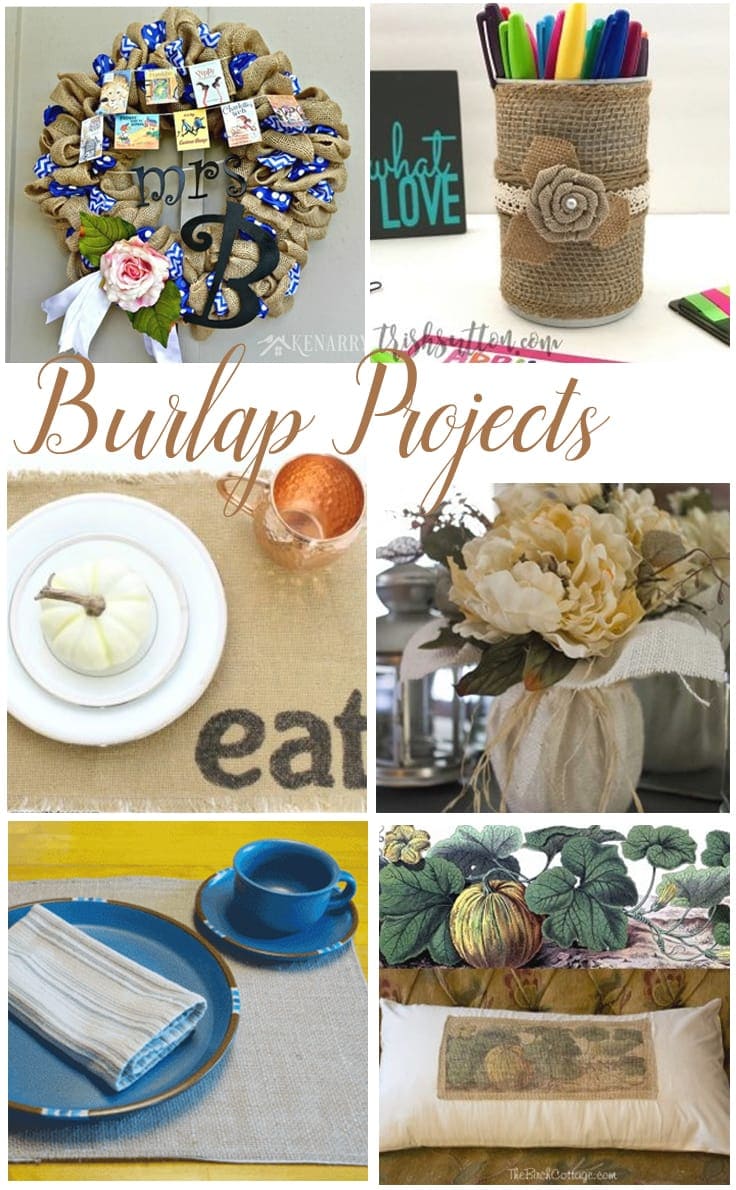
Before I share today’s Burlap Utensil Holder tutorial with you, I wanted to take a moment to share with you some of my favorite burlap project tutorials on Kenarry. You can start by checking out my favorite burlap wreath.
There are even two easy burlap placemat tutorials. The first is an easy to sew tutorial and the second gets a little more fun with permanent markers. Or how about making your own burlap floral centerpiece or this simple upcycled can burlap and lace vase?
Get our e-book The Ultimate Guide to Making a Burlap Wreath when you subscribe to be an Idea Insider. It’s totally FREE!
Your privacy is important to us. We promise not to spam you or share your information. You can opt-out at any time. See our privacy policy for more information.
How to Make a Burlap Utensil Holder
I made my burlap utensil holder using my sewing machine, but you could totally make this a no-sew project by using Tacky Glue instead of a sewing machine or sew the project together by hand with a needle and thread.
I’ll provide the directions for using a sewing machine since that’s how I made my burlap utensil holders.
Supplies for Burlap Utensil Holder:
- Burlap Ribbon – 5” x 30″
- Tacky Glue
- Button – 1-3/4”
- Twine – 4” long
- Ribbon – 7” long
- Darning Needle
- Sewing Machine (optional)
Instructions for Burlap Utensil Holder:
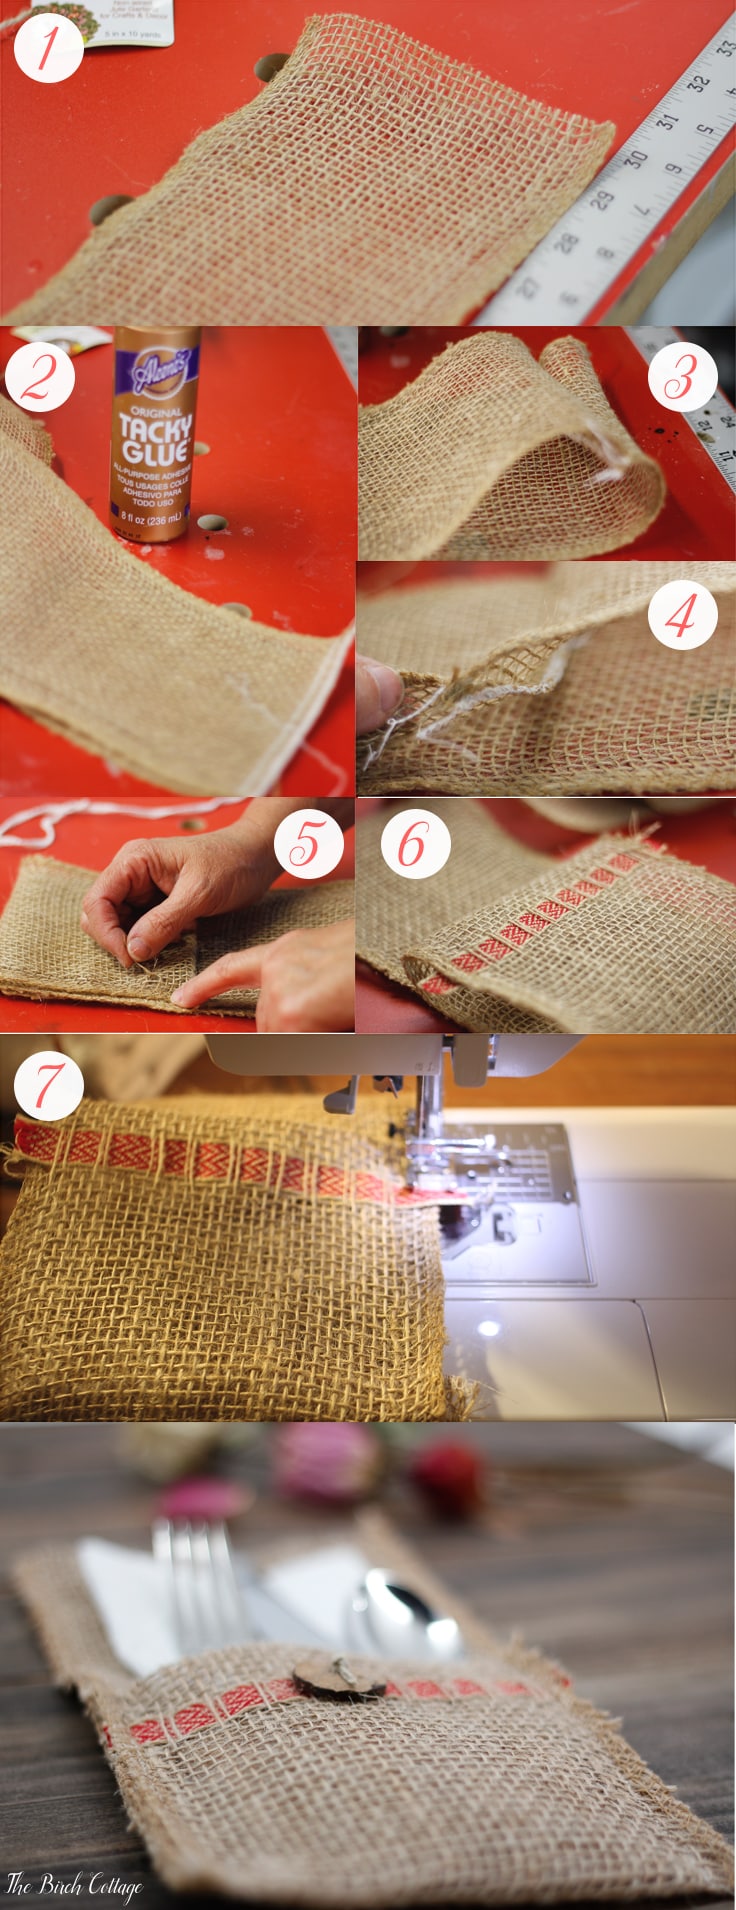
- Cut a 5” wide ribbon of burlap 30” long.
- Serge, sew or glue the short ends together.
- Turn the ribbon so the seam is on the inside of the loop of burlap ribbon.
- Lay the loop of ribbon out so that the seam is 5″ from one end. You’ll want the seam to fold towards the shorter end of the loop and fold up the top and bottom layer of the ribbon along the seam line. This will form the pocket for the utensils.
- Approximately 1″ from the top of the pocket, pull out enough strands of the burlap (the short 5″ strands) so that you can weave your ribbon through the burlap. I removed 3 strands for my ribbon.
- Cut a piece of ribbon 7” long. Weave the ribbon over and under every 2 strands of burlap. Make sure each end extends past the edge of the burlap. For the best results, you’ll want to tuck in or wrap around the ends of the ribbon between the first two layers of burlap ribbon.
- Stitch the long edges of the burlap, taking up 1/4” seam allowance. Be sure to catch the ends of the ribbon as you stitch the side seams.
- Cut a piece of twine 4” long. Thread twine through darning needle. Insert darning needle through front of button hole, through the burlap front pocket and back through the burlap and the other eye of the button. Tie a knot on the top of the button. Trim twine edges to desired length.
I made my burlap utensil holder using a sewing machine, but you could definitely make this project using Tacky Glue or hand sewing with a needle and thread.
Add Buttons for Rustic Charm
I know I said the napkin rings added the perfect touch of rustic glam to your tablescape, but don’t you think these utensil holders take that perfection up a notch? I used the same button on my burlap utensil holder as I did the napkin rings. The buttons are actually made of coconut shell and you can order them here.
If you have any questions about this burlap ribbon or this Burlap Utensil Holder project or, better yet, if you happen to make any of these burlap projects, please let me know as I’d absolutely love to hear about it!
More DIY Projects
If you’ve enjoyed this burlap utensil holder tutorial, you might like to browse some of these other DIY projects that I’ve shared here on Kenarry, like this Easy Sew Burlap Placemat! And, be sure to check out some of my DIY projects on The Birch Cottage blog, like:
Crunchy Stitch Crochet Dishcloth
Originally published April 2017. Updated April 2018.
Love the ideas you see here on Ideas for the Home by Kenarry®? Subscribe today to get our FREE DIY & Craft Planning Calendar, plus our weekly Ideas in Your Inbox newsletter filled with creative tips and exclusive offers!
What’s Next?
While you’re here, be sure to check out other burlap projects on Ideas for the Home by Kenarry® –
One Comment