How To Make Coasters From Ceramic Tiles
THIS POST MAY CONTAIN AFFILIATE LINKS. PLEASE SEE OUR FULL DISCLOSURE POLICY FOR DETAILS.
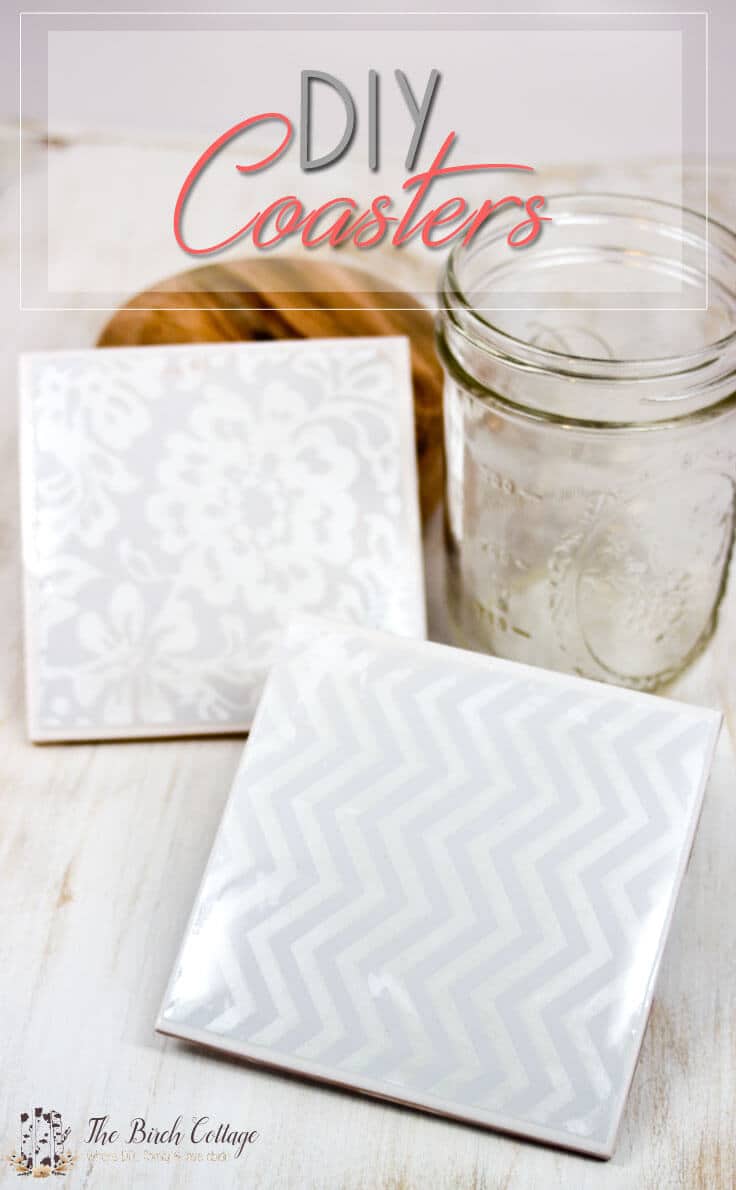
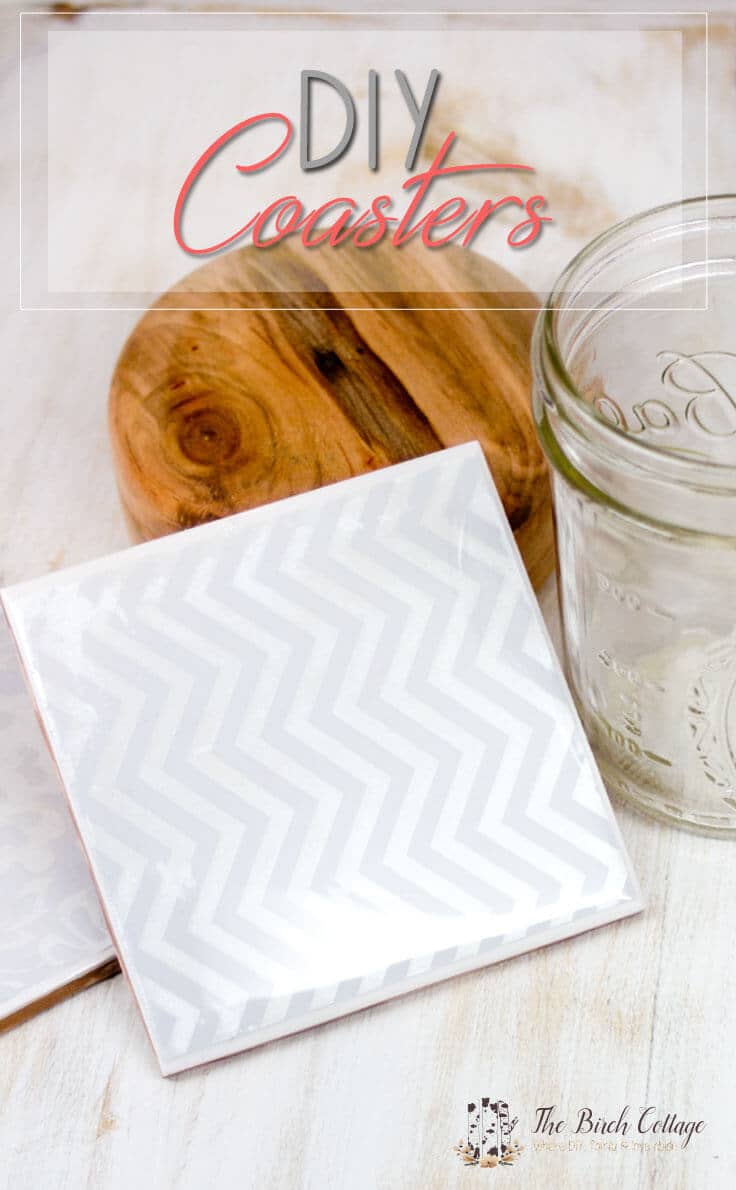
This tutorial on how to make coasters from ceramic tiles is super easy. DIY ceramic tiles make the perfect handmade gift! You only need a few things.
Learn how to make coasters with just a few items you can find at your local craft store.
Want more ideas like this? Subscribe today to get our weekly Ideas in Your Inbox newsletter plus other exclusive gifts and offers — all for FREE!
Tiles Make the Best Coasters
Hello, Ideas for the Home by Kenarry® friends! I’m Pam from The Birch Cottage and I’m so grateful to be back again this month to share with you how to make coasters from ceramic tiles.
As I was planning what to share with you this month, I had a few ideas, but finally decided to share this DIY project on how to make coasters from ceramic tiles. This is a project that you can easily customize to fit your personal taste and it’s a great handmade gift idea, too.
DIY Coasters Make A Perfect Handmade Gift
Spring and summer are busy times for families. Between Easter, weddings, birthdays, family reunions, Independence Day – well, I’m sure I don’t need to tell you how busy we get during the spring and summer months with all the different family activities.
So, I wanted to share a project with you this month that might help you with your gift giving ideas. These DIY Coasters would make for a great gift for just about any occasion.
DIY Coaster Ideas
There are a lot of different materials that you could use to decorate your coasters and a lot of different themes. Here are a few ideas and themes I put together for you:
- Scrapbook Paper
- Wrapping Paper
- Comic Books
- Adult Coloring Book Pages
- Pages from Old Books
- Pages from Favorite Books (Harry Potter comes to mind)
- Family Photos
- Printed Graphics
- Wallpaper
- Maps
- Monograms
- Paper Doilies
- Cricut or Silhouette Designs
- Favorite Soda, Wine or Beverage Labels
- Seasonal
- Important Dates
DIY Coaster Themes
Before you start making your drink coasters, decide on a theme. That will help with your creativity. Here are some popular theme ideas:
- Super Hero – Use clippings from comic books or from images you find online.
- House Warming – Use modern chevron scrapbook paper and pair the coasters with a gift basket of goodies.
- Wedding – Use monograms or wedding date.
- Wine – Use wine bottle labels and pair with a bottle of wine.
- Travel – Use old map images from old maps or map images online.
- Family Reunion – Use old family photographs.
- Independence Day – Use red, white and blue themed paper or old images of Uncle Sam.
- Christmas – Print out your favorite scriptures or pictures of holly, poinsettia, snowflakes or wreaths.
Again, the ideas could go on and on. But, hopefully, these ideas will help to get you thinking about putting your creativity to work on your DIY Coaster projects.
And here’s a great hint: it really is easier to make up a bunch of these coasters at a time. You’ll save time and be way ahead of the game for your gift giving! So, without further ado, here’s how to make coasters from ceramic tiles.
How to Make Coasters from Ceramic Tiles
Disclosure: This blog post contains affiliate links for products or services we think you’ll like. This means if you make a purchase from one of these links, Ideas for the Home by Kenarry® will make a small commission at no additional cost to you so we can keep the great ideas for the home coming your way. All opinions expressed are derived from personal experience.
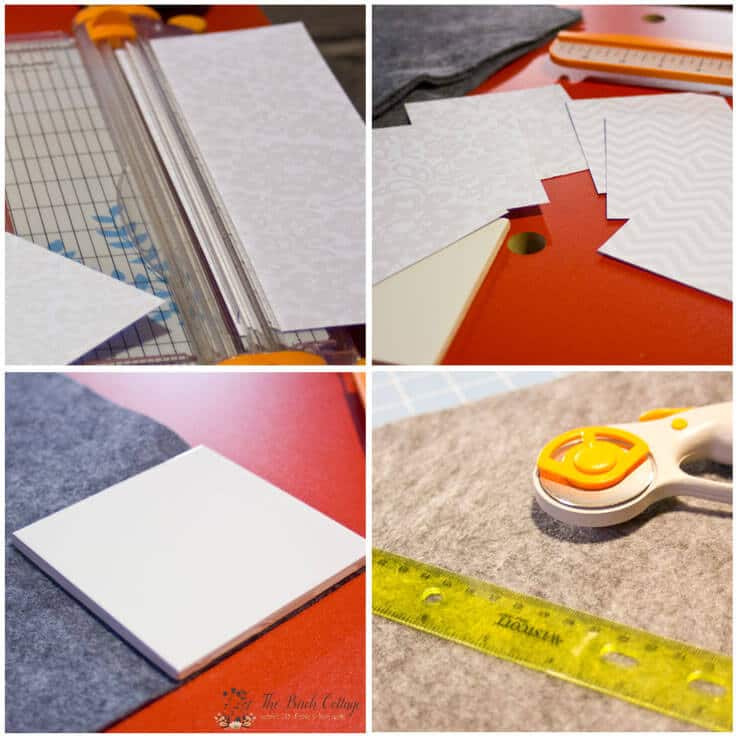
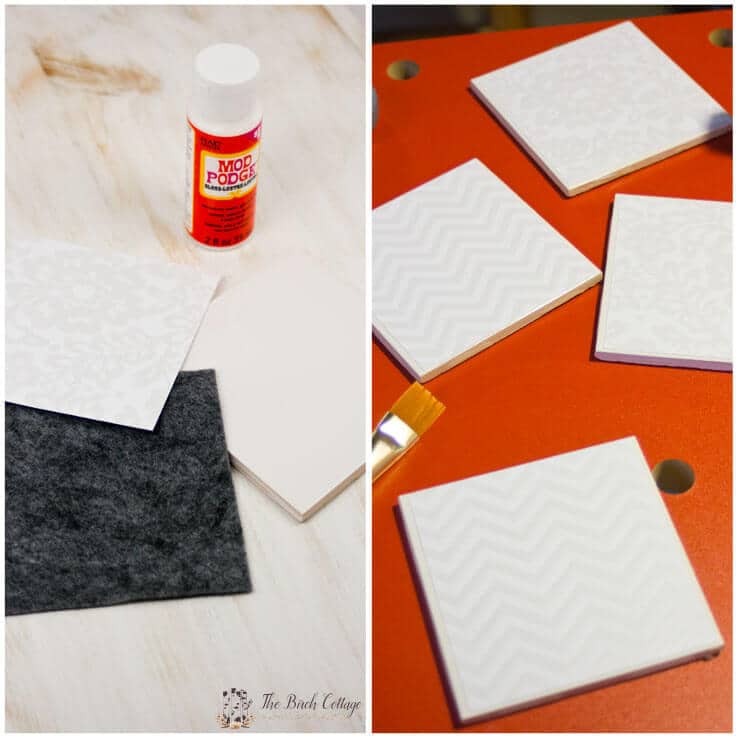
Supplies:
- 4″x4″ ceramic tiles
- Scrapbook paper, cut into 4″x4″ squares (one for each coaster)
- Paper Cutter
- Felt
- Mod Podge or Craft Glue
- Small paint brush
- Craft Glue
- Scissors
- Sealant (I used EnviroTex Lite’s Pour-On High Gloss Finish)
Instructions:
- Gather your supplies.
- Make sure your tile is free of dust and dirt. (I gave mine a quick wipe-down with rubbing alcohol. The alcohol dries super fast.)
- Cut scrapbook paper (book pages, wrapping paper – whatever you’re using to decorate your tile coasters) into 4″ x 4″ squares.
- Cut felt into 4″x4″ squares.
- Apply Mod Podge to the ceramic tile using a small paintbrush or sponge brush.
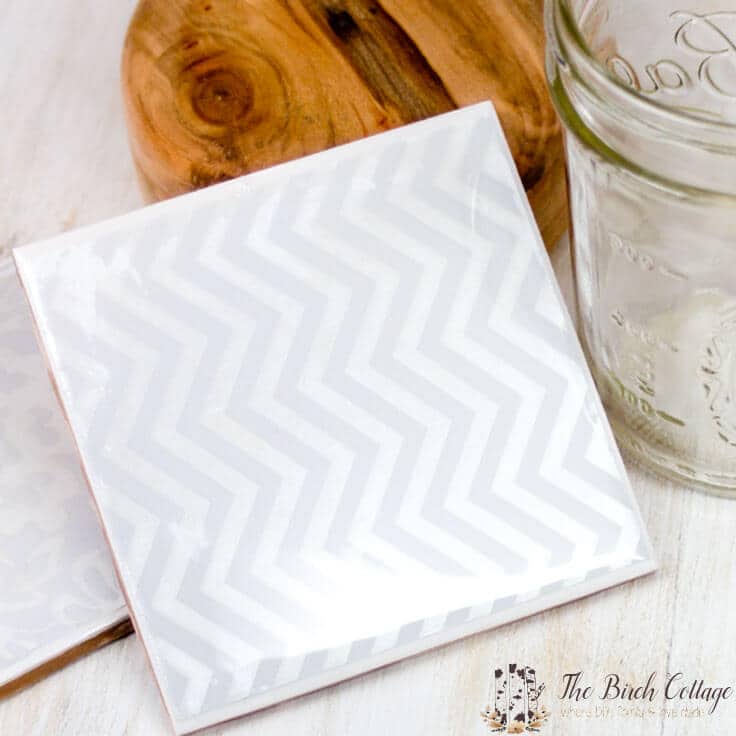
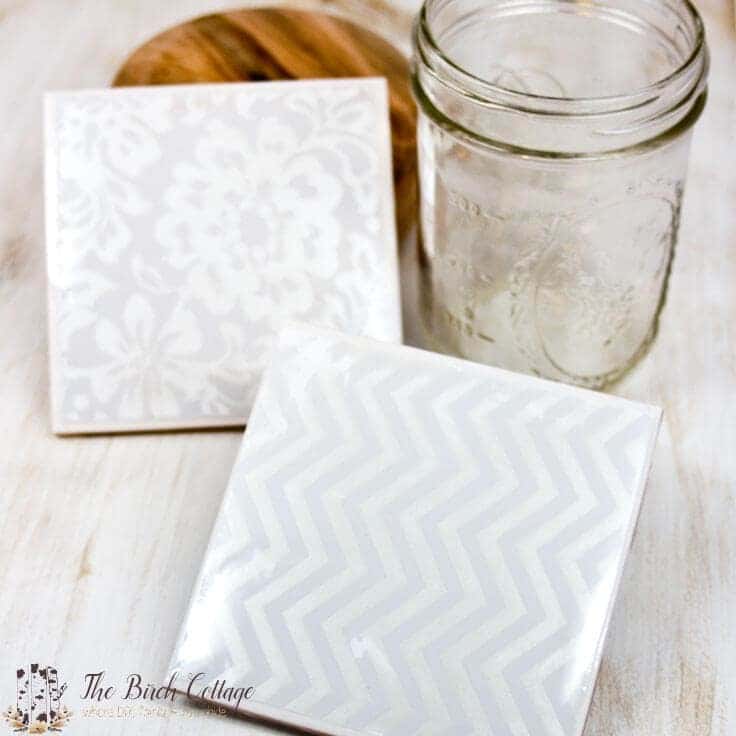
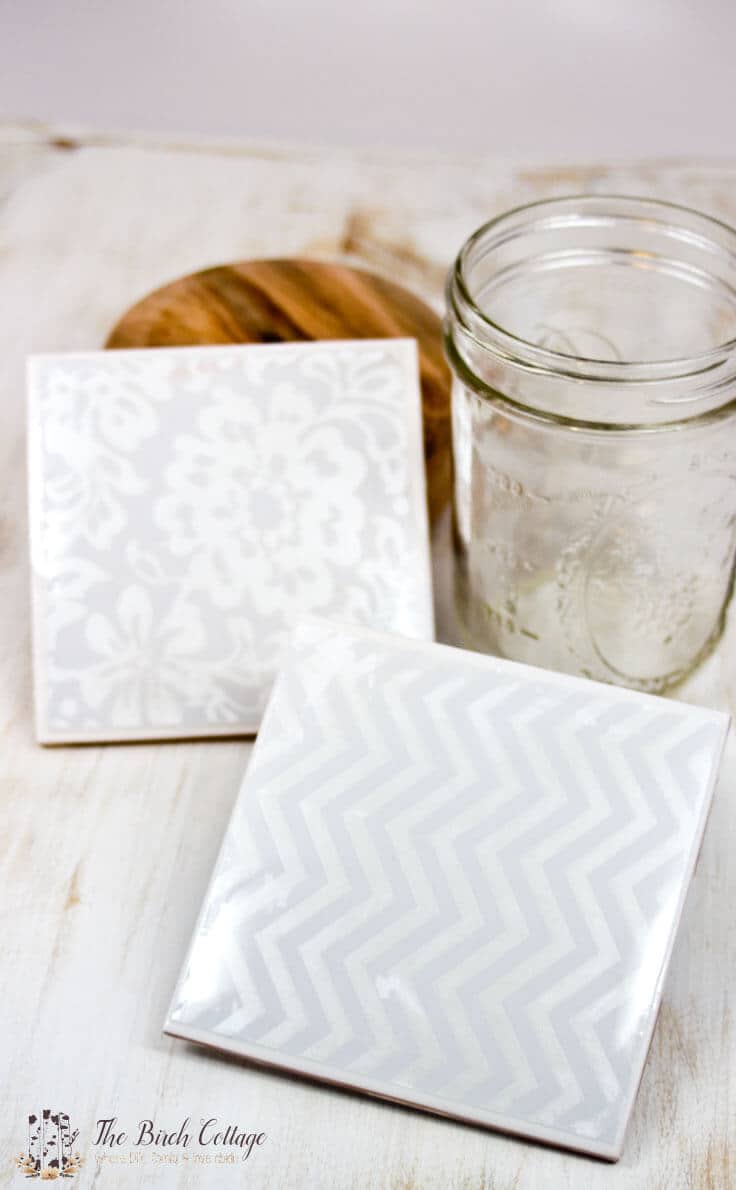
- Place scrapbook paper on the center of the tile and smooth in place using your fingers. (Allow time for the Mod Podge to dry before applying the sealant.)
- Apply sealant according to package instructions.
- Once the sealant is completely dry, apply glue to the back of the tile along the raised lines and press felt square onto the back of the tile. Place a book or something somewhat heavy on top of the tile and allow the glued felt to dry. Be sure not to use so much glue that it seeps through the felt or oozes out the edges.
Measure your tiles first
You know those 4″x4″ tiles? They aren’t really 4″x4″. Kind of like when you by 2″x4″ lumber. It’s not really 2″ by 4″. It’s really more reliably 1-1/2″ x 3-1/2″. So, what size are 4″x4″ tiles really? Honestly, it varies, but my 4×4 tiles were actually 4-1/4″ x 4-1/4″.
So, it’s a really good idea to measure your tiles and then cut your paper and felt accordingly. By accordingly, I mean you’ll probably want your paper and the felt to be a little bit smaller than the actual tiles.
How to Make Tile Coasters Waterproof
You’ll also want to make your coasters waterproof. I chose to use the EnviroTex Lite because it has such a beautiful, professional and almost glass-like finish. (The finish is so glass-like, that I had a hard time photographing the finished coasters without capturing the glass glare!)
It can actually be used on almost any type of surface: glass, ceramic and wood. The finish is heat and alcohol resistant and completely waterproof.
Although there are also spray sealants, the EnviroTex works so well, I haven’t even tried the spray sealants. If you try or have tried a spray sealant to make your coasters from ceramic tiles, I’d love to hear how it worked for you.
Make Harry Potter Drink Coasters
Our daughter Morgan is a huge Harry Potter fan. In fact, she recently got a kitten and has named him Sirius. I found a really cool Harry Potter-ish font online and made her a customized food dish for Sirius with my Cricut (you can read about it here).
I’m also thinking about making her some coasters using pages from an old Harry Potter book as an Easter present (her birthday is just too far away).
Our son Brandon is a superhero fan, so I’m thinking about making him a set of coasters with Flash, Green Lantern, Batman and Supergirl (for his wife). Our daughter Heather loves Elvis, so I think I’ll make her some coasters with an Elvis theme. You see, once you start, the ideas just keep rolling.
Frequently Asked Questions
If you don’t have extra tiles, you can always use wood. No matter what you use, always waterproof it so the condensation from your glass doesn’t damage it.
I like to leave my coasters out in a little pile on my side table or coffee table. But you can also buy or build a coaster holder.
You can easily sand down the edges of your tile to make it not as sharp. But an even easier solution is to add corner bumper guards to them. These are usually put on tables but they work great for coasters too.
More DIY Projects
Well, I’ve certainly enjoyed our little time together this month! If you’ve enjoyed this tutorial on how to make coasters from ceramic tiles, you might like to browse some of these other DIY projects from The Birch Cottage blog:
How to Make Gift Bags from Wrapping Paper
Love the ideas you see here on Ideas for the Home by Kenarry®? Subscribe today to get our FREE DIY & Craft Planning Calendar, plus our weekly Ideas in Your Inbox newsletter filled with creative tips and exclusive offers!
What’s next?
Looking for more DIY Coasters? Check out a few other projects on Ideas for the Home by Kenarry® –
- Quick and Easy Dollar Store Glass Gem Coasters
- Kintsugi Style Coasters
- Quick and Easy Hand Lettered Drink Coasters
Orginially published on March 14, 2015. Updated on March March 14, 2018.
Thanks for sharing this. Coasters are essentially a necessity for any wooden surface it seems, so personalizing some small tiles to be coasters would make a great gift for nearly anyone. Worst case, it could potentially promote better homecare habits in whomever you gift them too.
John, we wholeheartedly agree. Coasters are a definitely necessity!
Thank you . Hope to get many ideas. I have many tiles left from an old remodel. Interested in making coasters for hot foods. You used to be able to purchase a wire frame and make large coasters for hot food.?
Hi Anna,
I think you still can! Just search on line for “trivet holder” or better yet “trivet frame” and I believe you’ll find what you’re looking for! I would also think you could just put small felt feet on the bottom of a ceramic tile and use it directly as is — similar to this tutorial for how to make a cutting board from ceramic tile. Good luck with your project and happy crafting!
Best wishes,
Carrie
Approximately how many coasters can you make with one container of Mod Podge? Thanks for all the tips!
That’s a great question, Emily! I’m not sure, but I’ll ask Pam from The Birch Cottage to see if she knows. A little Mod Podge goes along way though so I bet you can make quite a number of them from one container.
Oh my! You could probably make 100 coasters from one container of Mod Podge!
Thanks, Carrie, I’m so glad I stumbled onto your site! It looks like it will be great creative fun for me…I’m interested in making tile coasters that I first paint, then next add a quote I like. I thought I would have to find small vinyl stick on letters but that has presented quite a challenge! ( I don’t have a machine to cut my own…) So I’m thinking that writing on the tile is the best idea, but how do I keep the ink from ‘running’ when I apply a sealer over the top of the tile? Can you give me some guidance?
Hi Peggy,
That’s a great question! I passed it along to Pam from The Birch Cottage who wrote this post to see if she has any insight. Personally, I’d try using a oil based paint pen for the lettering rather than a marker or ink pen to do the lettering. This ought to prevent the bleeding when you apply the sealant. Or I’d use acrylic craft paint and do the lettering with a brush. I’d do just one first and make sure I liked the how it turned out before making the rest of the coasters.
Let us know how your coasters turn out! I’d love to see a photo when you’re done.
Happy crafting,
Carrie
Hi, Peggy. Boy, you ask tough questions! I actually have no experience writing or painting on the tiles. I did a quick search online and came across this great blog post that discusses this exact issue: https://dsmartin.wordpress.com/2014/02/25/sharpies-on-ceramics-part-ii-good-news/
EnviroTex also has a blog called “Resin Crafts Blog”. I’m actually friends with the fantastic young lady who runs the blog and I know she’d be glad to answer your questions or help you find the answers to your questions.
I have seen people use acrylic paint and even nail polish to create some fun coasters. I have to admit, you’ve got me curious! I may have to purchase a few tiles and do some testing of my own. I’d really recommend you read that article I mention above and then, like Carrie said, do some testing. I’d love to hear about your results, so be sure to let us know how it goes!
Hi Peggy,
We were so intrigued by your project we shared the dilemma with our Kenarry Creative team to see if anyone else had ideas for you.
Meaghan from Cook. Craft. Love. suggested “She can print a photo of the image and quote she wants and do it that way with some mod podge. I made coasters like this for my grandparents a few years ago. Mod podge the back of the photo and stick it to the clean tile, pressing firmly with a cloth. Then mod podge the front and sides. And I used homemade mod podge too! 50/50 ratio of white glue and water!”
Hope these ideas help! We can’t wait to see how your coasters turn out!
Best wishes,
Carrie from Ideas for the Home by Kenarry®
Fun idea, Peggy! Have you tried Sharpies? They work well on ceramic mugs and should work great on tiles. Then you can spray them with acrylic sealer. We’d love to hear how they turn out!
J&K
Edit: We just clicked on Pam’s link above and it’s all about Sharpies on ceramic! Great find Pam!
Just wondering if these coasters actually work at keeping moisture off the wood surface. It always seems to me that when I put a glass on a coaster that has a smooth surface the condensation seems to roll off the surface and collects around the bottom of the coaster defeating the purpose of the coaster. The water leaves a ring the shape of the coaster instead of the shape of the glass. Any suggestions? Thank you.
Hi Karen,
That definitely depends on how much condensation is on the glass which usually correlates to how much ice you put in your drinks and the air temperature in the room. If you experience a lot of condensation on your glassware, one of these other DIY coaster projects might be a better fit for you:
Another option would be to stencil or paint a design on more of a porous tile. A porous tile will absorb more of the moisture. I’d use a gloss enamel paint and make sure you let the paint cure well before setting a drink on it. Curing gloss enamel paint usually takes 21 days unless you bake it in the oven like I do with these hand painted wine glasses.
Hope that helps! Good luck with your project and happy crafting!
Best wishes,
Carrie from Ideas for the Home by Kenarry®
Hi. I’ve found a beautiful pattern on fabric that I want on the coaster. Is there a way I can use the fabric for the tile coaster? I was going to test try one first but if you have any tips or somethings you just know won’t work, please let me know. Thank you.
Hi Tina, I think you can definitely use fabric on coasters like this. Here’s a tutorial for how to decoupage with fabric that might give you some tips. This tutorial uses a wooden birdhouse, but I think the same technique/idea would work on tile coasters. Earlier this week we also shared a tutorial for how to make flannel coasters that you might like too. The flannel ones are more lightweight fabric type coasters, but that idea might work with your fabric as well? Either way, I’d try it with one coaster first as a tester and then if you like how that one turns out make the rest.
Would you do me a favor and please circle back and let us know how your coasters turn out and what you learned in this process? I think that would be helpful to other readers who want to try this with fabric too. And if you want to e-mail me some photos at id***@*****ry.com that I can attach to your comment/tips that would be awesome!
Good luck and happy crafting!
Best wishes,
Carrie
Ideas for the Home by Kenarry®
Carrie gave you some great resources and tips. One thing/thought I might add pertaining to using fabric, just like with the coasters that I made using scrapbook paper, you’ll want to trim your fabric so that it’s a little smaller than the actual coaster. You could “probably” wrap the fabric around the sides, but then you’ll have to do something about the corners. I used some fabric on some coasters I made using this same technique and they turned out perfectly. I also highly recommend the Enviro Tex sealant. It puts a nice high sheen and protective finish on the coasters.
Would love to see pictures of your finished project and anything insightful you learned along the way! Happy crafting!!
Where do you buy your tiles?
Hi Kristen, you can buy tiles like this at any home improvement store or online at Amazon.
I bought my tiles at my local home improvement/hardware store/depot. The tiles come in a variety of sizes, colors and finishes. The tiles I used in this project were a bright white ceramic wall tile. The tiles cost a little more than a dollar a piece (like $1.24). I’m sure prices vary from place to place.
I’ve also tried using natural stone tile. Just a word of caution that it will take more of your sealant because of all the little nooks and crannies. I love the look of the natural stone though. I made some coasters out of just natural stone and topped it with the EnviroTex and some out of the natural stone that I applied a vinyl decal to first (I created the decal using my Cricut machine).
I’m actually making some coasters as Christmas gifts using old vintage maps. Just sharing this with you to tell you that you have a lot of options! Hope this helps!
I have never used the Envirotex Pour-on high gloss finish. Is it easy to use? Is there a better way to pour it on so that there is not a lot of waste? I am envisioning it running down the sides of the tile and making a mess. ?.
It is very easy to use! Just a couple of cautions. One, the measuring needs to be measured. No guessing or eyeballing. Make sure you measure exactly. Secondly, you’ll want to use a flat surface. So make sure your tiles are on a flat surface and level before beginning.
Actually, there is very little waste. It sets up pretty quickly and you pour slowly. I have seen some people brush it on, but I have never tried that. Just follow the directions and pour slowly. You may want to use a brush to make sure the sides are covered well. Really, there’s very little waste. There are quite a few YouTube videos as well.
How to Mix:
https://youtu.be/70bOH2j2vvs
Photo coasters:
https://youtu.be/3rK1OBxrERg
Thank you very much for your prompt reply and information. Looking forward to making my coasters. I will be adding them to Christmas gift baskets I am putting together. I printed maps from the states where the recipients were born and used Mod Podge to adhere them to the tiles. Thanks again!
Judy, that sounds fantastic! I’m planning to make a similar set of coasters for my daughter with maps of ports she’s visited with the Navy. They’re gonna love their coasters! Would love to see a picture of them when you’re done!
Hi. I design and print my own fabrics and was wondering if I could use fabric in place of scrapbook papers etc.
Absolutely, Robyn! Just trim the fabric a little shorter than the width of your coasters so you have neat edges and it doesn’t wrap around the sides. Happy crafting!
Hi— I tried the envirotex like you suggested. I love the look of it!!! My coasters were unsuccessful. I think I applied too much because they stuck to the newspaper underneath! Ugh!! Thanks for the suggestion though.
Hi Ashley, I’m so sorry to hear you had trouble with your coasters. Trial and error is definitely how you get better and better at DIY-ing and crafting, so now you know what you’ll do differently next time. Fortunately ceramic tiles like this are fairly inexpensive so I encourage you to give it a try again. Meanwhile, you might be able to remove the stuck newspaper off this batch by scrapping it off with a razor blade? Give that a try and let us know if it helps fix the issue!
Happy crafting!
Best wishes,
Carrie from Ideas for the Home by Kenarry®!
I’m going to be making monogrammed coasters. . Do I apply the sealant after I placed the monogram on the coaster or before?
Great question, Irene! You apply the sealant after you’ve decorated your tile with the paper or vinyl monogram.
Best wishes,
Carrie from Ideas for the Home by Kenarry®
Is it necessary to sand the tile before collaging it if using glazed tiles?
Hi, Kelly! What a great question! My husband actually wondered the same thing. But, guess what? It’s totally not necessary to sand the tiles first. The Mod Podge does a great job of applying and holding the paper or fabric material in place. Also, if you’re using vinyl, it adheres really well.
Good luck with your ceramic tile project! Please be sure to share your results with us! If you share a picture on social media, please use the hashtag #ideasforthehome and #ahandmadehome so we can celebrate and share your results.
Happy crafting!
Pam from The Birch Cottage
I see your respose to how many coastersthe mod podge will utilize, but how many coasters will the sealant cover?
Hi Amber,
Great question! The directions on the EnviroTex Sealer say “16-Ounce kit covers approximately 4 square feet at 1/16-Ounce”. There are approx. 9 square 4 inch tiles then per square foot. So if my math is right you could cover approx. 144 tiles with 1 coat of the 16 oz EnvironTex.
Happy crafting!
Best wishes,
Carrie
Can your brush the sealant on instead of pouring it.
Hi, Rick.
According to the manufacturer’s instructions, you should NOT use a brush with EnviroTex Lite. It is a pour-on product. You see, there is a chemical reaction when you mix the polymer compound and it literally starts setting within a couple of minutes.
Plus, if you were to use a brush, I would imagine it would leave streaks in the resin and your brush would quickly harden. Definitely not a good idea!
One of the magical things about this pour-on resin is the super smooth, glass-like finish.
Thanks for inquiring! Let us know if you have more questions! Good luck with your project!
Pam Baker
The Birch Cottage
For Ideas for the Home by Kenarry®
Where do you source your tiles from? All I can find are bathroom tiles which are glazed. Is this ok? Or do they need to be unglazed?
Hi, Kate! That is a great question! I bought my tiles from my local Home Depot and they were the glazed tiles. However, I have used the natural stone tiles and those work well, too.
I hope this helps! Please let us know how your project goes!
Sincerely,
Pam Baker
The Birch Cottage
Hello! I am looking to make a trivet. Do you think this sealant will hold up against the heat of pans?
Thank you!
Rose, thank you for your inquiry. I did a little bit of research and discovered that although EnviroTex Lite is “heat resistant”, it should not be exposed intentionally to hot objects such. Based on that information, I would not recommend using this product to make trivets that will come into contact with hot pots, pans or bakeware.
I also found this great article where they used an automotive type acrylic spray sealant. You’ll find it here: https://acrylicpouring.com/best-heat-resistant-sealant-for-tiles-and-coasters/
I hope this helps!
If you find something that works, we’d love to hear about it!
Pam Baker
The Birch Cottage
Hi,
I tried this and the coasters never set. I measured the sealant exactly and it remained tacky and never hardened. I tried to do this project in Western Washington in early December in time for Christmas time. I would recommend that you let people that live in humid, cold climates know that this is a summer, dry climate project, or else they need to use a different type of sealant or resin. I spent a lot of money on the materials only to have a bunch of sticky, useless coasters and a completely ruined piece of plywood from the massive amounts of spilled sealant.
Dee,
Thank you for reaching out to Ideas for the Home by Kenarry concerning your ceramic tile coasters project. We were very sorry to hear that you had such unfavorable results with this project. I’m sure it was beyond frustrating.
I would suggest, if you haven’t already, that you reach out to the manufacturer of Envirotex Lite®, Environmental Technology, Inc. (ETI), and share your experience with them. They should be able to provide insight, expertise and even recommendations that would help you be successful with this project considering your climate. Here is the contact information I was able to find for ETI:
Website at: https://www.eti-usa.com/contact
Email: ms******@*****sa.com
Phone: 1-800-368-9323
Again, we are sorry for all your frustration and disappointment. I wish there was more we could do, but I do believe that reaching out to the manufacturer is the appropriate step. Please feel free to share any insight or additional manufacturer recommendations with us.
By the way, if you’re interested in learning more about the possibilities with this product. ETI also has a blog called Resin Crafts. You can find it here: https://resincraftsblog.com/. There are tons of projects, tips and even a FAQ page. But, first, be sure to make contact with ETI Customer Service and give them an opportunity to assist you!
Sincerely,
Pam Baker
The Birch Cottage
On printed paper and colored ink images, how do you keep the colors from bleeding /smearing when using modge podge or modge modge waterproof sealant on top?
T, that is a great question and an issue I haven’t run into. Are you asking this question because you’ve experienced an issue with colors bleeding and smearing or are you just wondering how to prevent it, just in case?
I think there are really two issues here because you’re talking about two different mediums: printed paper and colored ink images.
I’ve made coasters out of our granddaughters artwork before and didn’t have any problem with bleed. But, I have to admit, you got me to thinking and wondering, so I did a little research and here are the tips I recommend:
> If you are using anything that was printed using an inkjet printer or has ink on the paper, you’ll want to use a clear acrylic sealer BEFORE using the Mod Podge. Instructions I found said to spray a thin coat of the clear acrylic sealer and allow to completely dry. Then, apply Mod Podge to the front of the paper and allow to dry. Then apply Mod Podge to the back of the paper and allow to dry. Then continue with your project.
> As far as colored photos, you’ll simply want to apply a thin coat of Mod Podge to both sides of the photo. Apply to the front and allow to completely dry and then apply to the back.
Also, you’ll find a wealth of information, tips and tricks on Mod Podge Rocks Blog. (https://modpodgerocksblog.com/is-mod-podge-waterproof/)
I hope this was helpful. Please let us know how your project turns out and if you have any insight to share with us and our readers!
Best of luck with your craft project!
Pam Baker
The Birch Cottage
So mod podge on tile then photo. My question is did you then apply coats of mod podge ontop of the photo as well and then the envirotex. Or did you just pour on envirotex.
Others sites said they applied a glossy mod podge on top then the envirotex. But I don’t like the look it gives to the photo so was seeing what you do.
Thanks
Hi, Bethany! Thanks for reaching out to us with your questions. I used Mod Podge to adhere the photos to the tiles. You could also simply use craft glue or a glue stick (although I haven’t tried those methods). I did NOT apply Mod Podge to the top of my photos or paper.
However, I have had an issue with some of the white cardstock yellowing with time. I’m wondering if the Mod Podge might prevent the yellowing. I haven’t tried this yet.
They do make different formulas, such as glossy and matte, of the Mod Podge. I wish I could be of more help. You could, of course, post a question on the http://www.resincraftsblog.com website. (Which is the Envirotex blog.)
If you don’t mind, please let us know what you decide and how it turns out. Good luck!!
Pam Baker
The Birch Cottage
Hi! Per your recommendation, I purchase environtex lite and am ready to make my tiles. But I just read that it should never be used on white surfaces even if they are coated first with something like mod podge. Did the tiles in your pictures yellow at all over time? Thanks for your help. I’d rather redo the tiles with darker paper than waste a bunch of this environtex and ruin the project.
-sharon
Hi Sharon. That is a great question!
I did have some issues with the white paper turning a sort of yellow color after some time. I contacted the manufacturer and was never able to get a solution from them as to what to do to prevent the white paper from yellowing.
I even reached out to the resin crafts blog and no one seem to experience the yellowing like I did. So in a weird kind of way, I am glad to hear that someone else had the same issue.
Since I didn’t have a solution to the yellowing, I have not tried to use white paper in my EnviroTex Lite projects since then.
I hope this helps! Would love to see pictures of your project when you’re finished!
Best of luck!
Pam Baker
The Birch Cottage
Do you think I could use this tile project for around my gas fireplace? I love the idea to use paper and then seal vs hand painting! But not sure the coating on top could handle being so near heat?
Tecie
Hi, Tecie! I now have an official response from ETI on the use of EnviroTex Lite on tiles around your fireplace:
“Our epoxies soften at 130*f and melt at 180*F. Placing the tiles in front of a fireplace is not recommended, epoxy will not hold up to the heat exposure.”
Also, did you see the tutorial on “How to Stencil Faux Tile Around Your Fireplace”? You can find it here: https://kenarry.com/how-to-stencil-faux-tile-fireplace/
Maybe, that will help? Best of luck!
Pam Baker
The Birch Cottage
Hi, Tecie! Thanks for reaching out to Ideas for the Home by Kenarry! I am afraid I do not know the answer to your question. I have, however, contacted ETI and reached out to the Resin Crafts Blog to see if they have any information or recommendations I can share with you. I’ll let you know when I hear back!
I did find this statement:
“Envirotex Lite® is heat resistant, however, it should not be intentionally subjected to high temperatures such as cigarettes, cooking utensils, etc.”
It tends to lean towards not using it around the fireplace, but doesn’t specifically mention that application.
By the way, I did do a quick search online and didn’t find where anyone had used this product around their fireplace.
It’s not looking very promising, but I’ll let you know when I receive official word from ETI (the makers of Envirotex Lite).
Thanks again!
Pam Baker
The Birch Cottage
Thanks for this tutorial! I found some lovely vintage tiles from my grandpa’s house that have such a beautiful blue and white pattern and reminds me of their old bathroom I knew I had to grab the box and make some coasters!
Hi Sami!
That sounds absolutely lovely! Those vintage blue and white patterns are always my favorite – so your coasters must be stunning.
Thanks for following along and checking out our tutorial! What projects are you planning on making next?
– Lisa, Ideas for the Home by Kenarry Customer Care