• About Us
    • Contact Us
    • Work With Us
    • The Creative Team
    • Disclosures
  • Subscribe
  • Shop Our Products
  • My Account
  • Cart
  • Nav Social Menu

    • Facebook
    • Instagram
    • Pinterest
    • Twitter
  • DIY & Decor â–¾
    • Crafts
    • Home Decor
    • Home Improvement
    • Technology
  • Recipes â–¾
    • Breakfast
    • Appetizers
    • Side Dishes
    • Easy Dinner Ideas
    • Slow Cooker
    • Fun Food
    • Desserts
  • Clean/Organize
  • Kid Ideas â–¾
    • Birthdays
    • Castle Playroom
    • Outer Space Bedroom
    • Teacher Appreciation
    • Travel Tips
  • Free Printables
  • Holidays â–¾
    • New Year’s
    • Valentine’s Day
    • St. Patrick’s Day
    • Easter
    • Cinco de Mayo
    • Mother’s Day
    • Memorial Day
    • Father’s Day
    • Independence Day
    • Halloween
    • Thanksgiving
    • Christmas
    • Gift Ideas

Ideas for the Home

You are here: Home / Home Decor Ideas / Outer Space Mural Tutorial for Boys Bedroom

By Carrie Ypma on April 28, 2016 25 Comments

Outer Space Mural Tutorial for Boys Bedroom

Home Decor Ideas· Home Improvement Ideas· Kid Ideas

  • Share
  • Tweet

Continued…

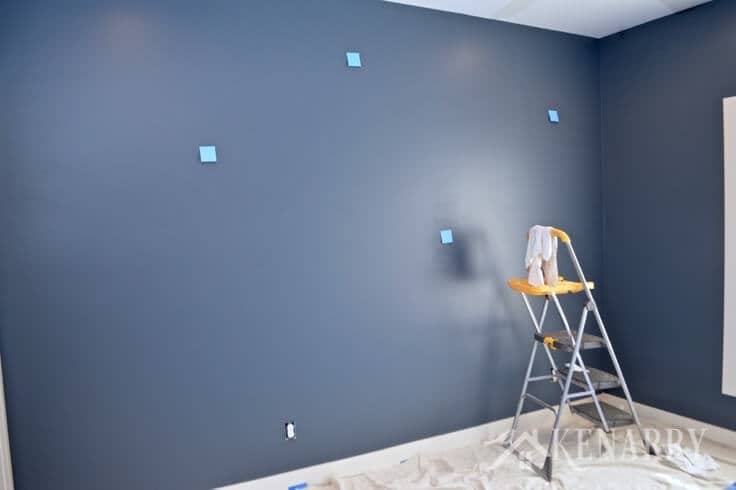
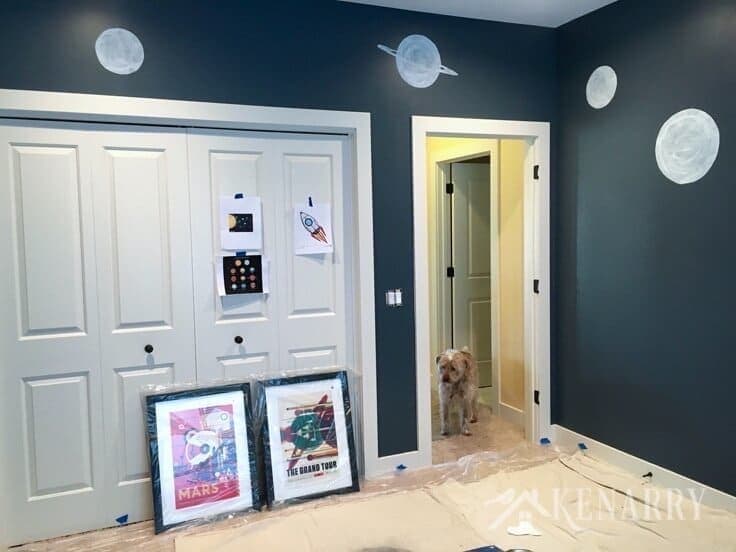
2. Determine where to put the rocket and planets. I knew I wanted the large rocket above my five year old’s bed so that it would be a focal point as you walked in the room. I then walked around the room and placed Post-It Notes on the walls where I thought the eight planets could go. I actually started by marking a few of the locations with pencil, but then realized I couldn’t see the pencil when I stood back. Using Post-It Notes to mark the locations of the planets helped me to see how many I had on each wall and whether they were spaced far enough apart before I actually started painting the outer space mural.

Love this idea for creating an outer space bedroom for boys! This tutorial makes it look easy to paint an outer space mural to decorate walls in your home.

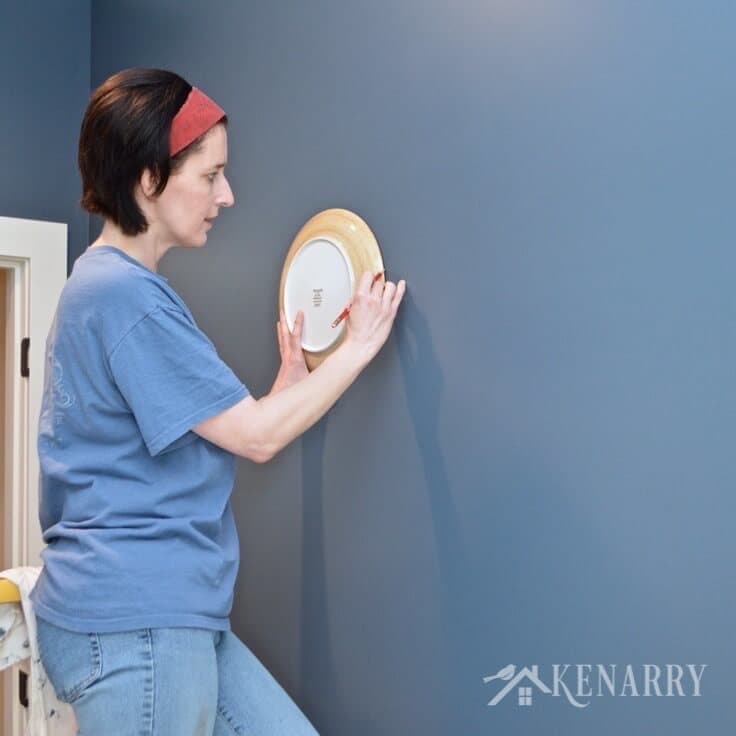
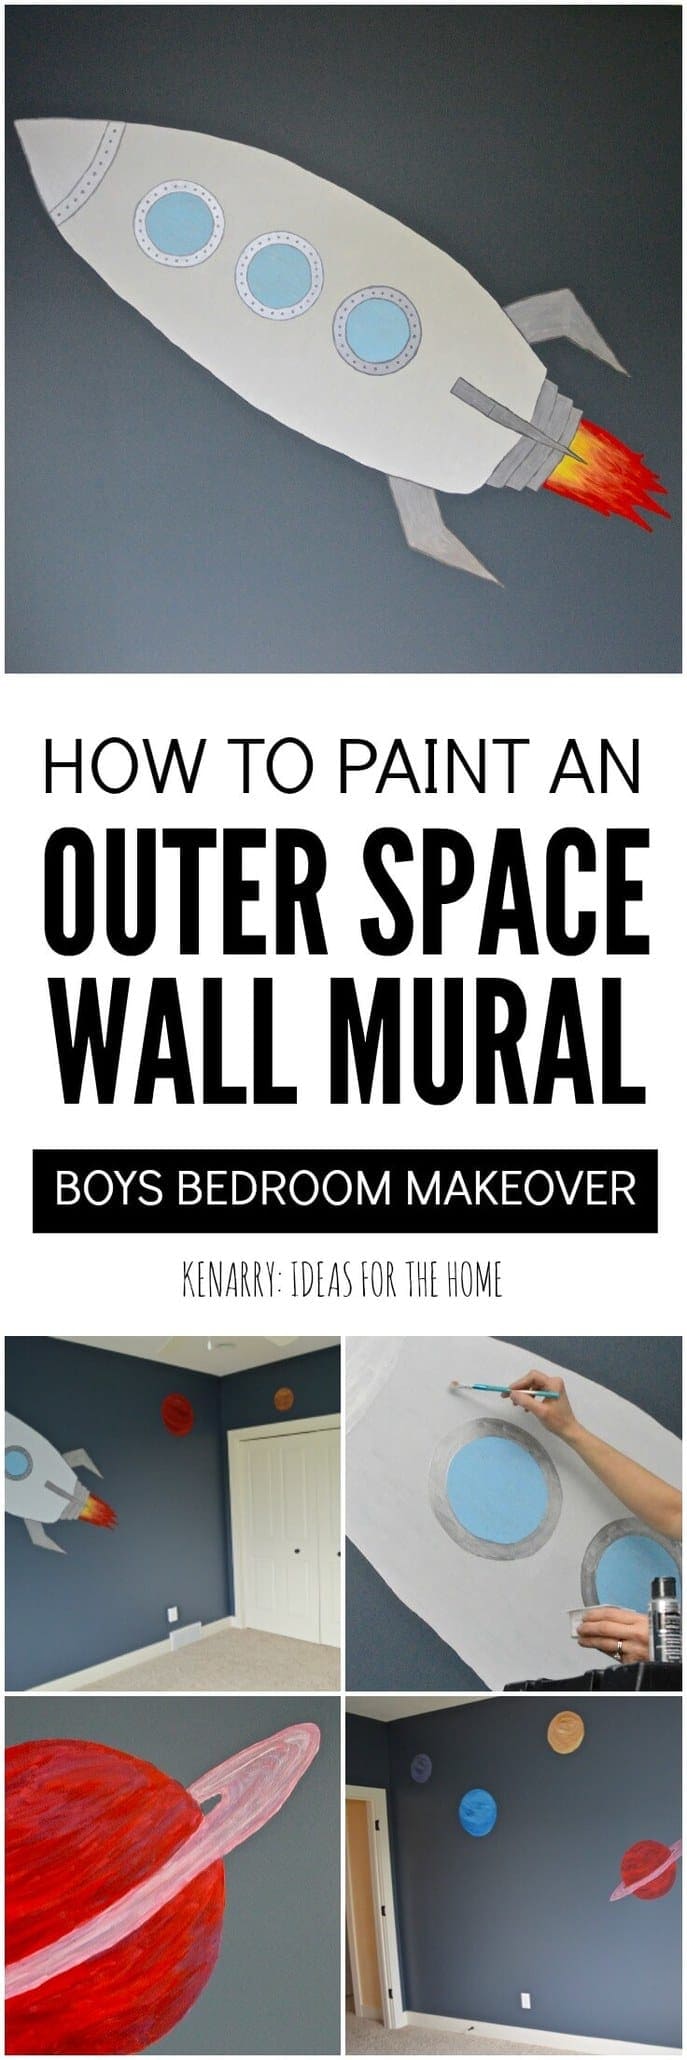
3. Sketch the outer space mural with pencil. For the rocket, I just sketched the outline of it on the wall with pencil. I didn’t worry about the details of the rocket at this point. Next I gathered plates and bowls of various sizes from my kitchen to use as circle templates for the planets. Once I knew where I wanted each of the planets to appear on the walls, I just held different sized plates or bowls up to the wall and traced around them with pencil.

Love this idea for creating an outer space bedroom for boys! This tutorial makes it look easy to paint an outer space mural to decorate walls in your home.

4. Apply primer to the outer space mural. As great as DecoArt Americana Multi-Surface and Dazzling Metallic Paints are, I knew it would be a challenge to paint over top of the dark outer space gray walls. I consulted with my brother who’s a set decorator for a national talk show. He suggested I paint all of the spots for the planets and the rocket with primer before I use the DecoArt Americana Multi-Surface and Dazzling Metallic Paints.

Love this idea for creating an outer space bedroom for boys! This tutorial makes it look easy to paint an outer space mural to decorate walls in your home.

I’m so glad I took his advice. The primer ends up being a neutral base coat so that later the colors of the DecoArt Americana Multi-Surface and Dazzling Metallic Paints can really show up well.

Love this idea for creating an outer space bedroom for boys! This tutorial makes it look easy to paint an outer space mural to decorate walls in your home.

Plus it was really fun to see the planets and rocket start to appear in the “night sky” of the outer space mural. (Our dog, Scruffy, thought so too as he supervised the entire project from the door way.)

Love this idea for creating an outer space bedroom for boys! This tutorial makes it look easy to paint an outer space mural to decorate walls in your home.

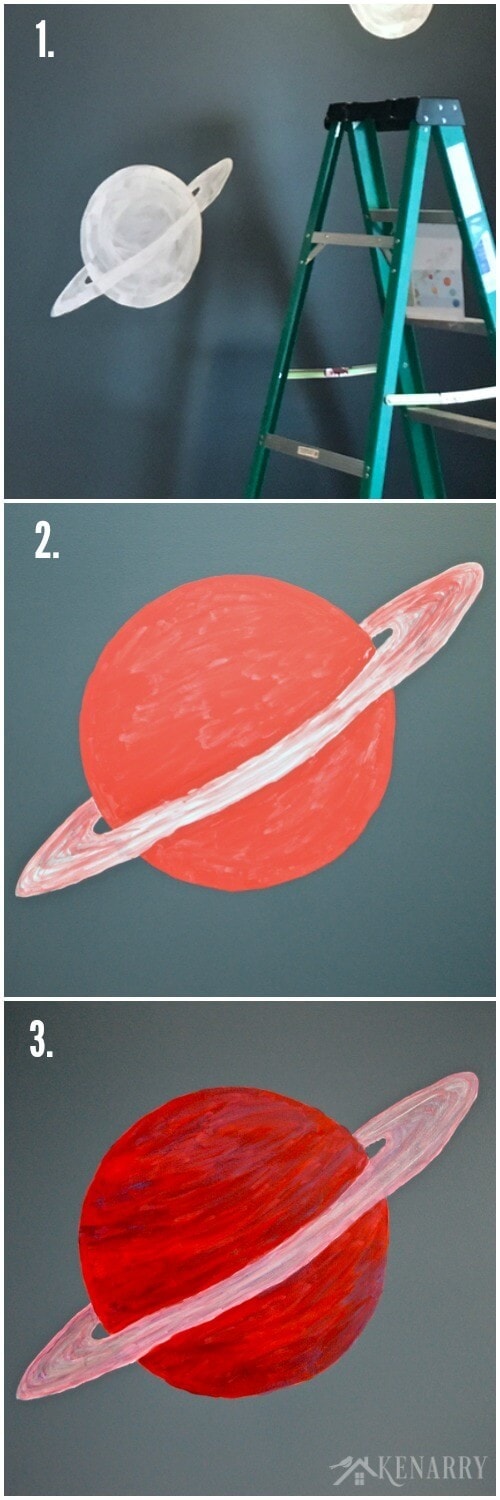
5. Paint the planets. To paint each of the planets, I went through three basic steps. First, I primed them as I mentioned previously. Second, I painted each planet with a different colored foundation using solid DecoArt Americana Multi-Surface Satin Acrylic Paints. I just used the three primary colors of True Blue, Lipstick (red) and Canary (yellow), along with Black Tie and Cotton Ball (white). I mixed combinations of those paints together in small plastic containers to get the colors and shades I wanted.

Love this idea for creating an outer space bedroom for boys! This tutorial makes it look easy to paint an outer space mural to decorate walls in your home.

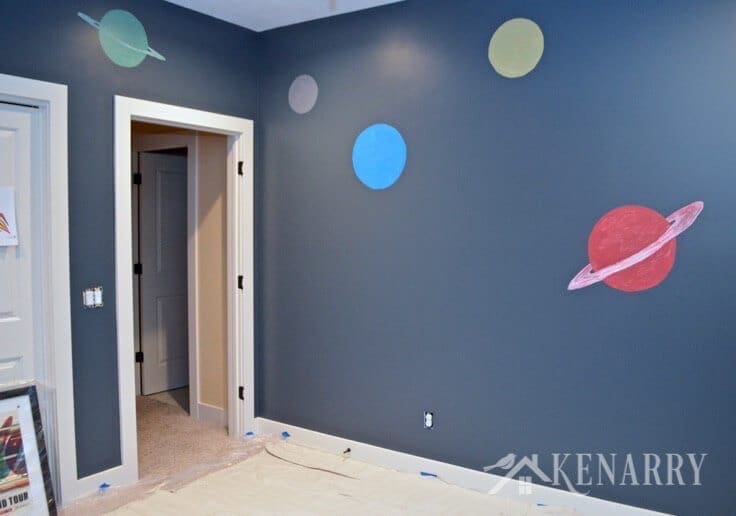
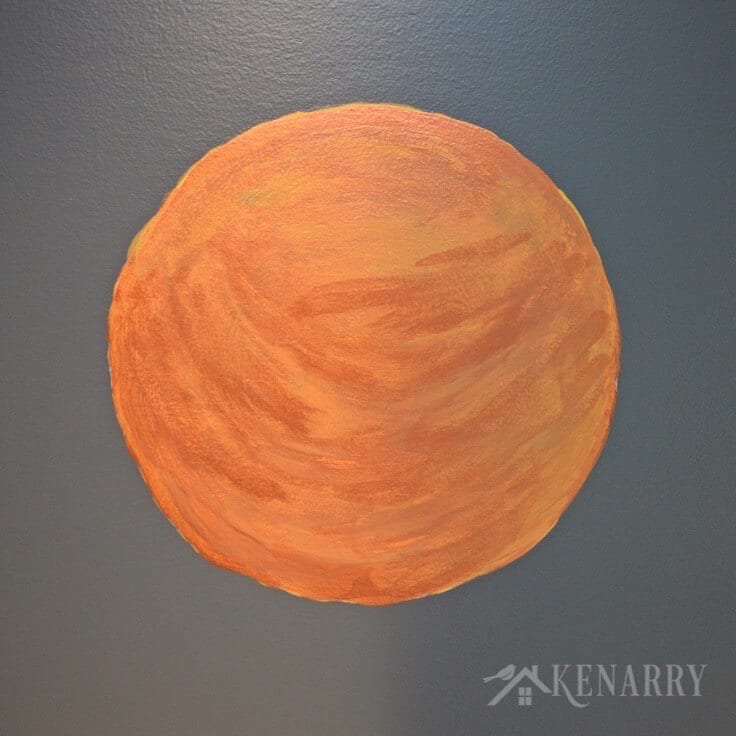
Once that was dry, I poured small amounts of DecoArt Dazzling Metallic Paints and Americana Multi-Surface Satin Paints into a plastic paint palette and focused on similar colored planets at the same time. In our outer space mural, there are two red planets, three brown/orange/gold planets, a blue planet, a green one and a purple planet. I rinsed off the plastic paint palette and started fresh each time I changed a color scheme to work on a new set of planets.

Love this idea for creating an outer space bedroom for boys! This tutorial makes it look easy to paint an outer space mural to decorate walls in your home.

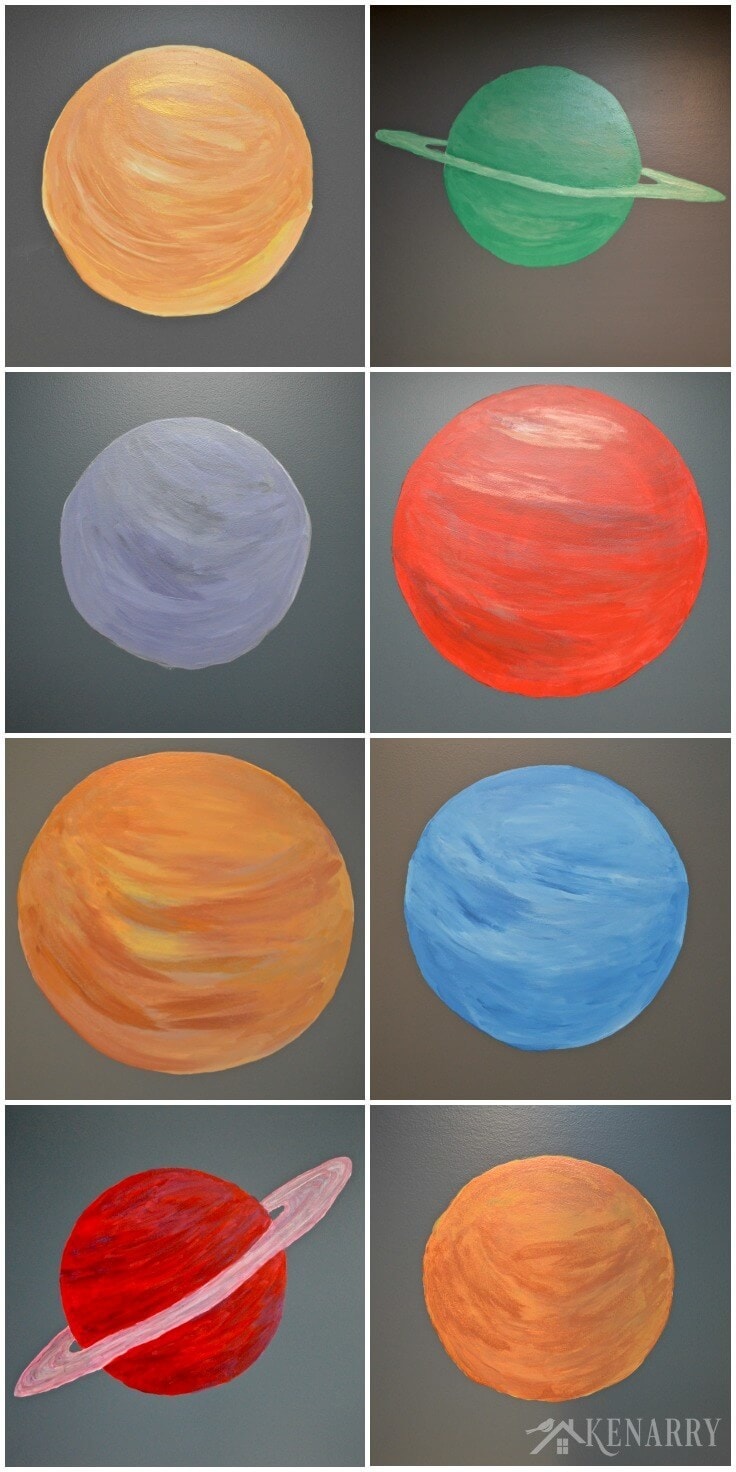
Using a paint brush and a small cotton rag, I applied several different, but related colors on to each planet. I then worked quickly using both a paint brush and a small cotton rag to blend and swirl the colors together before the paint dried. I continued to apply paint and blend it until it had the marbled effect I was going for.

For the red planets I primarily used these colors:

  • Lipstick
  • True Blue
  • Black Tie
  • Canary
  • Royal Ruby
  • Amethyst

For the brown/orange/golden planets I used these colors:

  • Canary
  • Black Tie
  • Cotton Ball
  • Royal Ruby
  • Emperor’s Gold

For the purple planet I used these colors:

  • Lipstick
  • True Blue
  • Cotton Ball
  • Amethyst

For the blue planet I used these colors:

  • True Blue
  • Cotton Ball
  • Ice Blue

For the green planet I used these colors:

  • True Blue
  • Canary
  • Cotton Ball
  • Crystal Green

I especially focused on using the DecoArt Dazzling Metallic Paints in this stage of painting as I wanted the planets to reflect the light in the room so they really shine in the “night sky”. Unfortunately, it’s hard to capture that in photos, but trust me when I say this one above the closet, for example, shines bright like a penny when the lights are on in the room:

Love this idea for creating an outer space bedroom for boys! This tutorial makes it look easy to paint an outer space mural to decorate walls in your home.

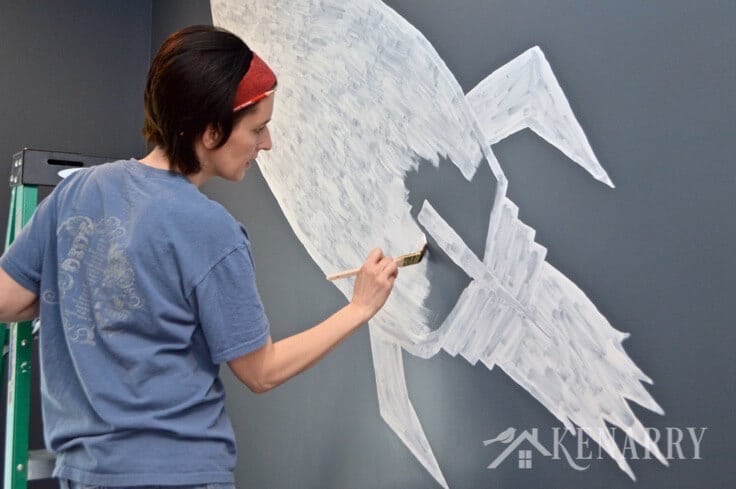
You can see the entire process illustrated in the photo below using Saturn as an example. To get the rings of Saturn to have a lighter, wispier appearance, I actually watered down the DecoArt paints slightly so they’d be more transparent. As the final step for both Saturn and Uranus, the two planets with rings in our outer space mural, I actually watered down Metallic Silver paint and gave a quick silver wash over the rings to make them more reflective.

Love this idea for creating an outer space bedroom for boys! This tutorial makes it look easy to paint an outer space mural to decorate walls in your home.

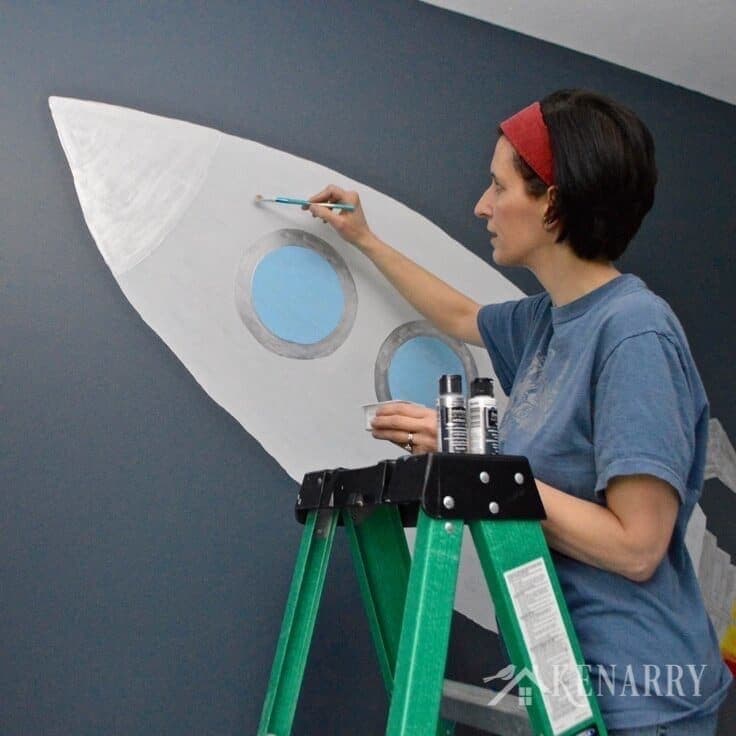
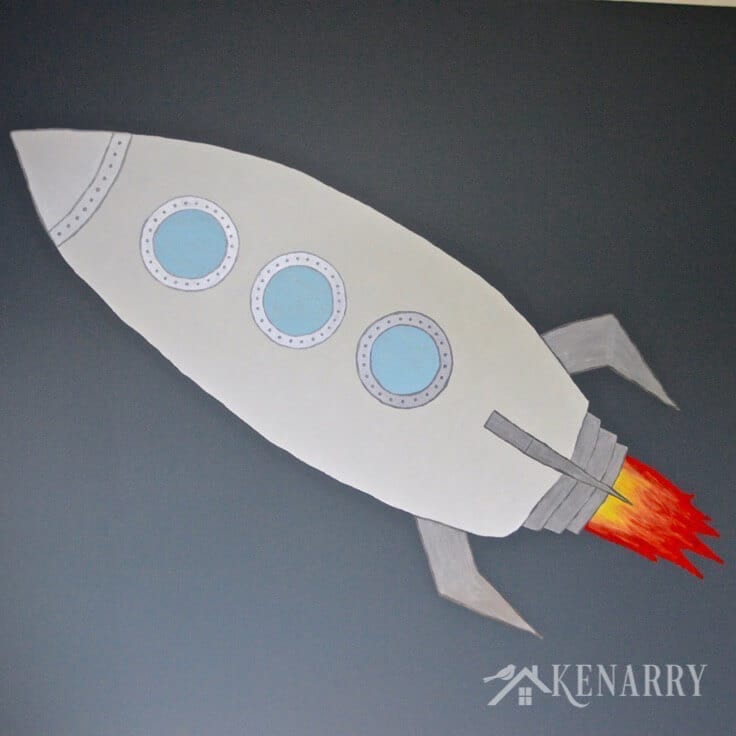
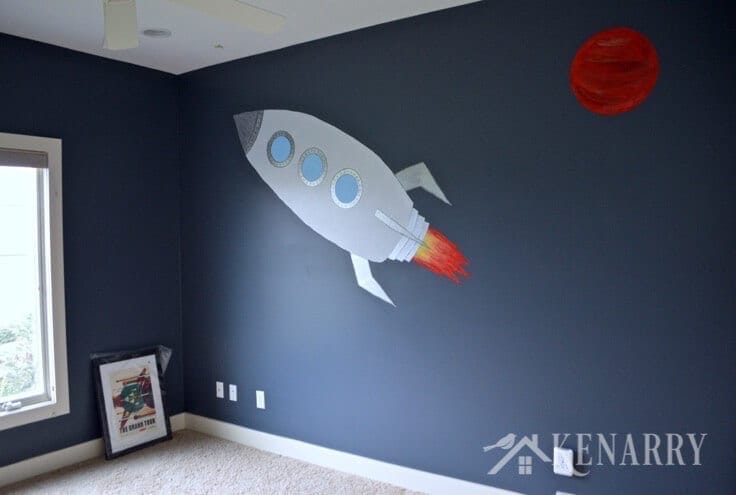
6. Paint the rocket. Once the rocket was painted with primer, I used a pencil to sketch the rest of the details including the nose cap, the jets and the thruster.

Love this idea for creating an outer space bedroom for boys! This tutorial makes it look easy to paint an outer space mural to decorate walls in your home.

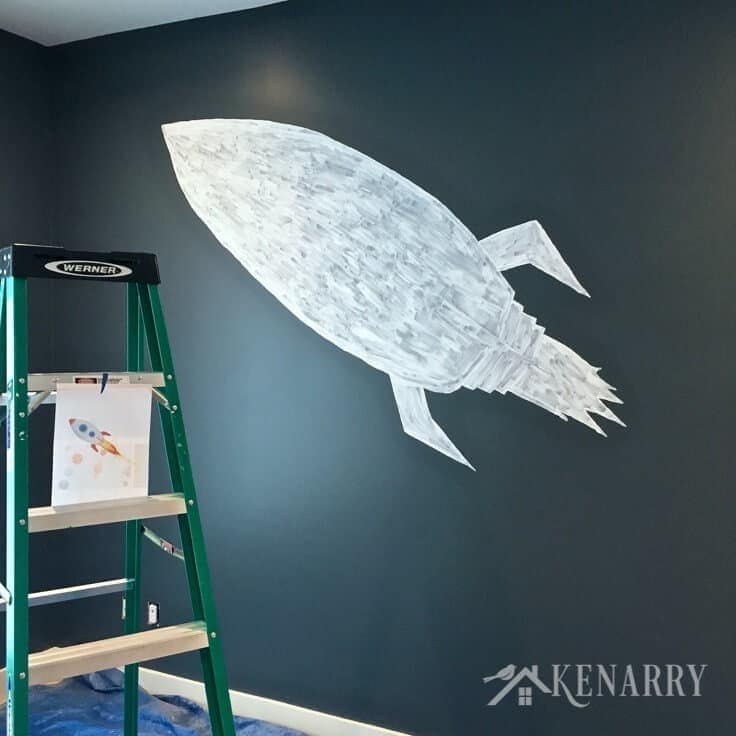
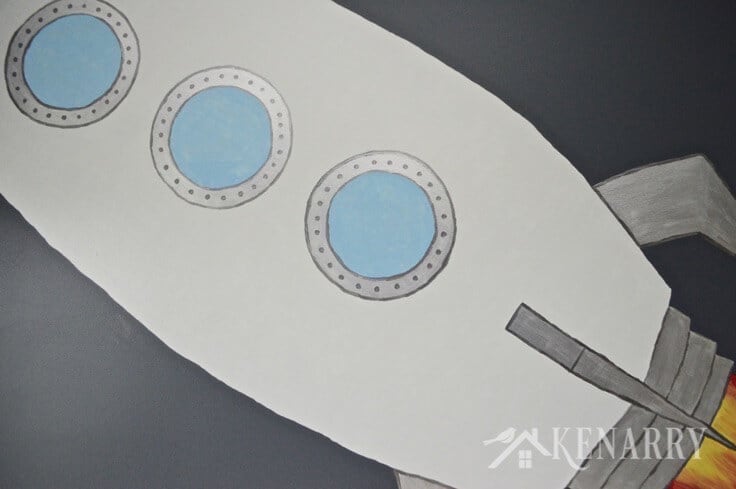
To make sure the windows were round, I actually used two bowls that nest together. I traced the larger bowl first with pencil. Then I centered the smaller bowl within the pencil outline and traced it. Once that was done, I began painting the rocket starting with the white part and working my way out from there as each part dried.

Love this idea for creating an outer space bedroom for boys! This tutorial makes it look easy to paint an outer space mural to decorate walls in your home.

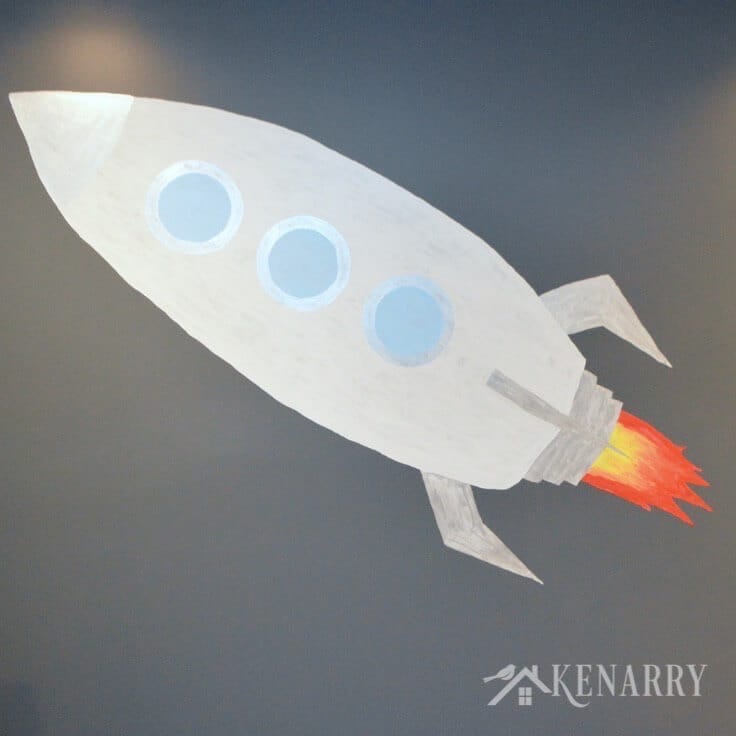
For the base of the rocket, I combined DecoArt’s Cotton Ball Americana Multi-Surface Satin Paint with some of their Americana Multi-Surface Metallic Silver paint in a small plastic container to give it a little sheen. In hindsight, I probably should have applied a second coat of primer to the rocket before I started painting the base. I ended up needing to give the rocket at least three coats of the white/silver paint blend before it was as solid and opaque as I wanted. I also painted several coats of metallic silver on the nose cone, around the windows, the fins and the thruster.

Love this idea for creating an outer space bedroom for boys! This tutorial makes it look easy to paint an outer space mural to decorate walls in your home.

For the flames coming off the thruster of the rocket, I used a similar blending technique like I used on the planets. I painted the outer part of the flame lipstick red. I painted the inner part of the flame canary yellow. Then working quickly I blended the red and yellow paints together using a paint brush and a small cotton rag to create the orange and give it a fire-y appearance.

Love this idea for creating an outer space bedroom for boys! This tutorial makes it look easy to paint an outer space mural to decorate walls in your home.

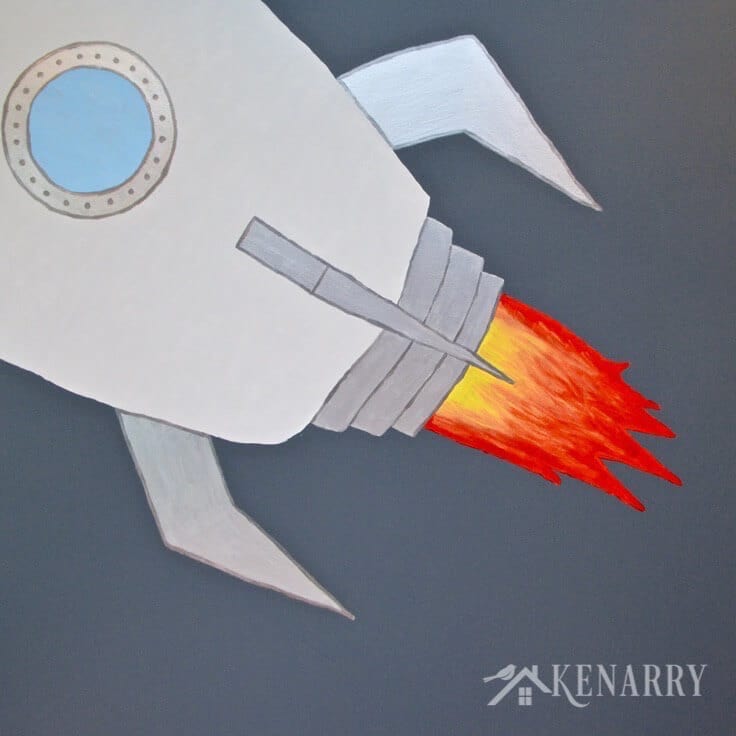
Lastly, I added a little DecoArt Dazzling Metallic Black Pearl Paint to the Metallic Silver Paint to darken it. I then outlined each of the windows, the fins, the thruster and the nose cone. I also added round dots for “bolts” around the windows and the nose cone.

Love this idea for creating an outer space bedroom for boys! This tutorial makes it look easy to paint an outer space mural to decorate walls in your home.

7. Step back and enjoy the outer space mural. While the oversized rocket really steals the show when it comes to this outer space mural, I must say I’m pleased with how the whole thing turned out.

Love this idea for creating an outer space bedroom for boys! This tutorial makes it look easy to paint an outer space mural to decorate walls in your home.

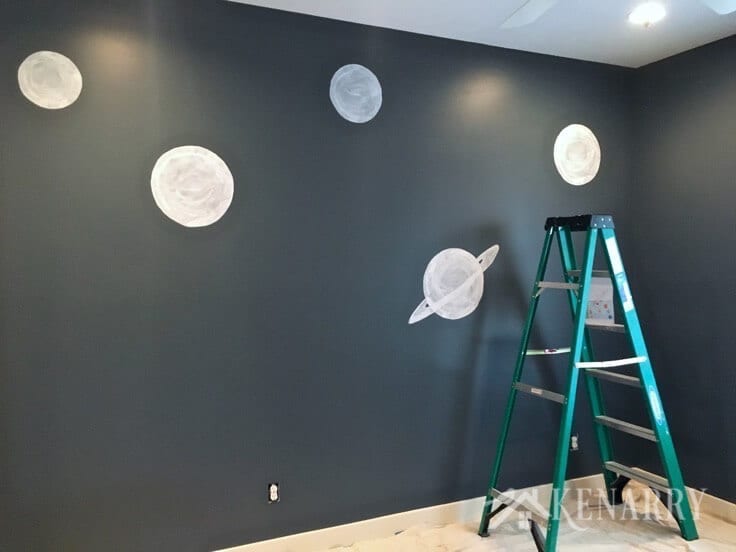
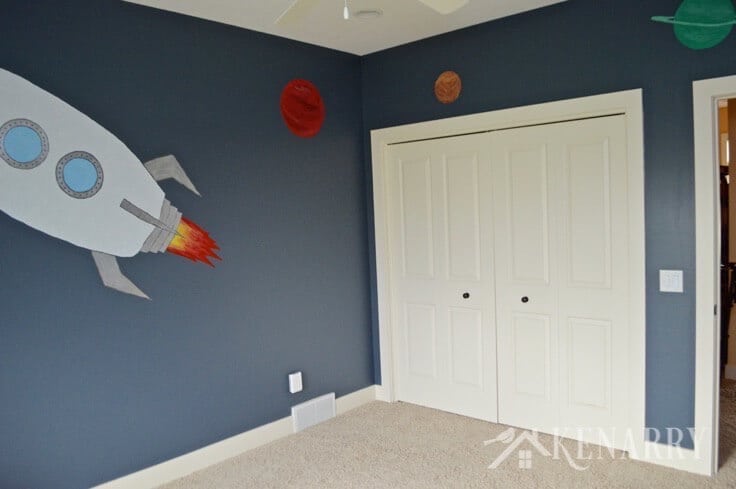
There are five planets on the wall across from the rocketship. Not that it matters, but if anyone ever asks from left to right, these are my artistic interpretations of Mercury, Neptune, Venus, Saturn and Jupiter.

Love this idea for creating an outer space bedroom for boys! This tutorial makes it look easy to paint an outer space mural to decorate walls in your home.

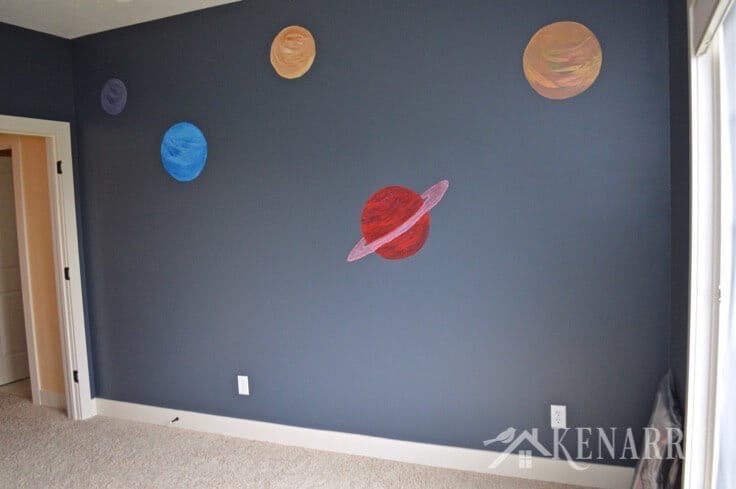
The large red planet on the wall with the rocket is of course, Mars. We didn’t put any planets on the wall with the window since that’s where the NASA Posters are going.

Love this idea for creating an outer space bedroom for boys! This tutorial makes it look easy to paint an outer space mural to decorate walls in your home.

The last two planets are on the wall above the closet and bedroom doors. The little copper colored one is Pluto and the green one is Uranus.

Love this idea for creating an outer space bedroom for boys! This tutorial makes it look easy to paint an outer space mural to decorate walls in your home.

Come back next week to see how we’re going to decorate the outer space bedroom and organize the boys closet. You can also read our overall plans for our boys outer space bedroom, check out the entire outer space bedroom series thus far or subscribe to get future updates. When you’re done here, I’d also encourage you to visit Calling It Home to see how the other One Room Challenge bloggers are making progress this week.

If you liked this outer space mural tutorial, please share it with your friends or pin it for later:

Love this idea for creating an outer space bedroom for boys! This tutorial makes it look easy to paint an outer space mural to decorate walls in your home.

While you’re here, be sure to check out these other Ideas for the Home by Kenarry® –

  • Decorative Painting the Easy Way: Step-by-Step Tutorial
  • How to Stencil Faux Tile Around Your Fireplace
  • Baby Nursery Idea: A Colorful Alphabet Theme
  • Share
  • Tweet

Home Decor Ideas· Home Improvement Ideas· Kid Ideas

Pages: Page 1 Page 2

About Carrie Ypma

Carrie is the chief writer, crafter and cook here at Ideas for the Home by Kenarry®. She's an optimist by nature and enjoys sharing recipes, trying new craft ideas, planning for parties and events as well as organizing and decorating. She and her husband, Kent live in Michigan. She also loves to hide away in a castle under the stairs reading to her two young boys and help guests plan vacations at Sunshine Villa at Glenbrook Resort, their short term vacation rental home in Orlando near Walt Disney World.

Whether you’re cooking, crafting or creating for your family, follow Carrie on Pinterest, Facebook, Twitter and Instagram to get inspiring ideas for your home. For home organization tips and ideas, check out her other website, Clutter Keeper or follow her on Pinterest, Facebook, Twitter and Instagram.

In this ultimate guide, you'll learn how to make a burlap wreath with ribbon for your home. The FREE eBook includes easy step-by-step instructions plus inspiring craft and decor ideas to make wreaths for fall, Christmas, Easter and other holidays.

Subscribe today to get ideas in your inbox plus FREE exclusives only for Idea Insiders!

Almost there! Now just check your email to confirm your e-mail address and get your free eBook.

There was an error submitting your subscription. Please try again.

You're already signed up! YAY! As an Idea Insider you have instant access to our Kenarry Idea Insider Resource Library with exclusive printables, offers and other freebies as soon as you confirm your subscription.
Previous Post: « Free Printables: Mother’s Day Gift and Card
Next Post: How to Paint Terra Cotta Pots »

Reader Interactions

Comments

  1. Maria says

    April 28, 2016 at 9:26 am

    I love the way the mural for the boys room came out amazing. I also like the castle theme under the stairs, Very creative. I know it must be relaxing for you! I love painting.
    Maria

    Reply
    • Carrie says

      April 28, 2016 at 11:08 pm

      Thanks, Maria. I’m not sure if I’d call it relaxing as much as I’d call it energizing! I love to paint creatively like this.

      Reply
  2. Samantha says

    April 28, 2016 at 2:16 pm

    This turned out SO cool! I bet he thinks it’s awesome!!! You did a fabulous job!

    Reply
    • Carrie says

      April 28, 2016 at 11:05 pm

      Thanks, Samantha. Both of my boys think it’s very cool too! (which is always a relief when your art critics are only 3 and 5 years old!)

      Reply
  3. Sarah says

    April 28, 2016 at 6:51 pm

    Wow wow! It looks fab! What a cool idea. I don’t know if I’d have the guts to free-hand anything on a wall… Great job!

    Reply
    • Carrie says

      April 28, 2016 at 11:04 pm

      Thanks, Sarah! I just figured if it didn’t turn out, I could always paint over it!

      Reply
  4. Katy {ashadeofteal} says

    April 28, 2016 at 7:26 pm

    Your mural paintings turned out so well, your son must be soo excited!

    Reply
    • Carrie says

      April 28, 2016 at 11:01 pm

      The boys are thrilled! Thanks, Katy.

      Reply
  5. Jen @ Fresh Crush says

    April 28, 2016 at 11:17 pm

    That rocket is the cutest thing I’ve seen all week! Loving this!

    Reply
    • Carrie says

      May 2, 2016 at 10:33 pm

      Awwwww, thanks Jen! I’m so thrilled you like it.

      Reply
  6. Nicole Q-Schmitz says

    April 29, 2016 at 8:38 pm

    I love how the planets turned out, and can definitely see how the metallic paint would work great to make them shiny. Now I wish I had some rooms to paint with cool murals too 🙂

    Reply
    • Carrie says

      May 2, 2016 at 10:30 pm

      Thanks so much, Nicole! I just wish the metallic paints photographed better. I love how they shine in the room and make the planets look different depending on where you’re standing and how the lights are reflecting on them.

      Reply
  7. Erin @ Lemons, Lavender, & Laundry says

    April 30, 2016 at 12:36 am

    First, I LOVE the wall color!!! (I must have missed last week… I’ll have to go have a look). The murals you painted are amazing! You’ve got some pretty lucky little boys!

    Reply
    • Carrie says

      May 2, 2016 at 10:30 pm

      Thanks, Erin! We love the new color too. So glad you liked the mural. Thanks for taking the time to come by and check it out.

      Reply
  8. April R - Uncookie Cutter says

    April 30, 2016 at 12:02 pm

    This is so fun!! What lucky boys! I love this personal mural, and it looks like something even I could paint. The wall color came out amazing, too.

    Reply
    • Carrie says

      May 2, 2016 at 10:29 pm

      You really could paint this, April! It’s not hard at all – especially when you use plates and bowls as your pattern.

      Reply
  9. Jenny @ Refresh Living says

    May 5, 2016 at 7:44 am

    You are so talented, Carrie! I LOVE how the planets and the rocket ship turned out. Your boys are very lucky to have such a customized space created just for them!

    Reply
    • Carrie says

      May 5, 2016 at 10:39 pm

      You are so sweet, Jenny! Thanks for your support and encouragement. Hopefully the boys appreciate it too!

      Reply
  10. samantha says

    June 21, 2016 at 5:38 pm

    So cool! My son would love this. Thanks for joining the Family Joy Linky Party. 🙂

    Reply
    • Carrie says

      June 21, 2016 at 8:48 pm

      Thanks Samantha! So glad you came by to check out our outer space mural.

      Reply
  11. Emma says

    June 22, 2016 at 2:57 pm

    That is awesome! I wish you’d come decorate my daughter’s walls, too, lol!

    Reply
    • Carrie says

      June 22, 2016 at 8:38 pm

      If you lived in West Michigan, I’d totally offer to help, Emma! Enjoy decorating your daughter’s room.

      Reply
  12. Theresa @DearCreatives says

    June 29, 2016 at 6:37 pm

    I just created a mural for a nursery a while ago. This turned out nice!! Thanks for sharing at the #InspirationSpotlight party. Pinned & shared.

    Reply
    • Carrie says

      June 29, 2016 at 9:13 pm

      Isn’t it fun to make murals for children? Thanks for visiting us, Theresa!

      Reply

Trackbacks

  1. Outer Space Bedroom Decor and Closet Organization says:
    May 5, 2016 at 5:54 am

    […] A tutorial for painting an outer space mural with a rocket and planets […]

    Reply

Leave a Reply Cancel reply

Your email address will not be published. Required fields are marked *

Recipe Rating


This site uses Akismet to reduce spam. Learn how your comment data is processed.

Primary Sidebar

Welcome

Carrie Ypma from Ideas for the Home by Kenarry®Hello, I'm Carrie! I'd love to personally welcome you to Ideas for the Home by Kenarry® where we curate and share great ideas you can create at home. Whether you're cooking, crafting or creating for your family, you're bound to find inspiration. Please pour yourself some coffee and stay awhile. We're glad you're here! Read more...

Sign Up and Get a Free Gift

Subscribe to become an Idea Insider. You'll get our weekly newsletter plus special deals and other resources that are only for subscribers -- all for FREE!

Almost there! Now just check your email to confirm your e-mail address and get your free eBook.

There was an error submitting your subscription. Please try again.

You're already signed up! YAY! As an Idea Insider you have instant access to our Kenarry Idea Insider Resource Library with exclusive printables, offers and other freebies as soon as you confirm your subscription.
In this ultimate guide, you'll learn how to make a burlap wreath with ribbon for your home. The FREE eBook includes easy step-by-step instructions plus inspiring craft and decor ideas to make wreaths for fall, Christmas, Easter and other holidays.
  • About Us
  • Subscribe
  • Shop Our Products
  • My Account
  • Cart

Footer

Disclosure: Posts may include affiliate links for your convenience. As an Amazon Associate I earn from qualifying purchases. All opinions are our own. You are reading and following advice from Kenarry, LLC at your own risk. Always use safety precautions. You should read and follow manufacturer’s directions for the products and tools you use. Read more.


Privacy Policy: The privacy of your personal information is important. We make every effort to safeguard your information and will never sell it to third parties. Read more.

Terms of Use: You are welcome to link to this site or use a single image and brief description to link back to any post. Republishing posts in their entirety is prohibited without permission. All images are property of Kenarry, LLC. Do not crop or remove watermark. Do not reproduce without link back or permission. If you do link to this site, please contact us to let us know. All free printables offered are for personal use only. Pinning is always welcome and appreciated. Thank you!

As it relates to comments and content posted on this blog by those other than the owners, any such content that contains the copyrighted and/or proprietary work of others is expressly prohibited and will be removed. Repeated posting of such content by the same user may result in that user being banned from this site.

Copyright © 2021 Kenarry LLC · Powered by Captivating Theme on Genesis Framework · WordPress · Log in