Castle Playroom Woodland Mural: Painting Animals and Trees
THIS POST MAY CONTAIN AFFILIATE LINKS. PLEASE SEE OUR FULL DISCLOSURE POLICY FOR DETAILS.
Use a little creativity and some craft paints to make a castle playroom woodland mural your kids will love.
How do you get to a fairytale castle? You go through the enchanted forest of course! Today, we’re sharing how we created the castle playroom woodland mural.
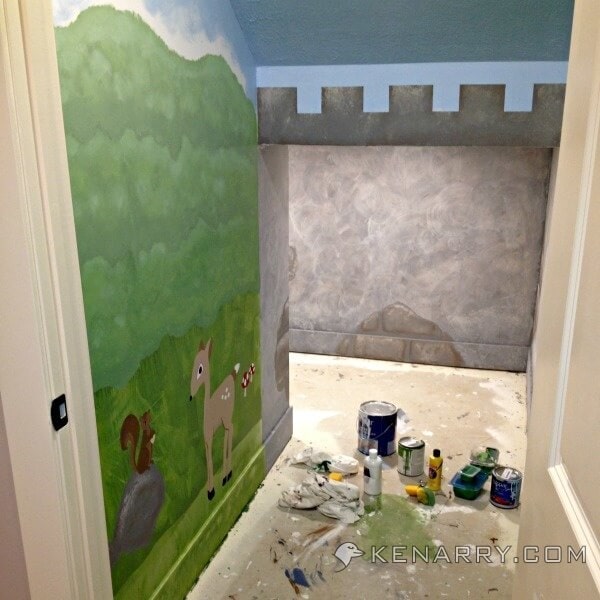
If you’re new to Ideas for the Home by Kenarry®, we’ve been sharing how we made a castle playroom under the stairs for our sons. Creating the castle playroom woodland mural was the most challenging, and yet most satisfying part of the entire project for me. It allowed me to tap into my artistic talents which I haven’t done in years and years. It was creative and fun to envision the woodland area and then try to figure out which animals and plants to include. When I was painting the castle playroom woodland mural, I didn’t know I would eventually be blogging about it, so unfortunately, I don’t have great step-by-step instructions. I’ll do my best to describe what I did, but you’ll have to let your own imagination and artistic talents run wild. That’s the most fun of all, though, isn’t it?
Disclosure: This blog post contains affiliate links for products or services we think you’ll like. This means if you make a purchase from one of these links, Ideas for the Home by Kenarry® will make a small commission at no additional cost to you so we can keep the great ideas for the home coming your way. All opinions expressed are derived from personal experience.
Finding Inspiration for the Castle Playroom Woodland Mural
For me, creating animals, trees and other plants is easiest when I have a picture of something I’m trying replicate. I looked for inspiration everywhere I could and then enjoyed trying to figure out how to apply paint to the walls to get the same effect. For the animals, I did an image search on Google for “woodland animals”. I chose animals I thought would be easy to draw and paint. I wanted them to be cute, but not feminine as this playroom is for my sons. I also didn’t want to try to recreate known animals. I knew I could draw, but knew it would turn out better if I wasn’t trying to copy a well-known character. For example, I wanted a fawn in the mural, but didn’t want to try to paint Bambi.
For the background of the castle playroom woodland mural, I wanted there to be depth and distance. Yet I didn’t want it to be too difficult to paint or too detailed for a small space. I looked through my sons’ books to find which ones had great woodland scenes. The ones I loved the most were the series of Franklin the turtle books by Paulette Bourgeois and Brenda Clark. The trees in the distance behind Franklin and his friends were simple yet had the texture, distance and creativity I was looking for.
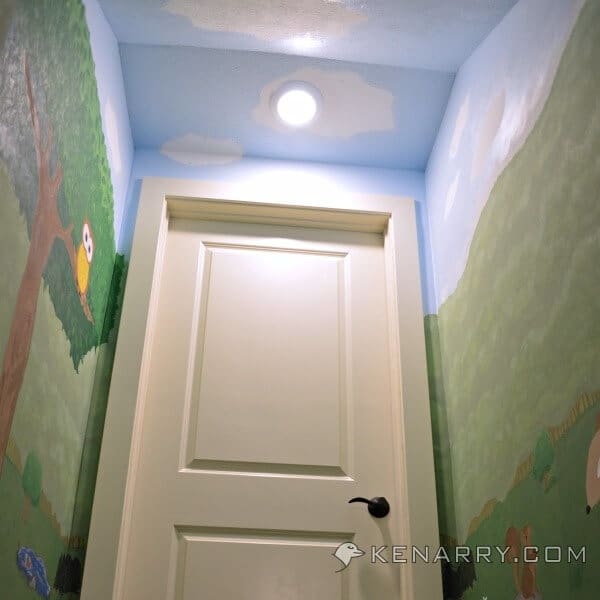
Painting the Sky
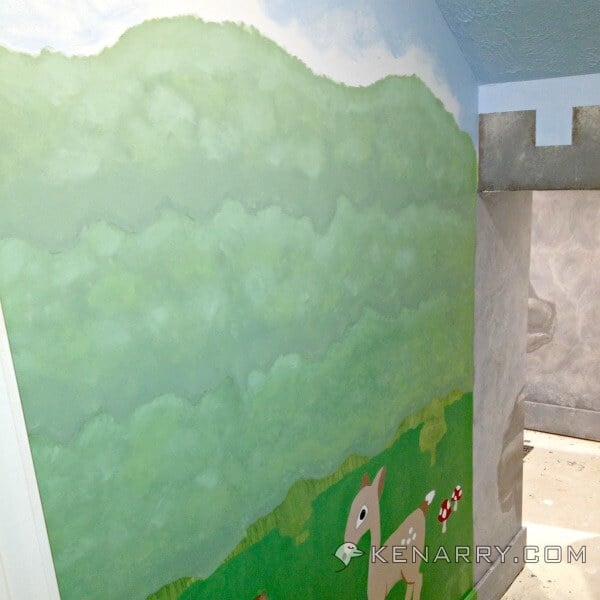
The sky above the woodland mural is actually the first thing I painted in the entire project. I didn’t want to add it later and risk dripping blue paint on the woodland mural. I did a rough sketch for the large tree. I also marked a wavy line where the top of the woods would be on both sides of the mural.
I then applied the sky blue paint using the same color wash technique I used for the faux stone walls in the castle. I poured some sky blue paint in a medium sized plastic container and then mixed in 1/4 to 1/2 cup of water. I used a crumpled old t-shirt or rag to apply the watered down paint in a circular motion. I left puffy white spaces where I wanted clouds. I made sure one of the clouds was around the light, so the white light fixture would blend with the mural. I took this photo after the entire project was done, but you get the idea.
Color Washing the Background and Painting the Large Tree
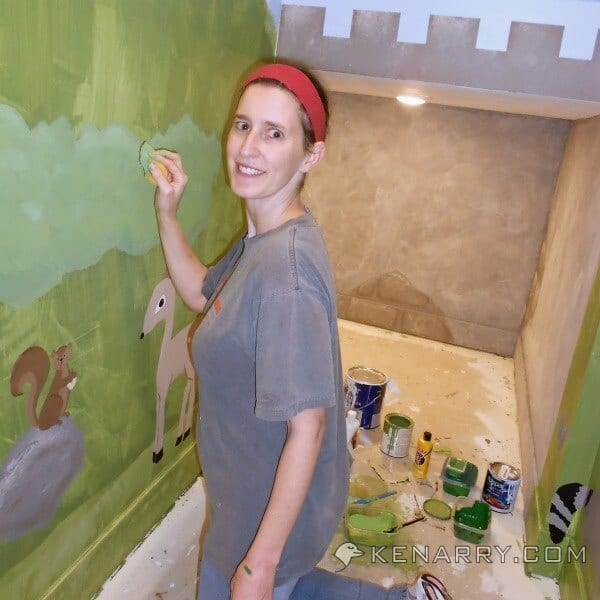
Next, I painted the background of the woodland mural by color washing it with a grass green color. Rather than using a crumpled rag, I applied the watered down paint to the wall with a large paint brush. I left an empty space where the large tree would go. Once I did the base coat through the entire woodland area, I used the same paint to color wash the area where the leaves would go on the tree. For that part, I did use a small rag in circular motions.
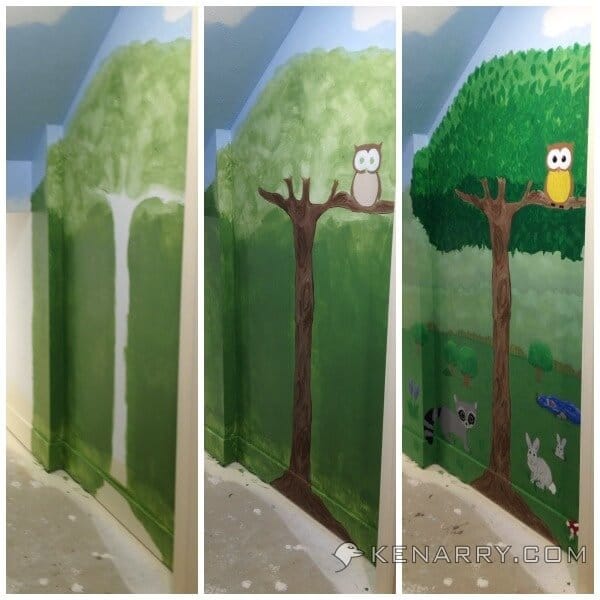
I created the tree trunk using three different shades of brown paint and then blended them with a brush. I used my brush strokes to create the rough appearance of bark. For the leaves on the large tree, I used three different shades of green to give it a three dimensional appearance. I used a pencil to outline where I wanted the shaded lower area of the tree to be. I then used a 1 inch thick brush to quickly paint leaves. I put darker leaves at the bottom and made lighter leaves as I got to the top of the tree. I overlapped leaves and painted them in all directions. I continued to add leaves until I felt like the tree appeared full enough.
Painting the Animals
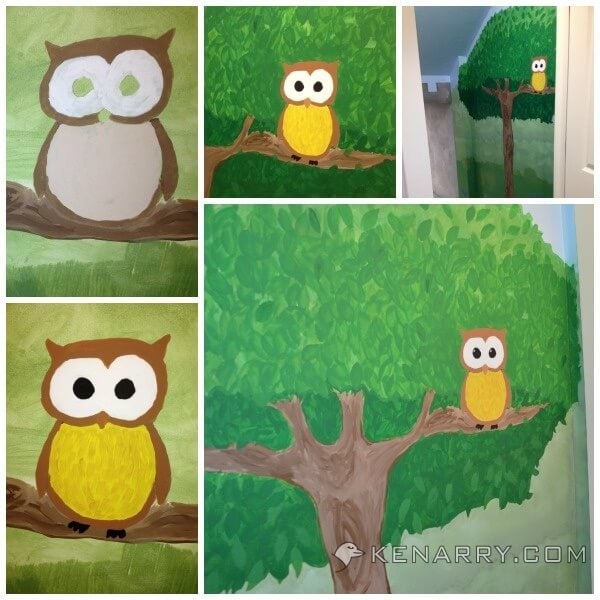
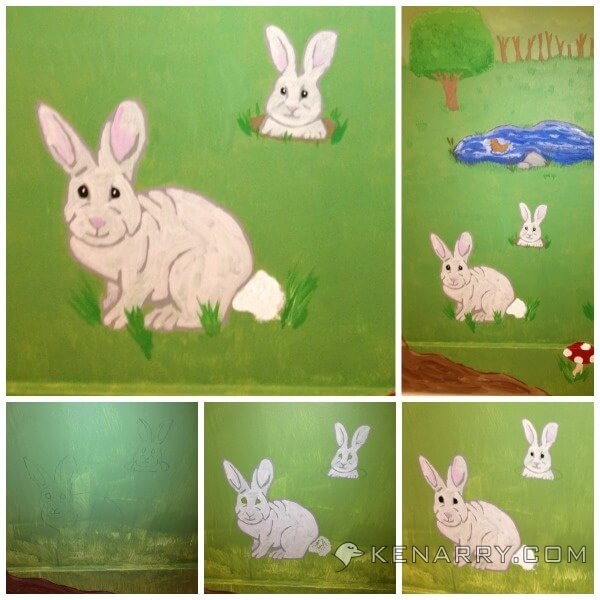
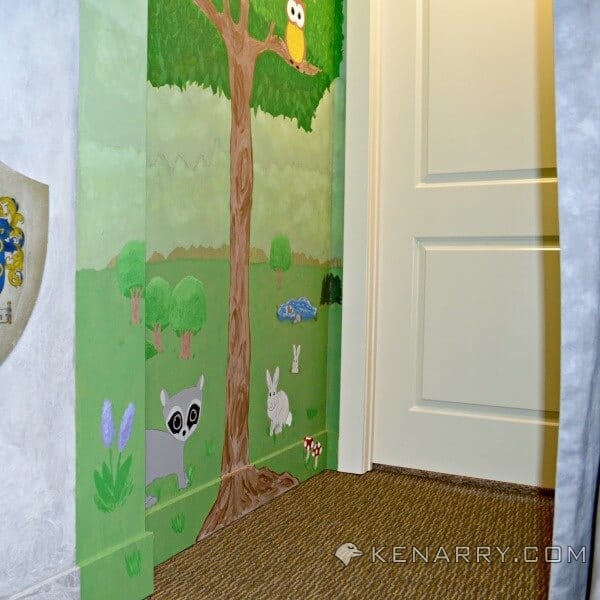
When I was searching online for woodland animals, I saved images I liked and enlarged them to print on paper. I kept the picture near by and looked at it as I drew the animals with pencil on the wall. For the rabbit, I actually cut around the silhouette on the paper, taped it to the wall and traced around it. I drew the rest of the animals freehand.
The Owl – I’ll start with the owl since this photo also gives you more detail on the leaves of the large tree. I drew the little guy on one of the branches before I painted the rest of the tree. At one point, his color was too close to the trunk of the tree so I gave him a second coat using an orange/brown color so he’d stand out more.
The Raccoon – Under the tree is a friendly raccoon. I used the same dark gray color from painting the castle and made that his base coat. I painted the dark gray first, then the lighter gray for his face and ears. Next I painted the black. I thought I would be done then, but the gray color seemed to blend too much with the background so I went back and added a much darker gray outline.

The Rabbits – Two curious bunnies are also under the large tree opposite the raccoon. One has popped up from his hole to see what’s going on. They’re both light gray with puffy white tails and pink ears. As I mentioned before I traced the large rabbit with pencil first. I drew the second rabbit freehand. I then painted the outline and details of both rabbits with dark gray paint. I filled in my outline with a very light gray paint. Afterwards, I added the pink noses and ears followed by the white puffy tail. The black eyes were the last detail I added.
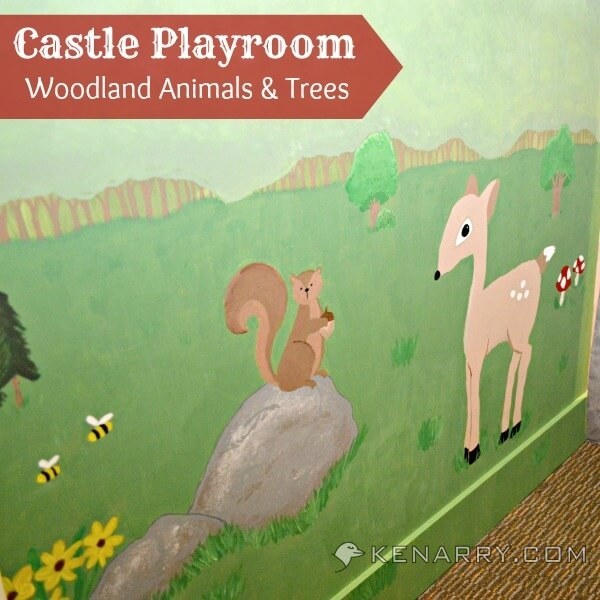
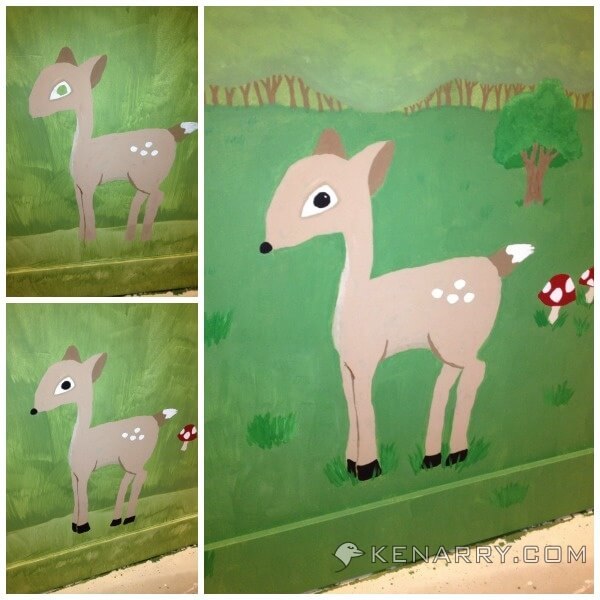
The Fawn – Opposite from the big tree is new fawn looking for his momma deer. I painted him in the castle playroom woodland mural using a medium brown, a light brown/tan, a very light tan and white paint. His eye, nose and hooves are black.
The Squirrel – With its curly tail, I think the squirrel is my favorite of all the woodland animals I created. He’s perched atop a large rock so he doesn’t miss any of the action. I painted the large rock using the same technique I used to paint the exposed stone patches in the castle. The squirrel and his acorn are a few different shades of brown.
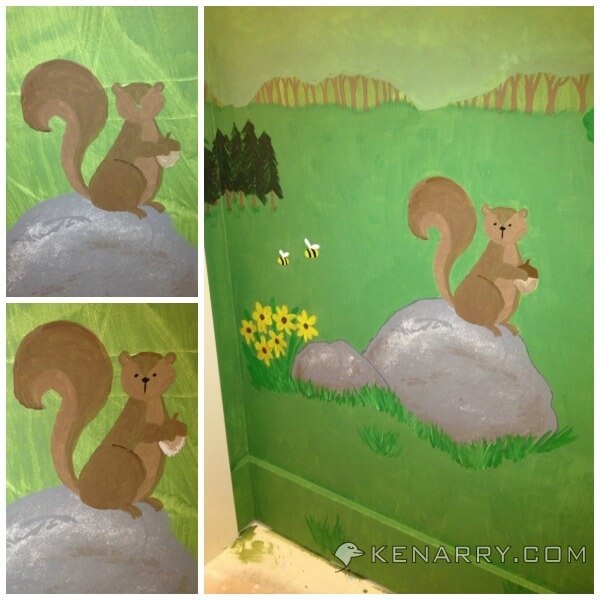
Throughout the photos, you’ll notice bees, pine trees, flowers, mushrooms and other details. These add to the whimsy and colorfulness of the castle playroom woodland mural.
The Background Trees
Finding a technique to paint the trees in the background stumped me for a little while. I chose to stratify my tree line into three horizontal sections. For each section, I decided to apply three different shades of green paint using a similar technique to the exposed stone patches in the castle. I used a brush to apply darker green paint towards the bottom of the trees, medium green paint in the middle and lighter green paint toward the top. I used a small sponge, rather than a plastic bag, to pounce up and down on the paint, blending the colors to create shading and texture. I worked across each horizontal tree line separately focusing only on small sections at a time so my paint wouldn’t dry before I blended it.
I was really pleased with the final result of this technique.
I repeated the same process on the opposite wall behind the large tree. I then went back and painted small brown tree trunks all along the bottom of the tree line. In the photo below, you’ll see I also added some other trees to the foreground. I used the same technique for little foreground trees as I did when I created the large tree. I also added blades of grass around the woodland animals and throughout the grassy foreground to give it more dimension and texture.

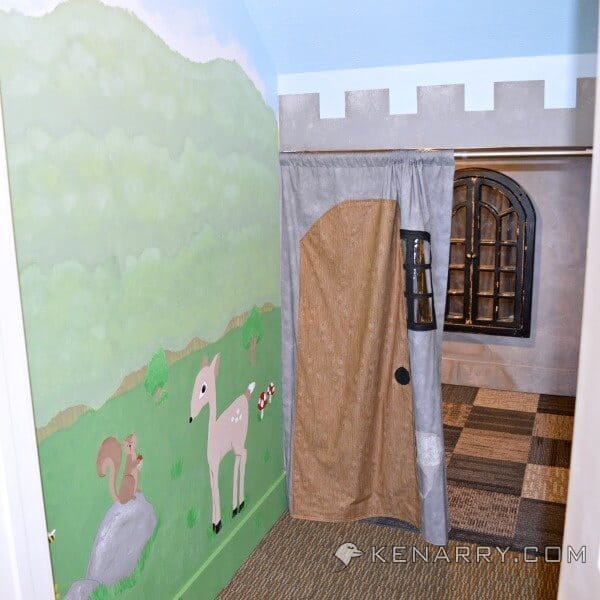
I absolutely love how the castle playroom woodland mural turned out. It’s one of the first things anyone sees when you open the door to the castle playroom. It’s also where I probably spent the most amount of time during this project. Ironically, though, we hardly spend any time in the woodlands, as we’re usually in the castle with the curtain pulled closed. I do love the view if we happen to peek out, though!
Next in this series, we’ll share how we used carpet squares to further define the castle playroom and woodland area. If you’d like, you can subscribe to Kenarry to follow along with our castle playroom series over the next few weeks. You’ll get an e-mail in your in-box every time we publish a new castle playroom post, so you don’t miss a thing.
———-
Previous in the Castle Playroom Series on Ideas for the Home by Kenarry®
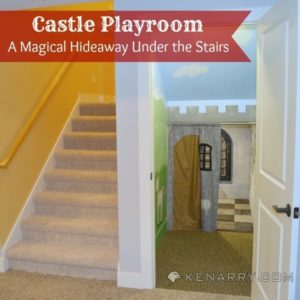
Castle Playroom: How to Create A Magical Hideaway for Kids
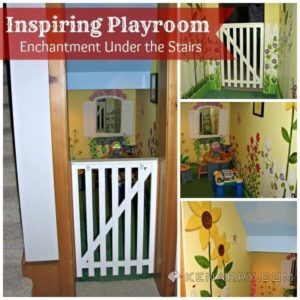
Castle Playroom Inspiration: A Whimsical Garden Playroom
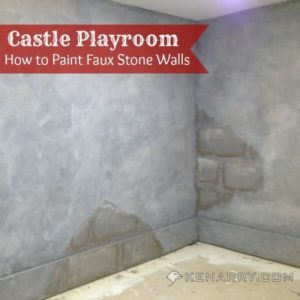
Castle Playroom Walls: How to Paint Faux Stone Walls
What’s Next?
While you’re here, be sure to check out other kid ideas on Ideas for the Home by Kenarry® –
Thanks, Mandy!
Love your murals! Wonderful work! I really was impressed with the style and creativity; as I read your step-by-step instructions, I feel like I can do it, too! Thanks for describing how you did each part w/brush, sponge, old rag, etc. Love it!
Hi Kathryn,
You’ve totally got this! I would LOVE to see photos of what you create! You can e-mail them to me or tag me @kenarryideas if you post them on social media.
Have a great day!
Best wishes,
Carrie
Ideas for the Home by Kenarry