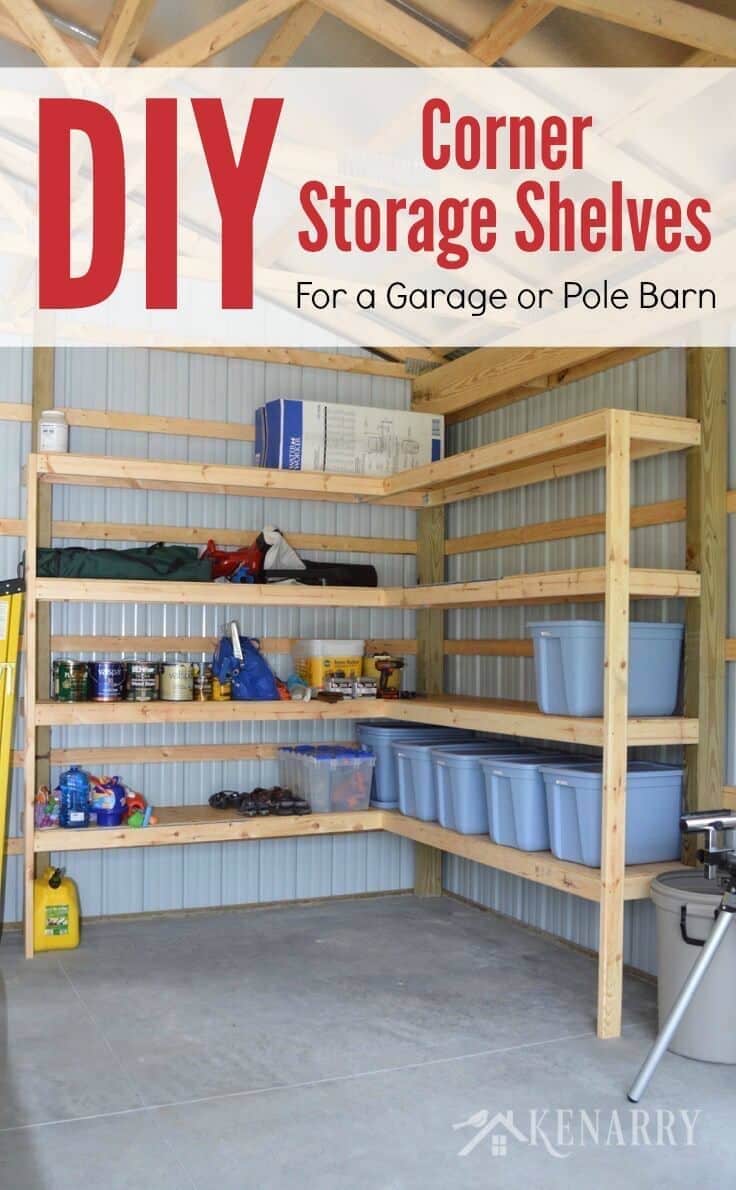
DIY Corner Shelves For Garage Or Pole Barn Storage
THIS POST MAY CONTAIN AFFILIATE LINKS. PLEASE SEE OUR FULL DISCLOSURE POLICY FOR DETAILS.
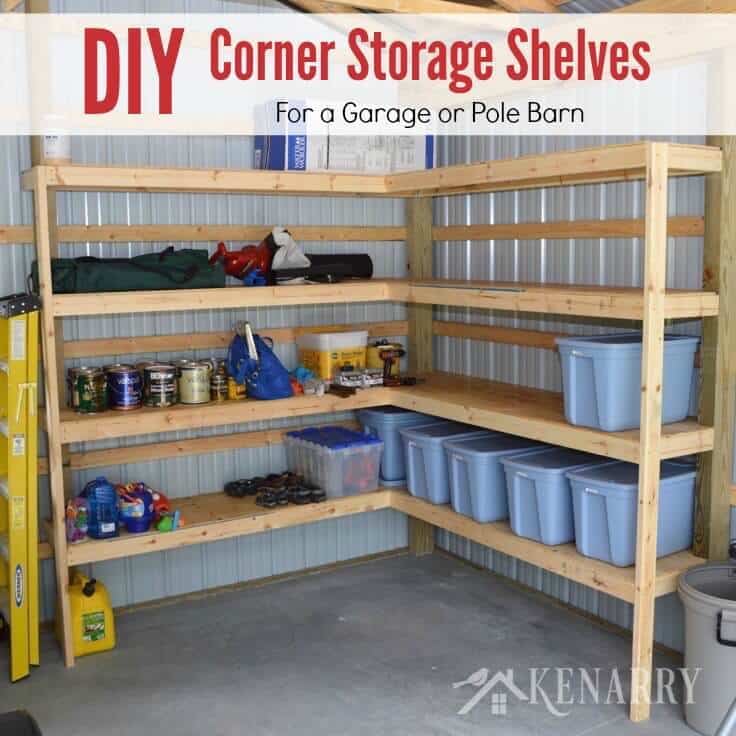
Learn how to make DIY Corner Shelves for your garage or pole barn in this easy step-by-step tutorial. This storage solution will help you get organized.
If you’re like me, you probably have a propensity to collect “stuff”. While most of it has a purpose, there are a lot of items that need to be stored while not in use. Today, I’ll show you how to make DIY corner shelves to create more storage space in your garage.
Want more ideas like this? Subscribe today to get our weekly Ideas in Your Inbox newsletter plus other exclusive gifts and offers — all for FREE!
Create More Storage When You Need It
When Carrie and I put up a pole barn a couple of years ago, one of the main purposes was additional storage to help keep things neat and organized. I wanted to achieve this in a way that minimized the required floor space while maximizing storage. Another requirement was for the storage to be easily accessed, so rafter storage wasn’t going to work.
Go Vertical and Use Corner Space Wisely
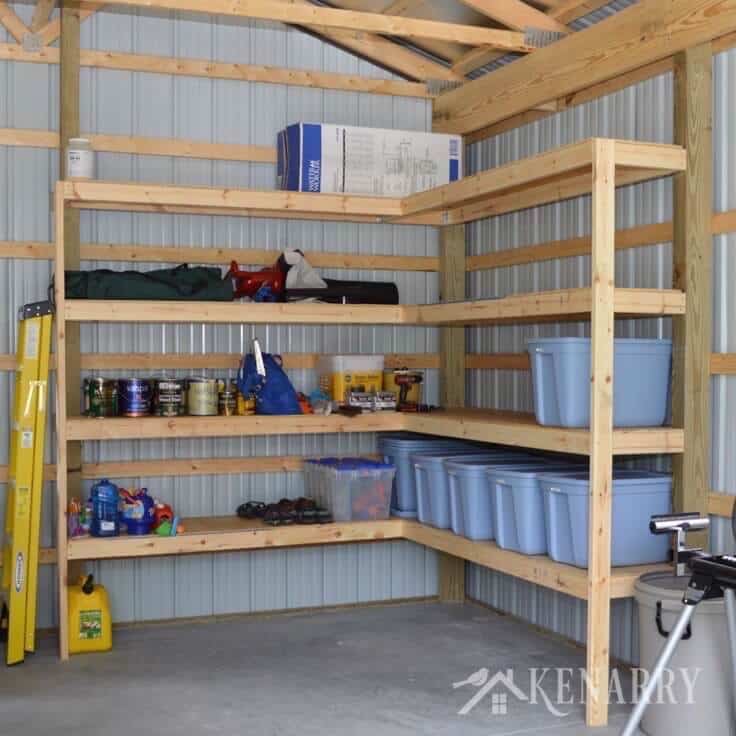
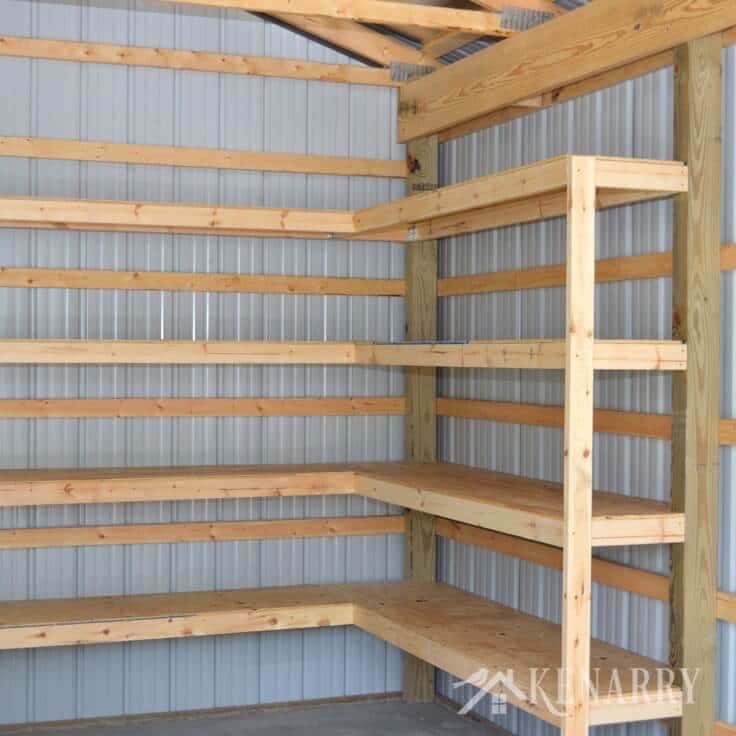
My final solution was to go vertical and tuck the shelving tightly into the corner. As you can see from the pictures of our DIY corner shelves, I also went out of my way to avoid a support post at the crux of the L shape to maximize usable space. I hope you’ll agree that the end result was a lot of usable shelving space with minimal reduction of floor space.
October 2020 Update
I wrote this tutorial in 2018. After two years, I’m happy to report that the shelves are durable and have lasted. This is a very reliable and time-tested plan for shelves.
It has been over two years since we originally put the corner shelves in our pole barn and I’m delighted with both the functionality and the durability.
In fact, here are a few things that I found out about these shelves.
Open Corner Storage
One of the key design requirements I originally had was to make sure that the inner corner of the L did not have any vertical supports holding it up. I really wanted to be able to use the space without worrying about a 2X4 blocking the path. I am so glad I took on the additional build complexity to make that happen! I have had a number of instances where I’ve been able to store oddly shaped items in the corner with ease due to the lack of obstruction.
Open Layout easy for cleaning
The other benefit of having an open layout is that sweeping the floor is a breeze. I have very easy access to clean out underneath the shelves.
DIY Shelves That don’t droop
The durability has also been excellent. The shelves are strong and there has been no drooping. Overall, I was so pleased enough with the design and construction of the shelves that I actually built an additional set of straight shelves on the other side of the pole barn for some additional storage!
I’ve also heard from some readers who have successfully tackled similar projects using this design as a guide. So bottom line, if you’re thinking about doing this, GO FOR IT!
How to Make DIY Corner Shelves for Garage or Pole Barn
Disclosure: This blog post contains affiliate links for products or services we think you’ll like. This means if you make a purchase from one of these links, we’ll make a small commission at no additional cost to you so we can keep the great ideas for the home coming your way. All opinions expressed are our own, derived from our personal experience.
Basic Materials and Tools:
- 4 ft. X 8 ft. Plywood Sheets – 15/32 in.
- #9 x 3-in Countersinking-Head Polymer-Coated Star-Drive Deck Screws
- Alternate Choice: #9 x 3 1/8-in Star Drive Bugle Head R4 Multi-Purpose Wood Screw
- #8 x 1.625-in Countersinking-Head Polymer-Coated Star-Drive Deck Screws (for joist hangers)
- Alternate Choice: #8 x 1-1/4 in. Star Flat-Head Wood Deck Screws
- 2 in. x 4 in. x 96 in. Premium Kiln-Dried Whitewood Studs
- 2 in x 4 in Triple Zinc Slant Nail Joist Hangers
- Alternate Choice: 2 in. x 4 in. Galvanized Double Shear Face Mount Joist Hanger
- Drill/Impact Driver
- Framing Square
- Measuring Tape
- Level
- Circular Saw or Table Saw (Miter saw is also useful for cutting studs to length)
I haven’t listed any material quantities since every project will be different. This DIY corner shelves tutorial will give you some basic ideas, but you’ll need to figure out quantities for your exact configuration.
The shorter screws listed are just used for the joist hangers, everywhere else I used the longer screws.
Instructions:
Just to reiterate, every project will be a little bit different, so my intent here is only to give ideas and get you started on the right track for DIY corner shelves.
1. Frame the shelves
The process for forming the frame is pretty straightforward.
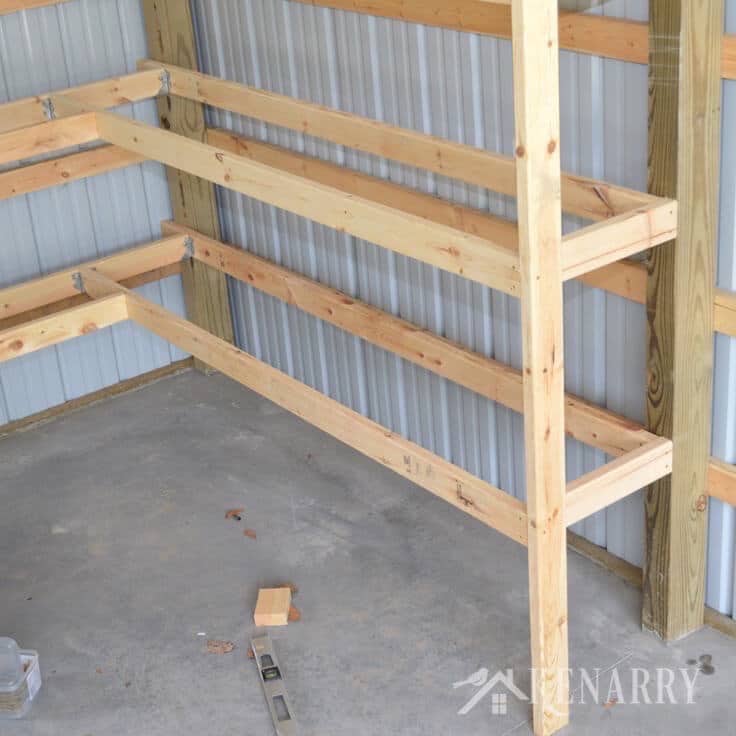
2 in x 4 in studs are used for both the vertical and horizontal shelf members. One key in reducing the cost for DIY corner shelves is to make sure that you use the existing posts from the barn itself rather than adding vertical studs to the back of the structure.
The picture below shows how I was able to anchor to the existing posts. In fact, connecting to those posts will drive a lot of the dimensional requirements.
2.Determine how many shelves you want
Now that you have a general direction for where to go with DIY corner shelves, it’s time to determine how many shelves you want. I chose to set the height of the shelving at 8 ft so that I could use full studs on the vertical members and avoid any cuts. I chose to go with four total shelves, the final one actually being the very top of the structure.
I evenly split up spacing on the DIY corner shelves but then adjusted slightly so I could fit some taller items on the bottom.
3.Make a Sketch To Determine A Materials List
Once you’ve chosen the number of shelves, you just need to do a sketch of the frame of one of the shelving layers. From that sketch, make a materials list with the required lengths of each of the shelf structural studs. Remember, you’ll need to multiply the final number of structural studs by the number of shelves.
4.Maximize Utilization of the Studs to Avoid Waste
Once you have that list, I recommend spending some time to figure out how to maximize utilization of the studs to avoid waste. If you’re brave you can make all the cuts at once for each shelf. This will reduce saw setup time.
In my case, I did the bottom shelf first to make sure I was happy with it and then did all the cuts for the final three shelves at the same time. Below are some pictures showing how I joined different parts of the structure for the DIY corner shelves.

Long deck screws were used to connect to the existing building post.
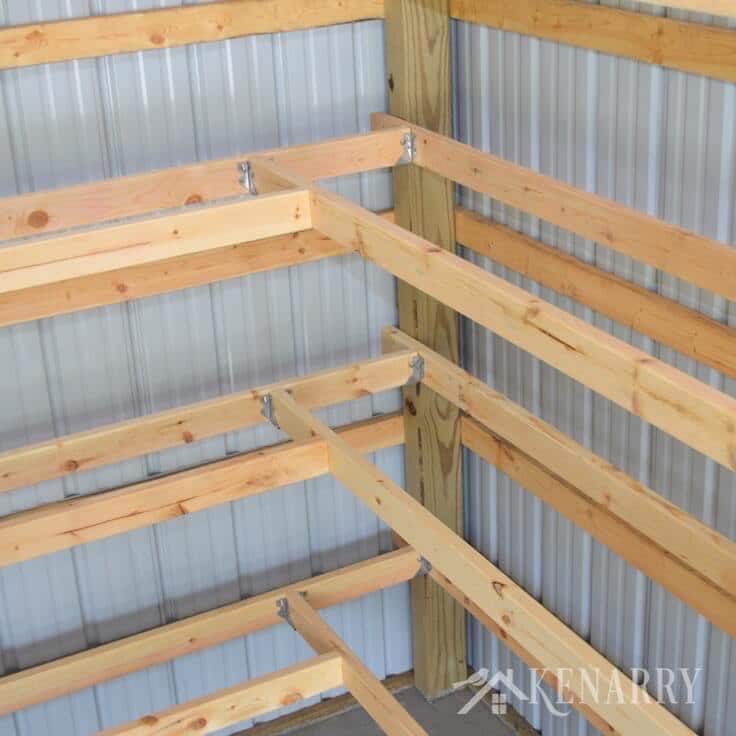
Joist hangers were used in places that I could not get screws in from the back side.
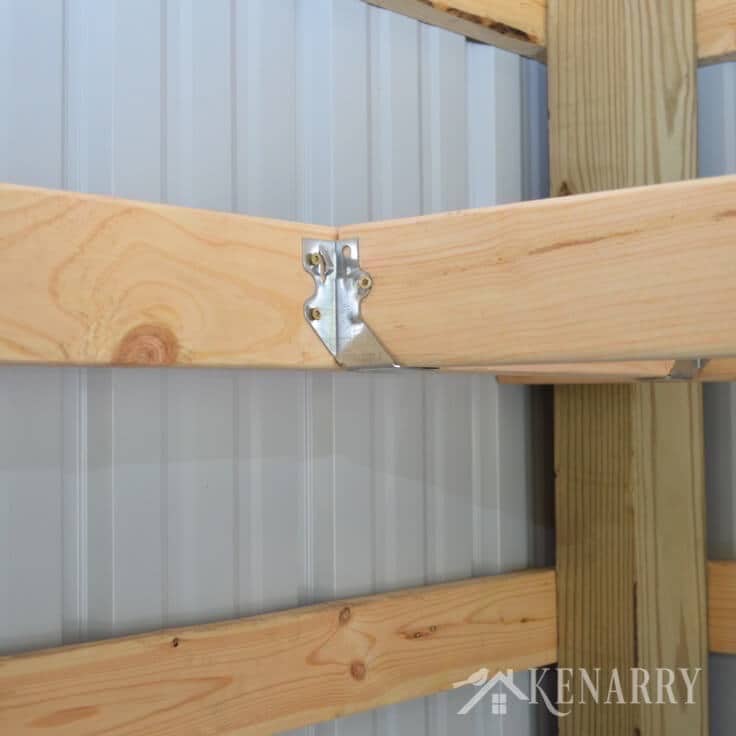
The shorter deck screws were used to attach the joist hangers to prevent the screw head from poking out the back side of the board.
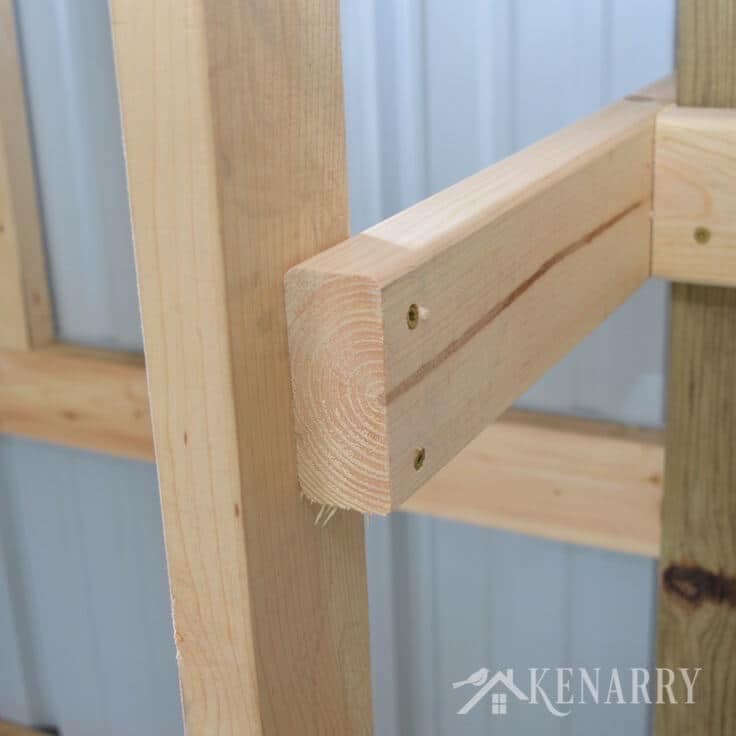
This shows a simple connection using two screws to hold the boards together.
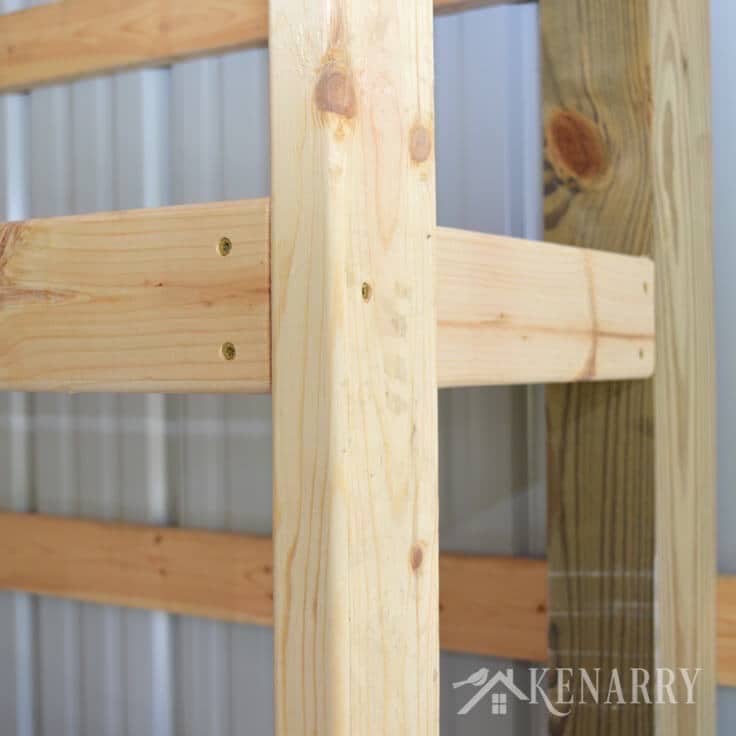
Wherever I had access I chose to screw through the backside of boards to make the connection.
The actual construction of the framework went quite quickly as there isn’t a lot to it.
I need to reiterate that proper planning will save you a lot of headaches, so take the time to sketch out the key elements of your DIY corner shelves.
Also, a level is your best friend in this process. Make sure that you are leveling each cross member as you put it up.
5. Cut the shelves
Now that your framing is up, it’s time to put on the shelving. Once again, I can’t overestimate how important it is to do a quick sketch and make sure you’re getting the best utilization from your sheet of plywood.
I chose to use 15/32″ plywood for cost savings. Because I built a robust frame I was able to go with thinner plywood and save some money. Rest assured, once you have it in place and screw it down, it gives plenty of support.
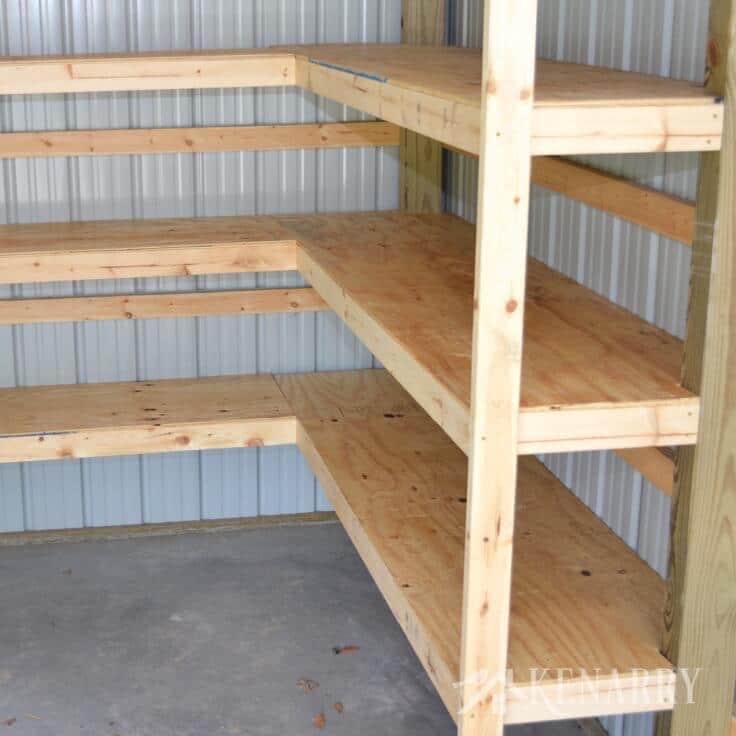
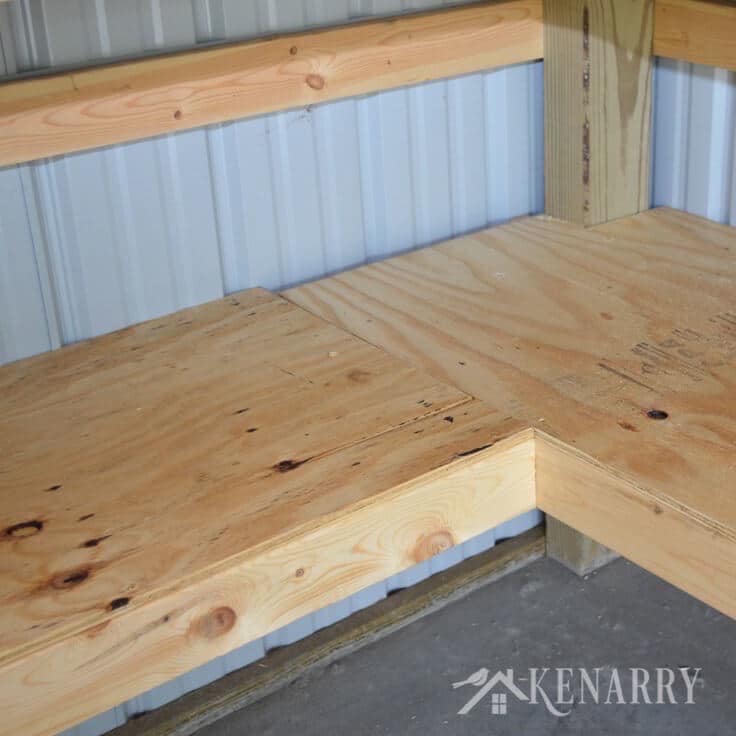
Below you can see the finished DIY corner shelves. Notice that I did have to notch out the corners in order to get the plywood to slide all the back to the metal siding.
6. Install the shelves
Once your shelves are cut, slide the plywood into place. Below you can clearly see the notch out to accommodate the post.
The final step in the process is to strategically screw the shelving down to the frame. It doesn’t take many screws to secure the whole structure together. Once secured the plywood will stiffen up the entire DIY corner shelves assembly and you’ll have some seriously heavy duty storage!
7. Store your stuff
Congratulations, you’ve just created some great, out of the way DIY corner shelves for garage storage. Now fill it up and enjoy your organized garage!

Love the ideas you see here on Ideas for the Home by Kenarry®? Subscribe today to get our FREE DIY & Craft Planning Calendar, plus our weekly Ideas in Your Inbox newsletter filled with creative tips and exclusive offers!
More Home Storage Ideas
While you’re here, be sure to check out other home storage ideas on Ideas for the Home by Kenarry® –
- Ceiling Mounted Shelves for the Garage
- How to Add (Temporary) Color and Style to a Cabinet
- How to Organize Seasonal Decor
If you enjoyed these DIY corner shelves, please share this post with your friends or pin it for later:
DIY Shelf Questions
You can use MDF or even solid wood boards instead of plywood. Just be careful if you use something that isn’t as durable or thick as plywood.
I attached my shelves to the poles in my barn. But if you are putting this in your basement and don’t have any studs, you can use 2×4 posts. Just find some way to safely anchor these shelves to the wall.
I chose 15/32″ sheet of plywood. It saved me money and my frame was robust enough to keep everything stable.
Originally published May 2018. Updated October 2020.
what a great idea I need something like this when I get a house thanks for sharing have a great week
Thanks, Lorraine! Extra storage shelves are always useful, aren’t they? Hope you’ll come back and see us when you get a house.
Thank you! It’s so useful for keeping that space organized.
Very Interesting and seems easy to do!
Shane, thank you so much for the invitation. I just stopped over to your blog to link up. Have a great week!
Thank you so much for sharing this and your other articles with us at The Homesteader’s Hop! I really enjoyed reading them. I do hope to see you again this week.
So glad you enjoyed this, Shane! Have a great week.
Thanks for linking up over at Family Fun Friday. This is one of the posts I’ll be featuring this week.
Oh yay, yay, yay! We’re thrilled you’re planning to feature our post this Friday. That’s such an honor for us. Thank you!
I understand that affiliate links and programs are useful, but for new ones coming to the site, don’t buy these $3 joist hangars from Amazon. Lowe’s and Home Depot has this bracket for 75 cents. With 4 shelves, that’s a near-$20 difference.
The special screws recommended here are top-of-the-line. Unfortunately, the article links you to a 5lb bucket of them (which is massive overkill), and Amazon seems not to have the 1lb bucket. Save another $30 and buy a pound (about 75) of the near-equivalent screw from the big-box stores.
Again, kenarry people gotta eat, I get that. But these links push the line.
Hi Ryan,
Thank you for taking the time to comment! I understand the concern you’ve raised and wanted to give you a little background. When selecting links I try to remain true to product I actually used for the project. In this case, smaller quantities of screws that exactly matched what I used were not available on Amazon, so I chose to link to the larger bucket to give people the graphical representation of the products used. I do think adding some links for alternate materials that could be used and purchased in smaller quantities is a great idea and I’ll get right on that! Thanks again for your valuable input!
Kent
Kent,
I’ve made shelves similar to this excluding the corners; could pocket holes be utilized similarly to secure ends of boards? I have a Kreg jig and it keeps most things very secure.
Thanks in advance
Eric
Hi Eric,
I believe you’ll see decreased performance/load bearing with the pocket screws. In my instance I wasn’t concerned with aesthetics so I opted for long screws that went fully through the wood. That’s just a word of caution, if you do try it and find the results acceptable for your load conditions, please come back and share with us!
Thanks,
Kent
I have been looking at a ton of storage shelving designs and this is one of the nicest open shelving units. I am very curious if you have a feel for how much weight the shelves can support without the addition of front center posts? Nice job!
Hello and thanks for the comment!
I can’t give a weight recommendation due to safety concerns and construction variation. In my particular case, I did not feel like the center post was necessary and have not had any issue with flexing and bowing of the shelves. Good luck with your project!
I don’t see a number count for each of the items needed…how many 2×4’s are needed. How many hoist hangera…ect.
Hello Curt,
Thank you for taking the time to read my article on DIY Corner Shelves. You are correct that I did not give specifics on lumber and hanger quantities. This was intentional as most implementations will be slightly different so I’d recommend sketching out your particular implementation to get the exact numbers you need. Just for reference, I used approximately five 8 foot 2X4’s and two hanger for each shelf level. I was able to use some of the scrap pieces on subsequent levels so my total was around eighteen 2X4″s and eight hangers. I hope that helps and good luck on your project!
I clearly did not read your full article before sending the message about the piece count for each item needed…my bad lol. I am half way through the project , so far so good. Wish I would have taken more time to get straight 2×4’s but I am able to make it work. Excited to see the finished product, the beginning of many wood working projects. A lot of fun
Thanks Curt! Sounds like your project is off to a great start. We’d love to see how your shelves turn out. If you post a pic on Facebook or Instagram tag us @kenarryideas so we can check it out!
Mission complete. This was my 1st big wood working job and I really enjoyed it! Instructions I followed for the most part, but I learned so much about measuring. The square tool is a life saver, so useful. I used a circular saw for the 2×4,s and jigsaw for plywood. I don’t have social media to upload
Pics. Can upload
A pic here ?
Congrats on finishing your project, Curt! That’s fantastic. I don’t think there’s a way for you to upload your photos directly to the comments, but if you e-mail them to us at id***@*****ry.com then we can add them to this comment thread so other readers can check out your awesome work too. Best wishes, Carrie & Kent
I sent you some pics of the shelves I built! Thanks for the great idea guys!
Curt, great job! I just shared the photos as a separate conversation thread to this post so the pics would be bigger for other Kenarry readers to see. Thank you so much for sharing them with us.
Best wishes,
Carrie & Kent
Curt, your project turned out GREAT! Thank you so much for sharing the following pictures with us:
Here is a pic with the frame and no plywood shelves yet
Here is a pic from outside the pole barn
Finished with and starting to add storage
Enjoy filling your pole barn with useful equipment and fun “toys”, Curt! We’re so glad you allowed us to follow along on your building project.
Best wishes,
Carrie & Kent
Ideas for the Home by Kenarry®
I am so glad I found this post! I have been trying to figure out how to build some L shaped corner shelves in my “post and beam” storage shed. The framework was the part I was trying to wrap my head around. I am definitely going to try this method.
Nate, we love hearing that our project can help inspire yours. Hope the shelves in your storage shed turn out great. Let us know if you have any questions.
Best wishes,
Kent and Carrie
This is exactly hat I want to Putnam in our basement for storage but couldn’t find it anywhere and couldn’t figure out how to have a structurally sound shelf that has “open” access in front. Will definitely replicate this!
Could you please share the measurements of the shelf you built so I have an idea of size? I want to are sure I don’t make each shelf too long that they become structurally unsound. THANKS!
Hi Andy,
I’m glad that my post on the corner shelves in my pole barn was helpful! My longest shelf on the project was 96″ or 8ft which is a standard size for both plywood and 2X4’s and happened to match up well with pole barn posts. Best of luck on your project!
Kent
I absolutely love this but I have a concern. I am doing this in my basement and will not have the luxury of connecting the shelves to the structure as you did with your barn posts.
Will this still work if I just use 2×4’s in place of the barn structure? Meaning will it still be strong enough to be a legitimate tote storage shelving unit and won’t sag by the weight?
Thanks,
Rob
Hi Rob,
Thanks for taking the time to reply on the corner shelves. I personally don’t see an issue with replacing the barn 4X6″ posts with 2X4″ posts. Because the posts are vertical you’re loading them lengthwise in compression which I imagine will be pretty stable. My one caution would be to make sure you find a way to anchor it to the wall to prevent it from tipping since you won’t be attached to the actual building structure. Good luck on the project!
Kent
What depth did you go with the shelving?
Hello Lisa,
My shelf width was just under 23.5″. I went slighty under 24″ to maximize the usage of the plywood sheets allowing for the loss of material from the saw blade. Hope your project turns out well!
Kent
Thanks so much for the fabulous idea! I’m going to attempt this with the modification for not using the two vertical end supports. Instead I will hope to provide support using a 2×4 support at 45 degrees from the shelf to the shed post on each level of the shelf. This approach will provide a little less strength, but I’ll also add it on the corner post as well. My reasoning is to keep the shelves above walking height to further minimize the “floor space” reduction. I’d be curious to get your thoughts on whether this approach for support will be adequate. Of course, it will depend on the load… just wonder how much weaker it will be versus having the vertical support to the ground?
Hi Dave,
Thanks so much for reading my article on corner shelves!
Am I understanding correctly that you are hoping to have the shelves suspended and only attached at the back? If so, I certainly think this could work with enough supports. I’d envision having the 45 degree supports at every shed post to support each level of the unit. Of course make sure you give it a good strength test before loading the shelves up! Also send some pictures when you’re all done, I’d love to see it!
Kent
I absolutely love this but I have a concern. I am doing this in my basement and will not have the luxury of connecting the shelves to the structure as you did with your barn posts.