Mosaic Garden Rocks: How To Make Garden Mosaics
THIS POST MAY CONTAIN AFFILIATE LINKS. PLEASE SEE OUR FULL DISCLOSURE POLICY FOR DETAILS.
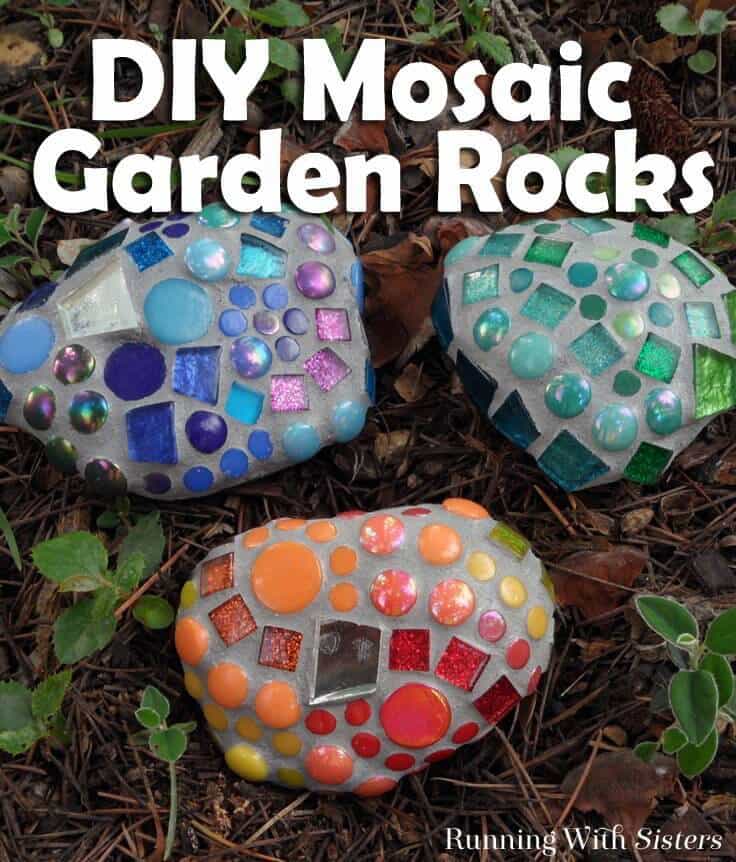
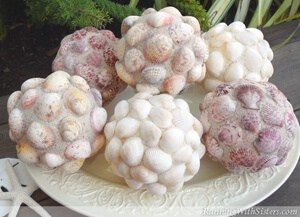
Make mosaic garden rocks to add a pop of color to the garden. We’ll show you how to glue the tiles and mix the grout. A great DIY mosaic project for anyone!
Hi Kenarry Readers! We’re Jennifer and Kitty from RunningWithSisters.com, and with spring in the air we are ready to craft outside! We love garden crafts, and one of our favorite projects for the garden is doing mosaics. So we made these mosaic garden rocks to add a little extra pop of color to garden!
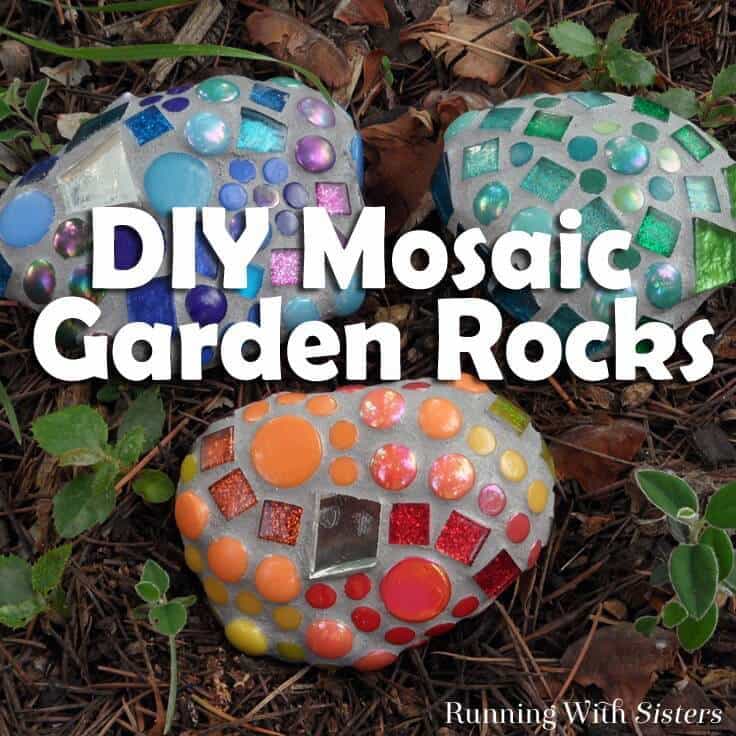
Even if you’ve never done a mosaic project before, you can make these easy mosaic rocks! There’s no wrong way to do them! We’ll show you how to glue on your tiles – and just about any tiles will work. Then we’ll show you how to mix the grout, tint the grout, apply the grout, and buff it. We’ll even seal the mosaic so it will repel water in the garden.
How To Make Mosaic Garden Rocks
Disclosure: This blog post contains affiliate links for products or services we think you’ll like. This means if you make a purchase from one of these links, Ideas for the Home by Kenarry® will make a small commission at no additional cost to you so we can keep the great ideas for the home coming your way. All opinions expressed are derived from personal experience.
Materials (For One Rock)
- 1 rock, 4” to 5”
- Colorful tiles
- White sanded grout
- Clear silicone adhesive
- Mosaic grout sealer
- Black acrylic craft paint
Other Supplies
- Plastic disposable mixing container (like a cottage cheese container)
- Wooden stirring stick or putty knife
- Gloves
- Sponge
- Plastic cup for water
- Measuring spoon
- Paper towels
Steps
1. Pick Out Your Tiles
Set out your tiles so you can see them all at once. We used dots, squares, and mirror tiles in sizes ranging from 1/4” to 1”. We decided to make three rocks spanning the spectrum, so we did one in blues and purples, one in greens and aquas, and one in yellows, oranges, and reds. This is where you get to make your own creative decisions. You can make your rock with any colors you like! One rock with the whole rainbow, seven rocks each a color from ROYGBIV, it’s up to you!

2. Glue On The Tiles
Glue the tiles to the rock using the clear silicone adhesive. You don’t need a lot of the glue. Just place a dab on the back of each tile and press it onto the rock. Each tile has a top and bottom. Usually the bottom is rougher. This allows the glue to grab the tile better. Be sure to glue the tiles onto the rocks with the rough or bottom side down.
The grout we used spans a width of 1/8th inch to 1/2 inch, so we made sure to place our tiles that close together. If you have big spaces between the tiles, the grout might crack. Plus these mosaic rocks are all about the pretty tiles! Not big areas of grout.
Cover all the surfaces of your rock with tiles except for the bottom where the rock will sit on the ground. Let the glue dry.
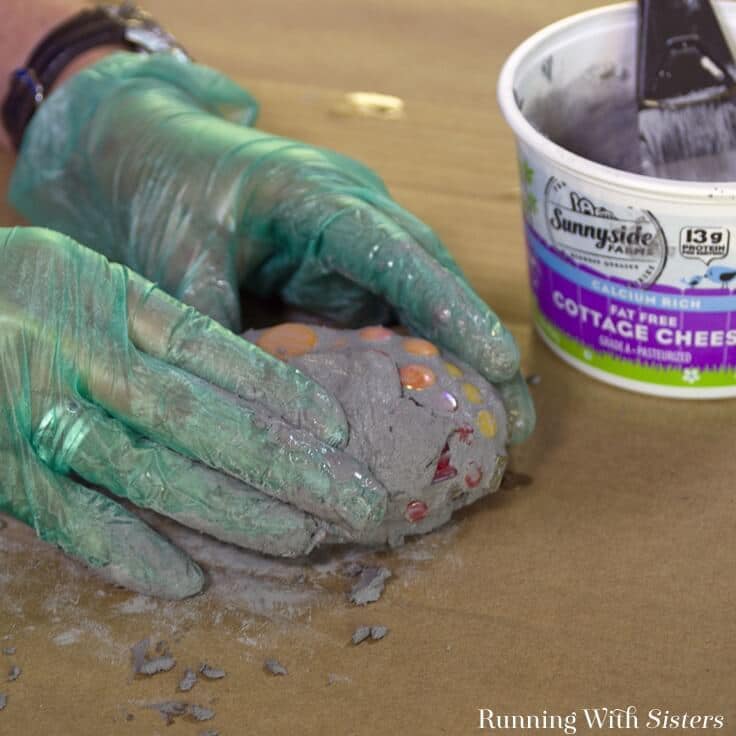
3. Mix The Grout
Put on your gloves. Read the instructions on your package of grout to see what ratio of water to grout you will need. Our grout calls for 1 part water to 7 parts grout. For these small rocks, we only need a little grout, so we used 1 tablespoon of water and 7 tablespoons of grout. (You will only have 15 minutes to apply the grout after it is mixed, so it is better to mix small batches as needed.)
Here’s a video we made showing how to mix and tint the grout:
Start by adding 1 tablespoon of water to your disposable container. Then add 7 tablespoons of grout. Mix thoroughly. The grout should be the texture of natural peanut butter. Add more water, a little at a time, if necessary until the grout is pasty but not runny.
4. Tint The Grout
For this project we chose to tint the grout gray to make the color of the tiles pop. To tint the grout, squeeze a small amount of acrylic craft paint into the grout. Mix thoroughly. Keep in mind you only have about 15 minutes to work with the mixed grout including applying it, so don’t take too long with this part. See if you like the color, if not add more paint and stir. The grout will look darker when wet and will dry a little lighter.
5. Apply The Grout
To grout your rock mosaic, smear the grout right over the tiles. Press it into all the spaces between the tiles. Make sure you get some grout around every side of every tile. Then wipe the excess grout off with a damp sponge.
There will be a small amount of grout left on top of the tiles, but that’s okay. Let the grout dry for 30 minutes, then buff the haze off the tiles with a damp paper towel. Let the grout dry completely over night. (If a haze forms again, just buff the tiles again.)

6. Seal The Mosaic Rock
Shake the grout sealer. Apply it all over the mosaic rock in a thin coat using a sponge paintbrush. Don’t worry. It will dry clear!
When your rock is all dry, give it a new home in the garden. These mosaic rocks add such a playful touch to the yard, you’ll want to make a whole bunch! Set them in and around greenery for little bursts of color. Or create a whimsical rock border for your favorite flowerbed. So pretty! Or, a small version of these rocks would be such a great whimsical element in your fairy garden.
Looking for more garden crafts to do with the kids? Check out this fun Wind Chime Made with Repurposed Old Keys, learn How to Transfer Photos to Stone, or these Stepping Stones Painted with Stencils.
If you have any questions at all while you’re working on your mosaic rocks, just leave us a comment and we’ll reply. We are always here to help. And even if you don’t have a question, we’d love to hear from you! Have you ever done mosaics for your garden? What was favorite project? Please share in the comments!
Happy Crafting,
Jennifer & Kitty
If you’d like to share this idea, you can pin this photo:
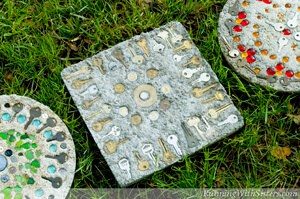
Here are a few more garden projects from The O’Neil Sisters:

Love the ideas you see here on Ideas for the Home by Kenarry®? Subscribe today to get our FREE DIY & Craft Planning Calendar, plus our weekly Ideas in Your Inbox newsletter filled with creative tips and exclusive offers!
What’s Next?
While you’re here, be sure to check out these other craft projects on Ideas for the Home by Kenarry® –
the necessary supplies included black craft paint. i didn’t see anywhere that the black paint was used. why is it a necessary supply? thanks
Great question, Lorette! The O’Neil Sisters use the black acrylic craft paint to tint the grout in Step 4. Good luck with your mosaic garden rocks.
cant wait for spring to get started
You could make them now to get a jumpstart, Lorraine! Just wait and put them out once we’re past winter.
Is there a grout edge or just an open side to the tiles on the outermost edge?
Great question Brenda! We put grout around all the tiles. On the bottom, we just smoothed the grout from the outer most tiles in a slope down to the rock surface. Hope that makes sense! Let us know if you need more information.
Jennifer & Kitty
Can these mosaic rock withstand heat from a fire? I was thinking about my fire pit at my lake house
Hi Renee,
We’ve never tested them near heat, but the glass tiles should be able to withstand the fire. We’re not sure about the mirrored pieces. The grout is essentially concrete which should be able to take the heat. And we notice many fire pits are decorated with ceramic tile. Maybe you could make a test piece and do a little experiment. We’d love to hear your results!
Cheers,
Jennifer & Kitty
Where do you buy or get the mosaic tiles?
Great question, Julia! (This response includes affiliate links.) You can find mosaic tiles online at Amazon.com or at craft stores like Michael’s, Hobby Lobby — and even Walmart.
My lovely kids like mosaic garden rocks. I had tried to make it before but never make it perfectly. I wanna try once again. Thanks
Hi Ruthdiana, hope you and your kiddos have fun making the mosaic rocks! So glad you stopped by!
Hi Ruthdiana, You and your kids will definitely have fun making these! Let us know if you have any questions while you’re working on them — we’re happy to help!
Hi what do I apply to rock if I want it to be slightly raised in a shape before mosaic.
Hi Alyson, I’m not sure what you mean exactly, but you might be able to create your shape using a small amount of wet concrete/cement to attach it to the rock? Is that what you mean?
Best wishes,
Carrie
Ideas for the Home by Kenarry®
Is your grout waterproof for outdoors? If so where is it available? I’ve looked before but couldn’t find the waterproof. Thanks!
Great question, Jane! I checked with the O’Neil Sisters. They said any grout will work just fine, but you should seal whatever you use once the grout has set up with a clear grout sealer for outdoors.
Hope that helps!
Best wishes,
Carrie from Ideas for the Home by Kenarry®
I live in Minnesota where it’s really cold and snowy for several months-do they make a grout to withstand these conditions or would I have to bring all my mosaic rocks inside each winter?
Hi Deb,
I’m located in Michigan so I totally understand your concern. If the rocks are small enough to move inside, I’d recommend doing that for the winter months just to be on the safe side. If you’re going to do a larger mosaic that can’t be easily moved inside, I’d look online for some additional guidance so you choose the best materials and supplies that can withstand the harsh elements. This blog post of lessons learned from a mosaic artist in Pennsylvania may be helpful to you – https://sandymalamed.wordpress.com/2012/04/08/lessons-in-building-a-grandisimo-mosaic-tile-mural/
Best wishes – and happy crafting!
Carrie
How could you cover that beautiful rock
Love your project. I have two questions. One is: can I do the same project using cement stepping stones and applying broken china that I find on the beach and/or sea glass? Second question: can I use MAC glue to adhere glass and china to the cement stepping stone? Thank you very much for your help!
Charlene
Thanks for writing in with your great questions, Charlene! We haven’t tried MAC glue for a project like this, but we know the clear silicone adhesive works well! It’s easy to find at the hardware store, and it’s inexpensive, too. As for making a stepping stone, you can use a similar technique, but you’ll need some kind of base to glue your broken china and sea glass to. Perhaps you can find some plain/cheap stepping stones as your base then arrange and glue your broken china and sea glass to it. Then grout using the technique above. Or it might be easier to start with a stepping stone mold, mix, pour, and spread the grout, then press your mosaic pieces into the grout while it’s still set. Whatever you choose to do, just be sure none of the broken china edges are poking up! Hope that helps!
Is there a clear grout to let the natural beauty of the rock show through?
I have been wanting to do this for years! I’m in the “cocktail hours” of my life (80) so with your guidance and “how to” info I’m going to do it. Thank you so much. LK
Fantastic! We’d love to see photos of how your project turns out.
Best wishes,
Carrie
Ideas for the Home by Kenarry