Coat Hooks, Hat Racks And Organization For The Mudroom
THIS POST MAY CONTAIN AFFILIATE LINKS. PLEASE SEE OUR FULL DISCLOSURE POLICY FOR DETAILS.
Organize your mudroom or back hallway with simple coat hooks, hat racks and baskets. Never lose jackets or mittens again with this easy DIY idea.
Happy New Year! I don’t know about you, but the start of a brand new year always has me thinking of new ways to freshen up and organize our home. One of the biggest problem areas in our home has been our mudroom or back hallway space. It desperately needed some coat hooks.
Just inside our garage, we have a decent sized entry way that’s adjacent to our laundry room. The problem was the space didn’t have enough organization or storage so it’s often a cluttered unruly mess. When my husband initially built the house, he had the the builder create a storage bench and a shelf with coat hooks and cubbies. This worked great when it was just the two of us, but as our family grew it started to become impractical and overcrowded.
Organization Problems in the Mudroom
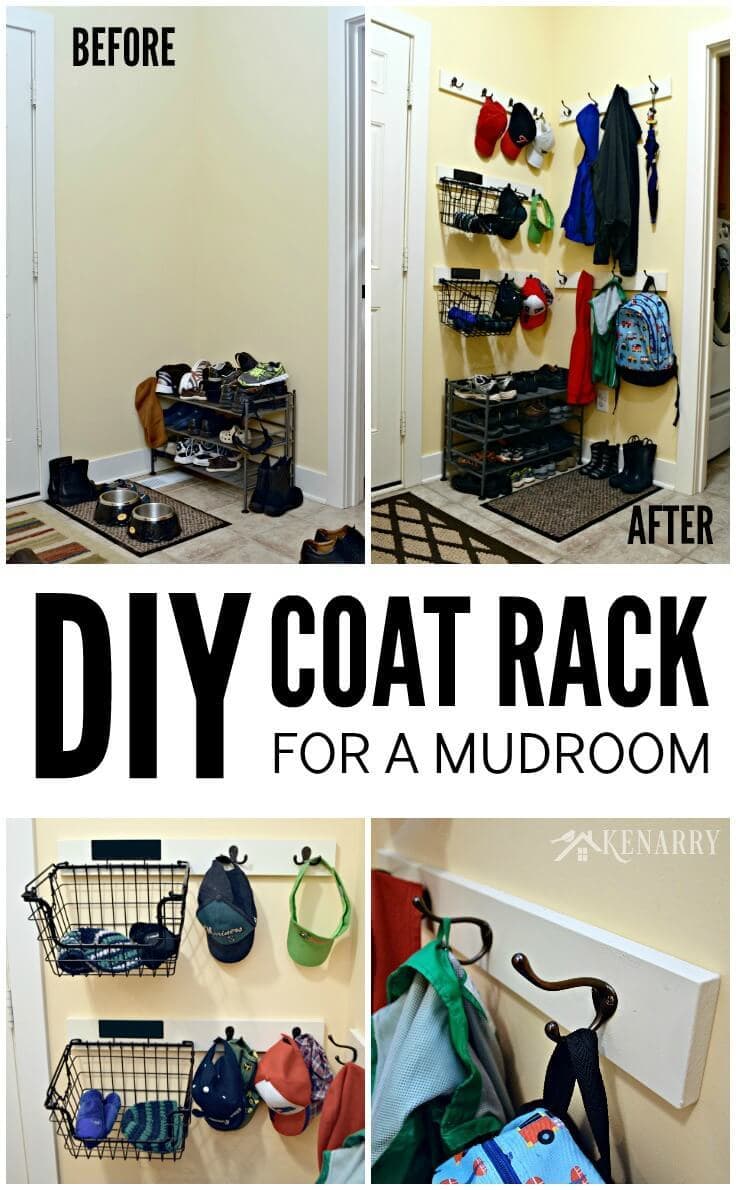
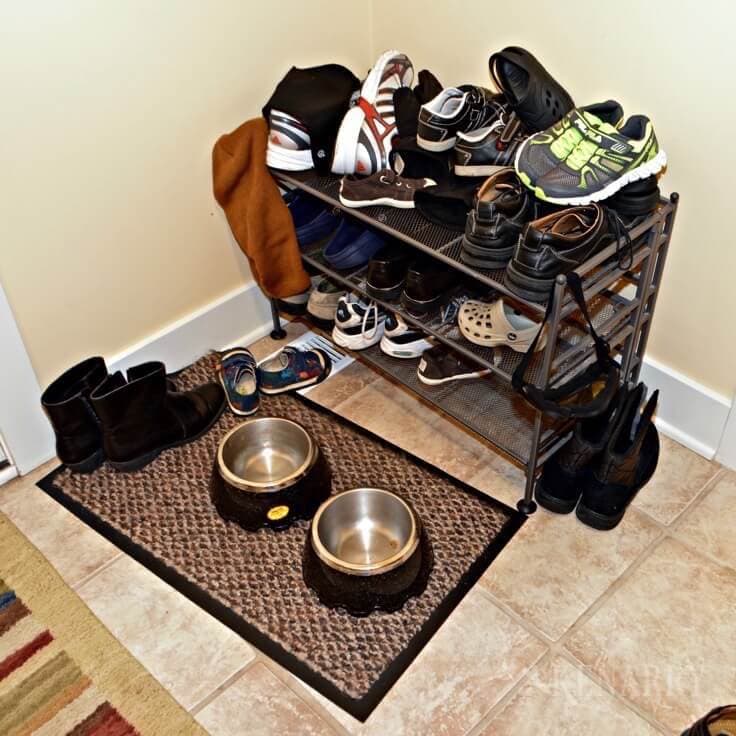
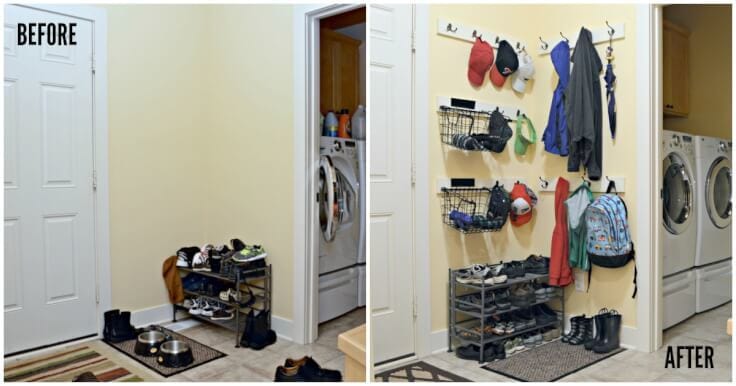
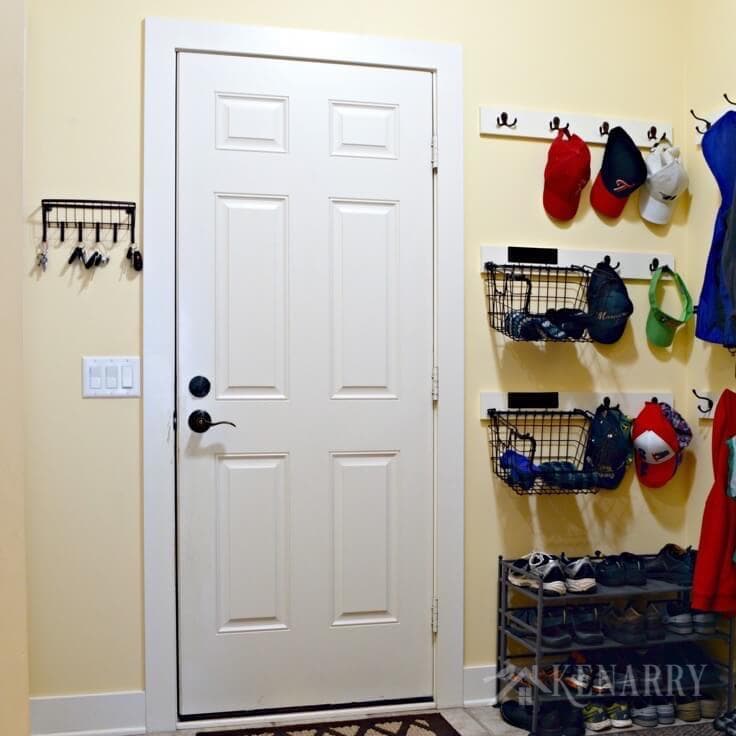
Before we share the new coat hooks, hat racks, and organization solutions we implemented, let me walk you through what our mudroom space looked like before we started. As you can see in the “before” photo below, the four coat hooks we already had were piled high with multiple jackets stacked on top of one another.
The cubbies were overflowing with baseball caps, winter hats, mittens and gloves. That small canvas bag was used to hold our car keys so we could easily find them, but it was taking up one of the limited coat hooks.
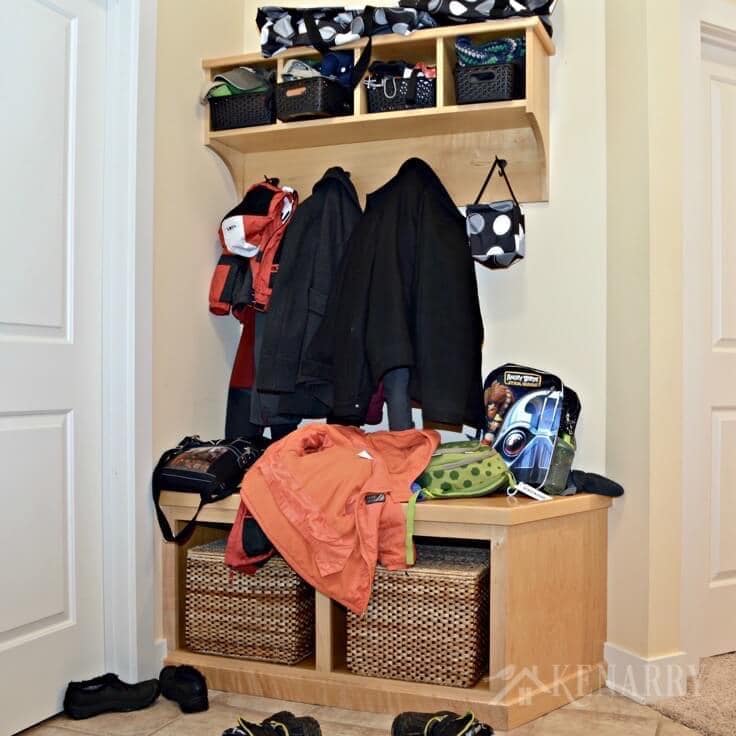
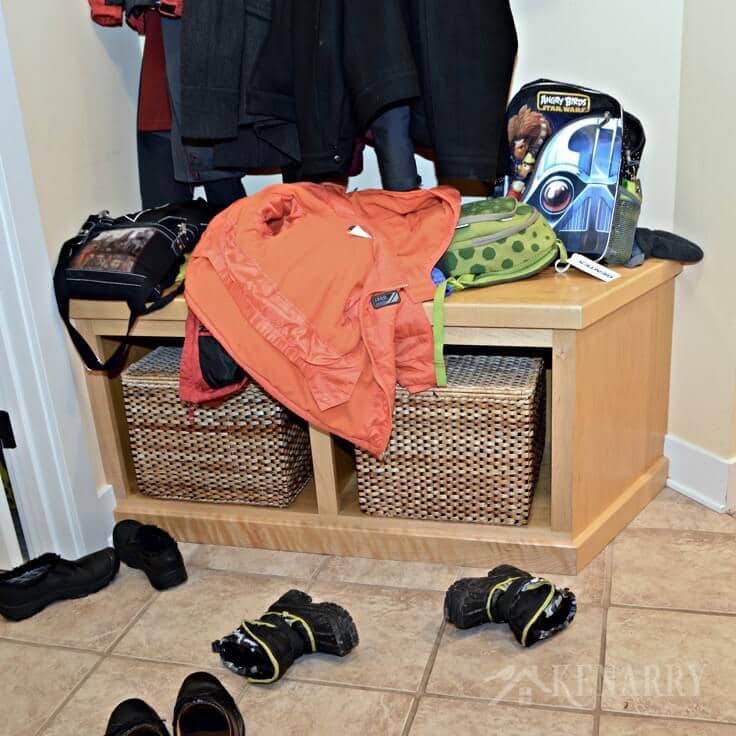
To make matters worse, our boys are both under the age of six. They can’t physically reach the coat hooks to hang up their jackets or backpacks so they just toss them on the bench or the floor.
The baskets in the bench look pretty but functionally aren’t useful for anything other than hiding reusable grocery shopping bags and stuff you don’t use every day.
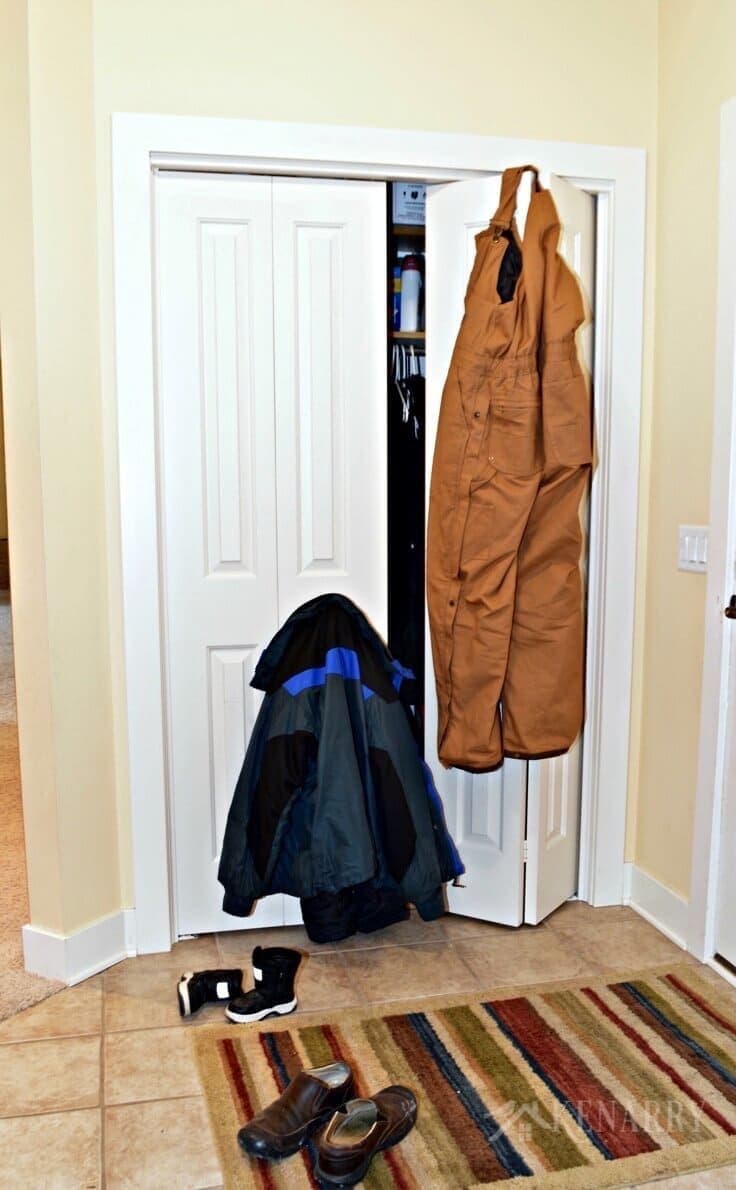
Thankfully we do have a large coat closet in the mudroom, but it’s full of cleaning supplies and off-season outerwear. Kent was also using the doors to hang his winter gear up to dry after he came in from snow blowing.
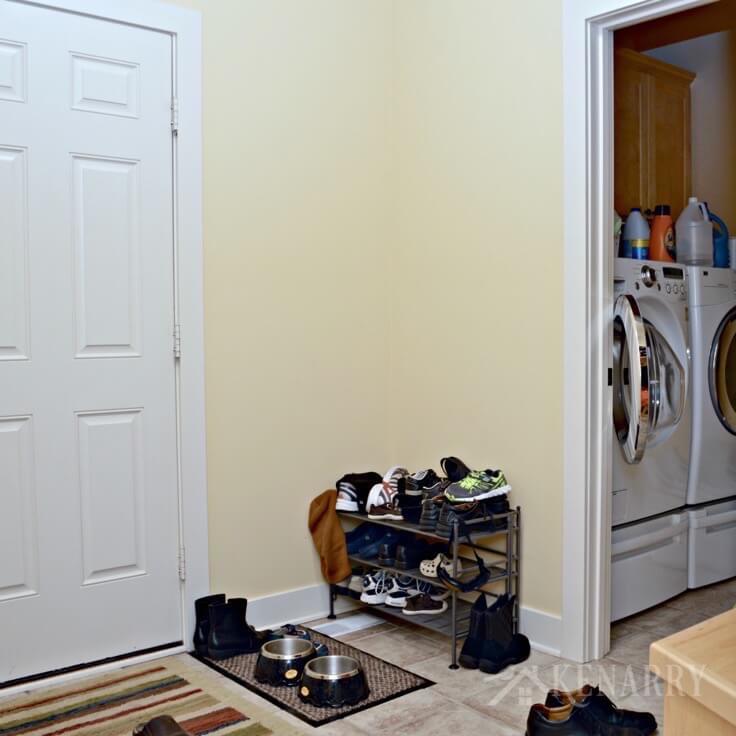
Across from the storage bench and cubbies, we had one solitary shoe rack and a small rug with Scruffy’s food and water dishes. Someone was always tripping over those dog dishes to try to find their shoes or boots.
Solving Our Mudroom Problems
Disclosure: We want to give a big thanks to Hickory Hardware and HomeRight for sending us complimentary products to use for our DIY coat hooks and hat rack to help us solve our mudroom problems. No other compensation was provided. This blog post also contains affiliate links for products or services we think you’ll like. This means if you make a purchase from one of these links, we’ll make a small commission at no additional cost to you so we can keep the great ideas for the home coming your way. All opinions expressed are our own, derived from our personal experience.
This little mudroom was ALWAYS in a constant state of chaos and disorder that drove me bonkers. This was especially true during the winter months. However, it was worse yet during the transition between seasons when the coat hooks were overflowing with both light spring/fall jackets and heavy winter coats. When we added the new coat rack by our front door last spring, it occurred to me we could create something similar to tidy up the mudroom.
The walls in the corner above where we have the dog dishes and shoe rack were completely empty. I knew it would be the perfect spot to create a simple organization solution for a hat rack and coat hooks. Between that and a few other mudroom organization ideas I had, I was confident we could overcome our issues with this room.
Easy Ideas to Organize the Mudroom
The first thing we did was move Scruffy’s dog dishes into our half bathroom just down the hall. We don’t know why we didn’t do that years ago! The dog dishes are tucked away in there out of the way of our day-to-day traffic, but Scruffy can still get to them whenever he wants.
We also replaced the individual pet bowls with a mission-style elevated dog dish set on top of a small gray and black tapestry rug with bones on it. This makes it look a little more stylish if a guest ever needs to use the half bathroom. It also makes the bowls tidier and less of a trip hazard because they’re connected.
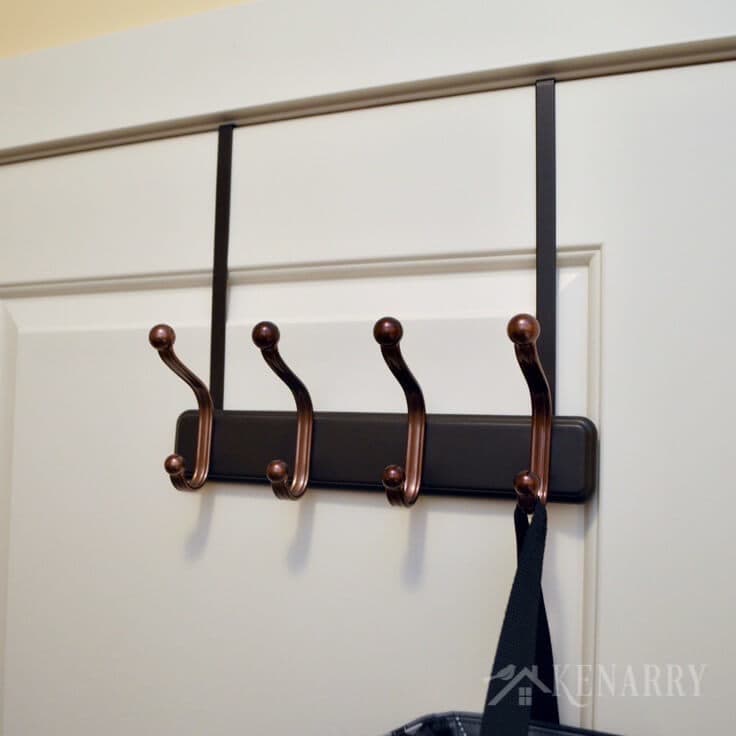
Next, we got an over the door rack in oil rubbed bronze to hang on the back of the laundry room door. Now Kent can hang his winter gear there when he comes inside after blowing the snow off the driveway. Moreover, I don’t have to look at it every time I walk by the mudroom. It’s also a great place to hang the boys’ snow pants when they come back from playing in the snow.
After that, we straightened up the existing coat hooks and put away anything we weren’t really using. Doesn’t that look better already?
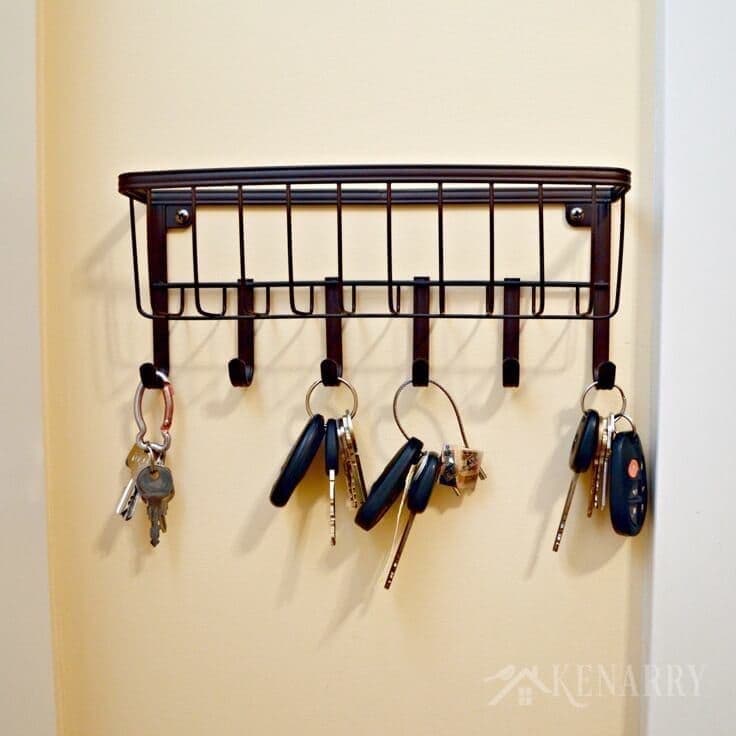
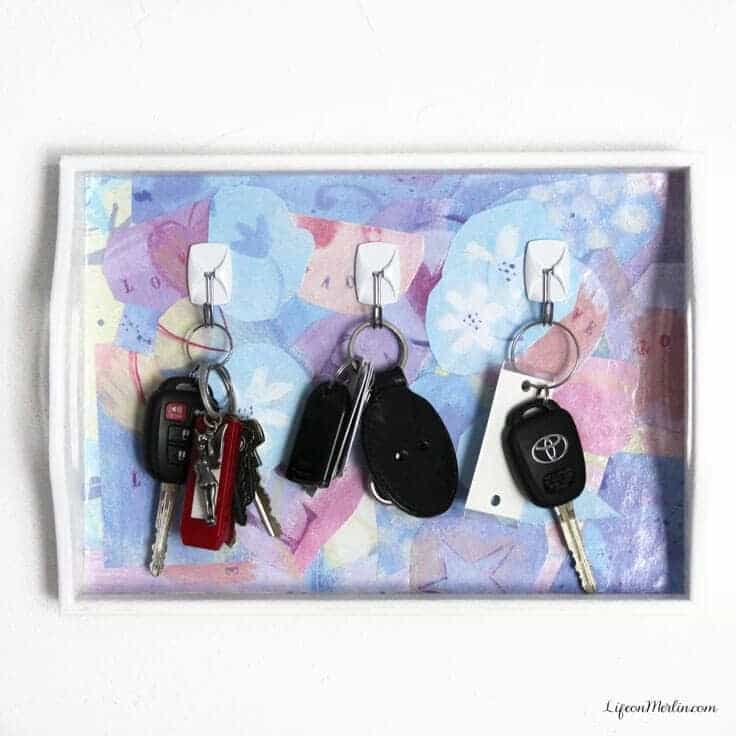
We got rid of the canvas bin for keys and installed a wall mounted mail and key rack to the left of the garage door. Now we can still find our keys, but we’re not taking up one of the precious coat hooks that can be used for jackets, purses or bags instead. This also gives us an easy spot where we can put bills, greeting cards and other things we want to remember to mail so they’re not cluttering up our kitchen counter.
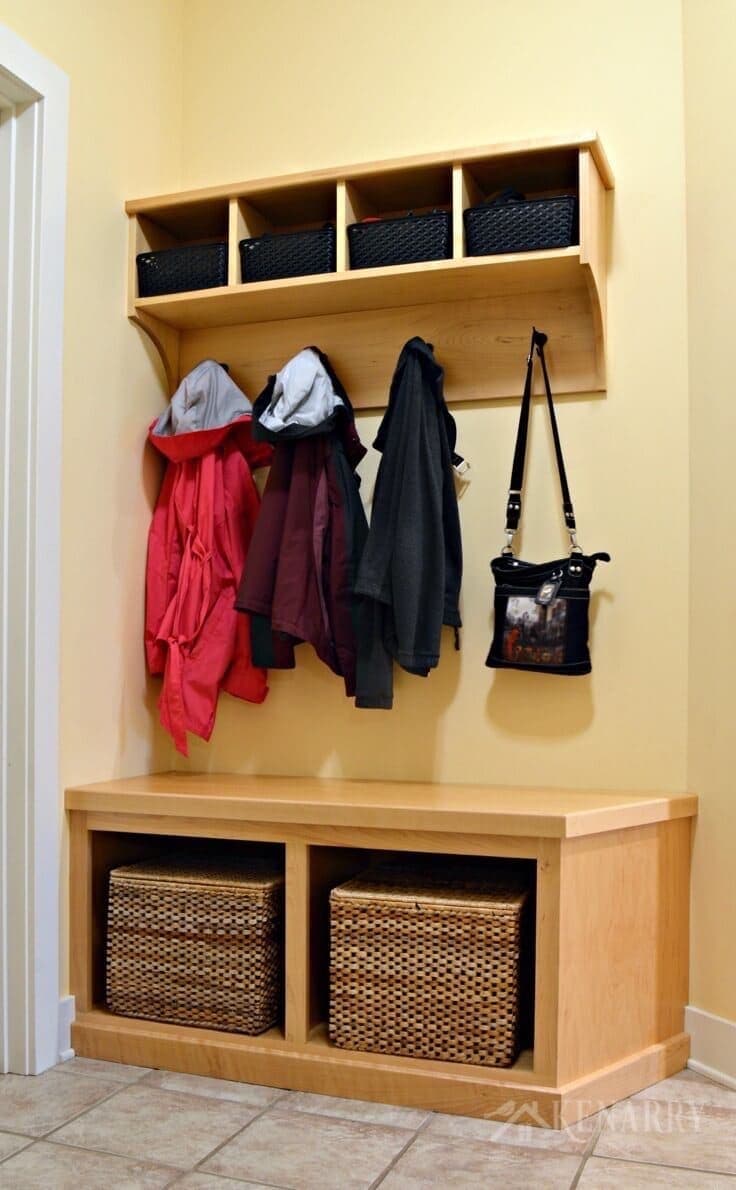
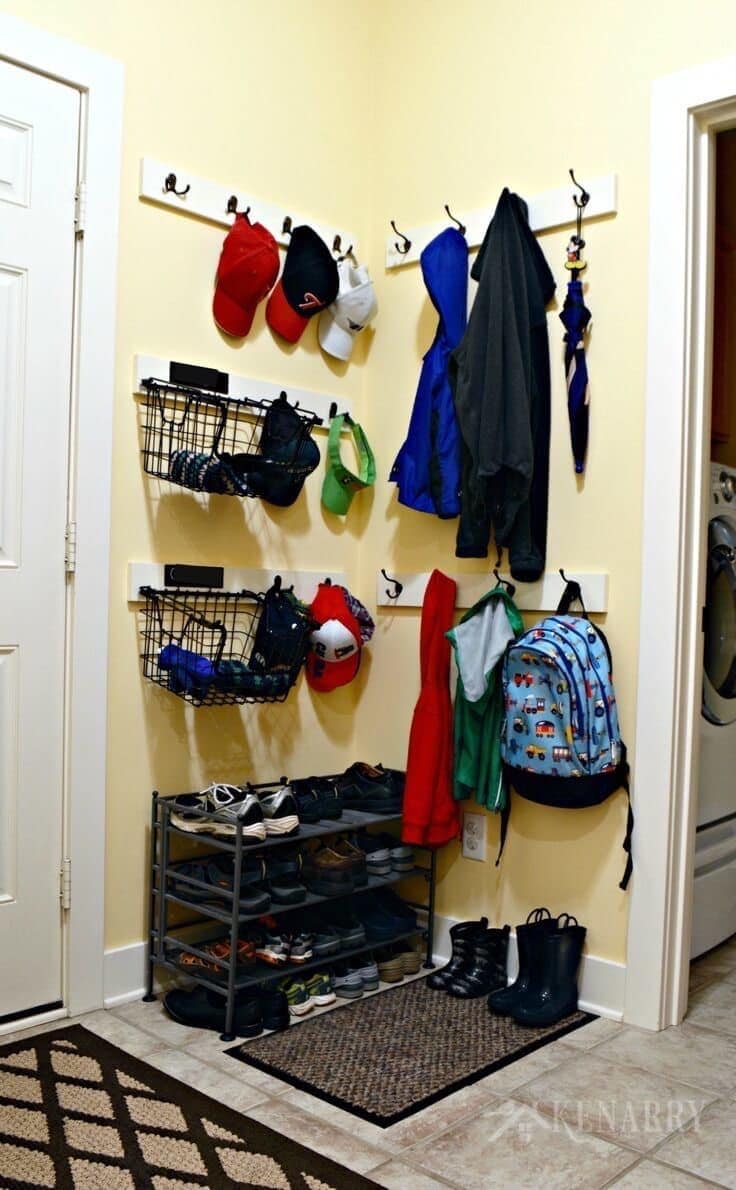
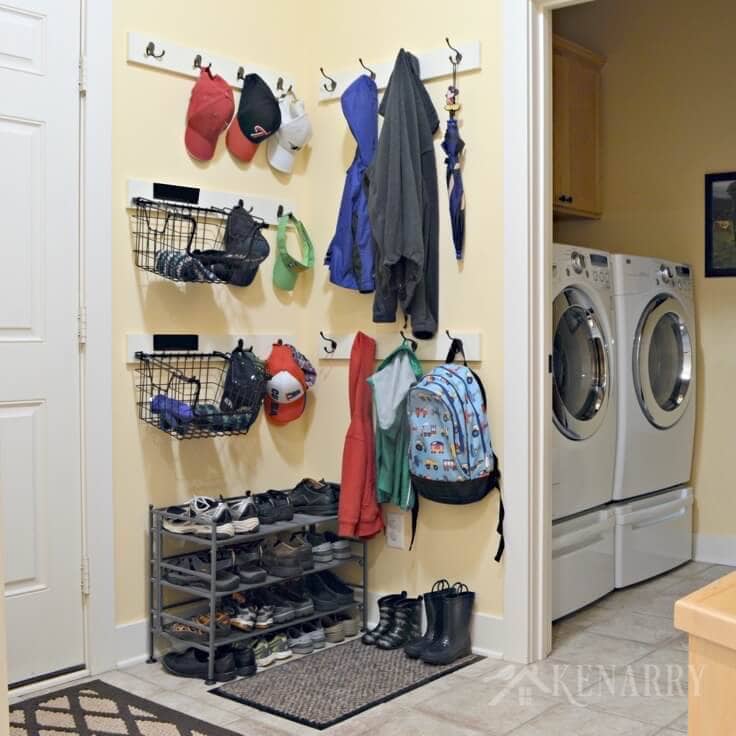
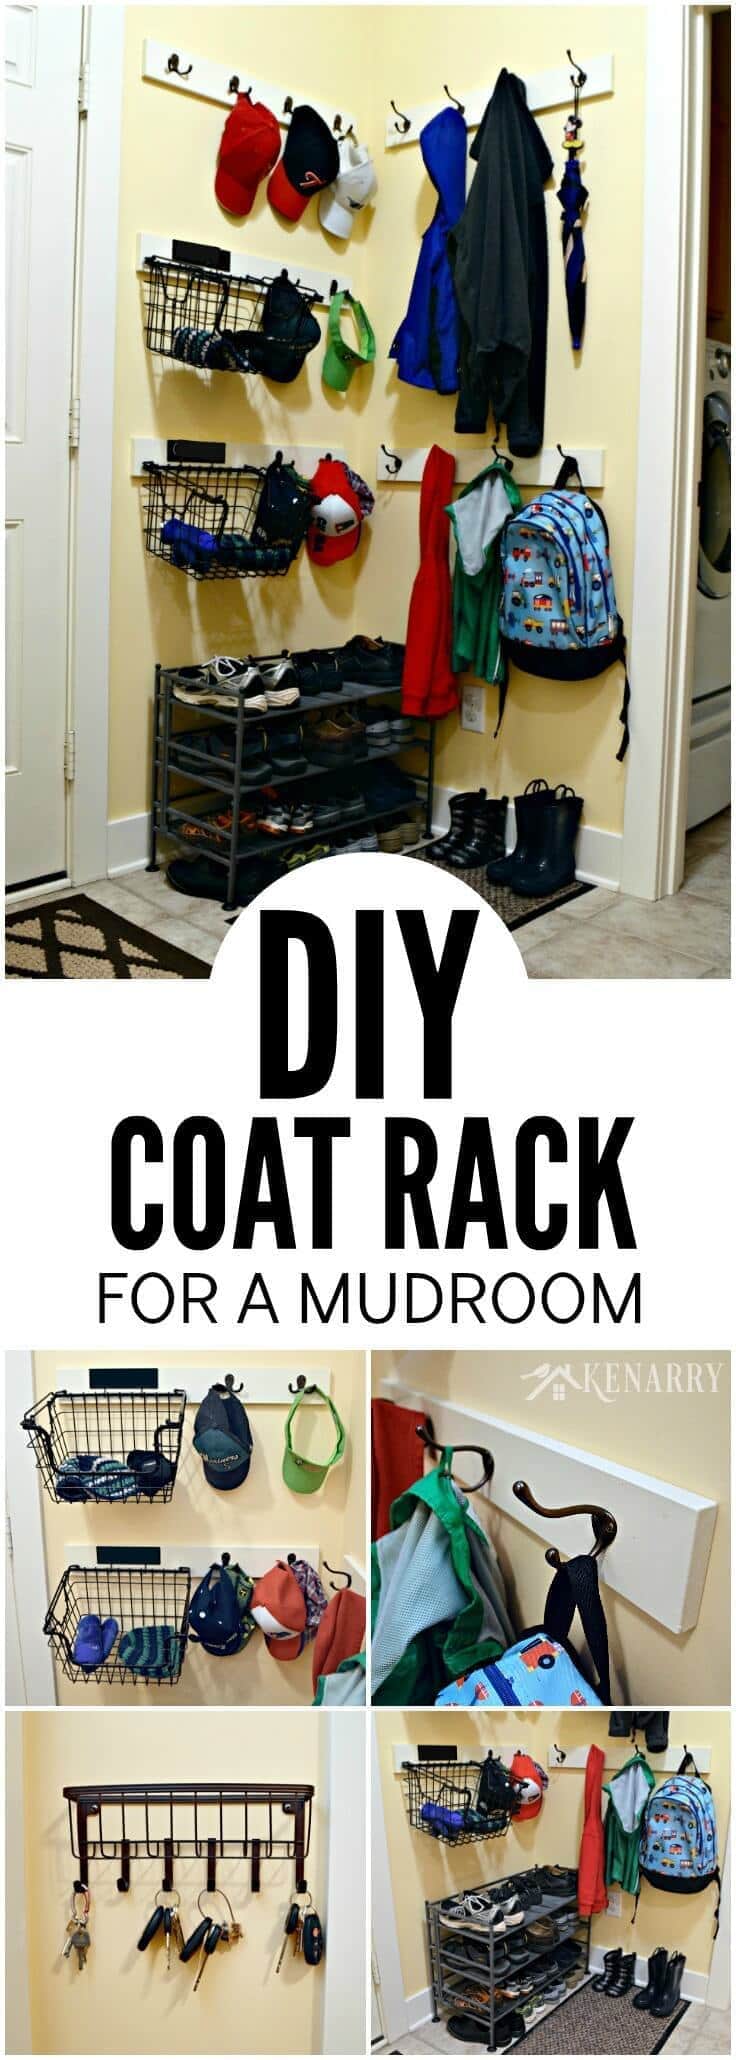
Last, but not least the pinnacle of our easy mudroom organization – we created the new coat hooks and hat rack using decorative hooks from Hickory Hardware, wire baskets, spray paint and some boards.
We intentionally wanted a double row of coat hooks so there would be some at kid level that the boys could easily reach to hang their coats and backpacks when they get home from school. The three hat rack rows allow us to use the top row for Kent’s baseball hats. The middle one is used by our six year old son and then the four year old can easily reach the lowest one.
How to Make the Mudroom Coat Hooks and Hat Rack
It’s incredibly easy to create a station like this for coats and hats in the corner of your mudroom. It will make the space more useful for your family and yet the coat hooks from Hickory Hardware give it decorative style in case your guests ever wander into that room in your home.
What You Need:
- 5 boards (Each of ours is 28″ x 3 1/2″ x 3/4″)
- Router
- HomeRight Spray Shelter
- Spray Paint (We used Rust Oleum American Accents Ultra Cover 2X Spray Paint in Satin Heirloom White.)
- 8 of P27120-RB – 3-Inch Utility Hooks from Hickory Hardware in Refined Bronze Finish
- 8 of P27115-RB – Double Utility Hooks from Hickory Hardware in Refined Bronze Finish
- Gourmet Basics by Mikasa, Hartney Stacking Baskets, Set of 2 (Ours are 13.4″ x 10.4″ x 8.1″. We got them at Costco, but these baskets on Amazon are similar.)
- Drill/Impact Driver
- Measuring Tape
- Stud Finder
- Level
- Pencil
- Spackling
- Small Putty Knife
Instructions:
Step 1: Prepare the Boards
We cut boards to fit our space then Kent just ran a router along the edges to make it smoother.
Step 2: Paint Boards
Using the heirloom white spray paint, we sprayed several coats of paint on each side of the boards, allowing the boards to dry between each coat. Kent used an extra board to prop up the five that we’d be using for the coat hooks and hat racks so he could get the edges painted well.
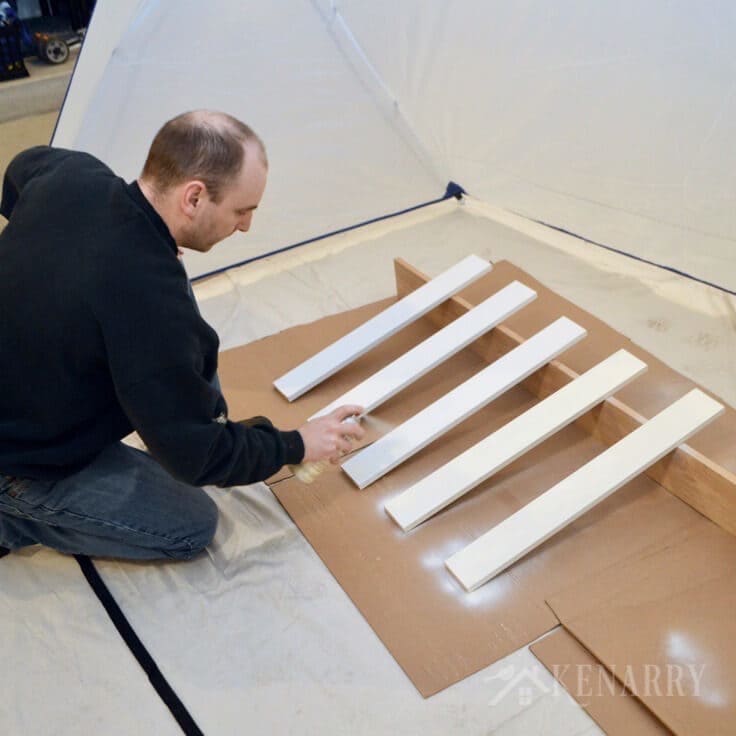
Having the HomeRight Spray Shelter made it really easy for us to do this in the garage without worrying about wind and weather. It kept the temperature moderate for the spray paint to dry and more importantly kept us from getting over spray on anything else in our garage.
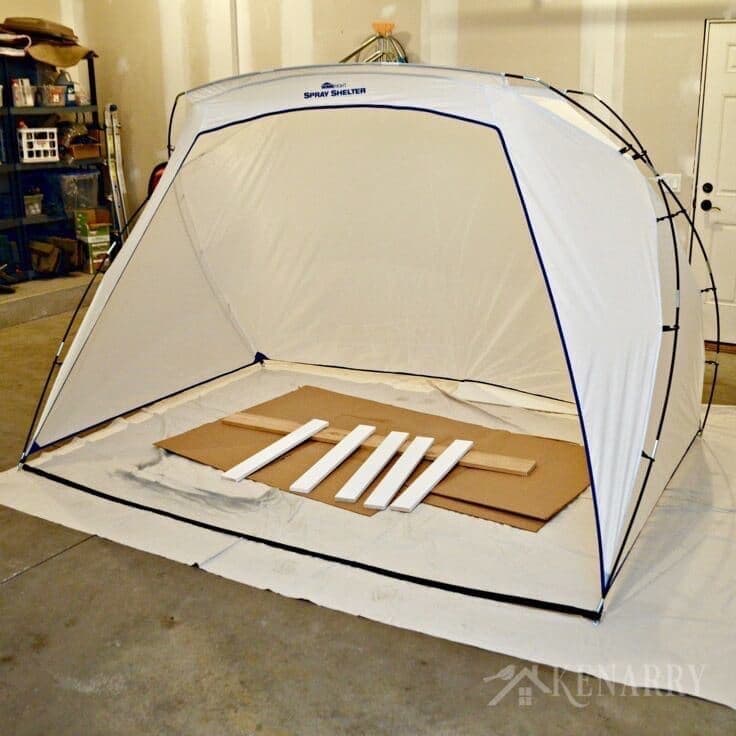
The Spray Shelter is almost like a three sided tent. While it’s larger than we really needed for just a few boards, it would be very useful for large dressers, chairs, furniture and other spray paint projects. It also folds up small and comes with a bag so we can easily store it away until another DIY project arises.
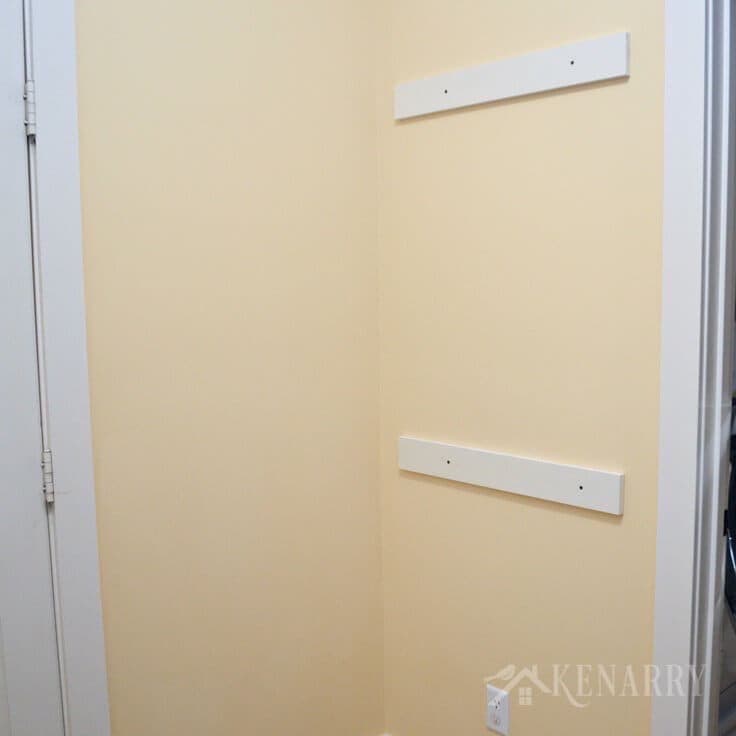
Step 3: Screw the Boards into the Wall
Measure to determine the height and center for where you want to place the boards for your coat hooks. Use a level to make sure they’re even. You’ll also want to use a stud finder to make sure at least one of your screws is connected to a stud in the wall. Those winter coats and back packs can get heavy and you do not want your coat hooks to fall down. Once you’ve marked where you want them with pencil, use the drill/impact driver to screw the boards into the wall.
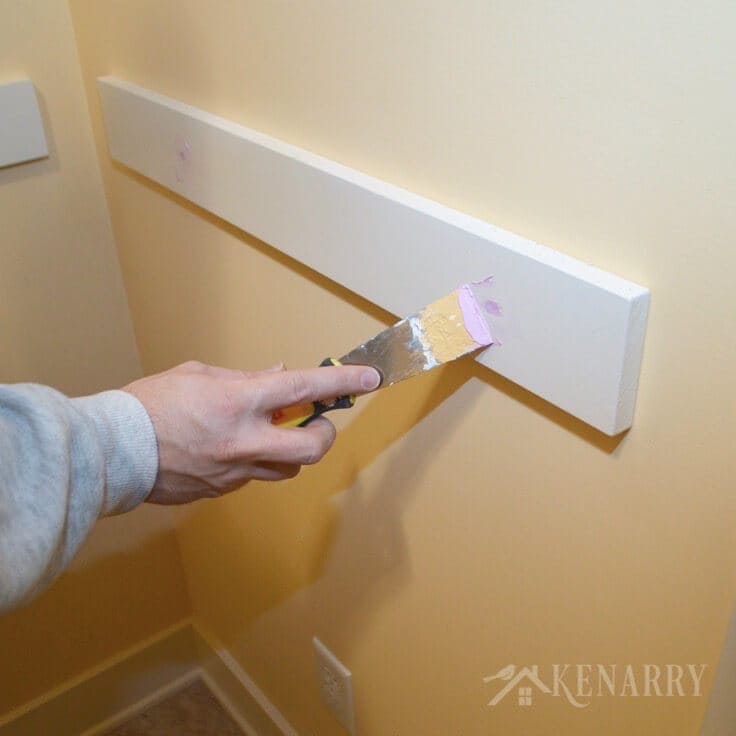
Step 4: Patch the Screw Holes
Use spackling and a small putty knife patch and cover the screw holes. We used a small paint roller and antique white paint we had leftover from painting the trim in our home to hide the patches when the spackling was dry.
Step 5: Attach the Coat Hooks
Use a pencil and measuring tape to determine where you want to put the coat hooks. Screw the Double Utility Hooks from Hickory Hardware into the hat rack using the drill/impact driver.
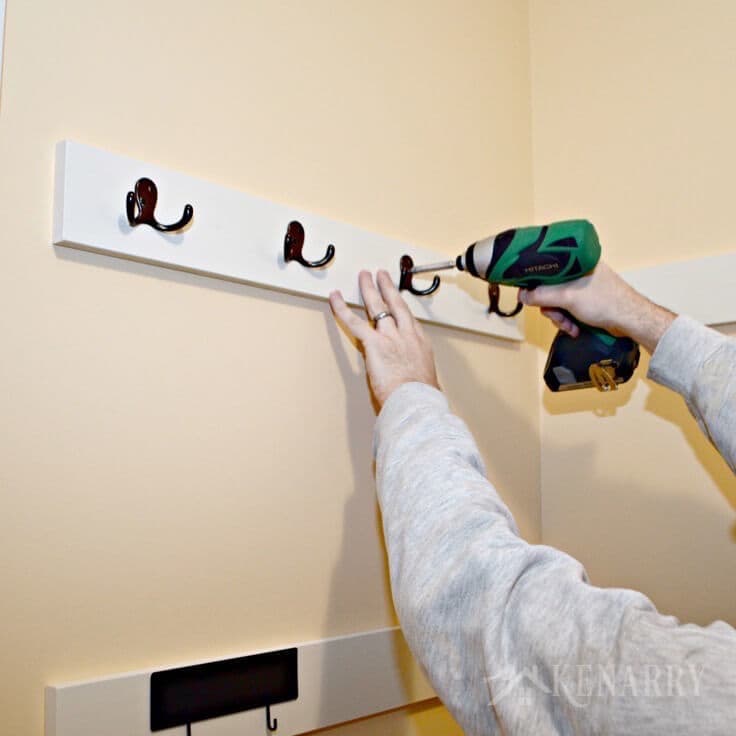
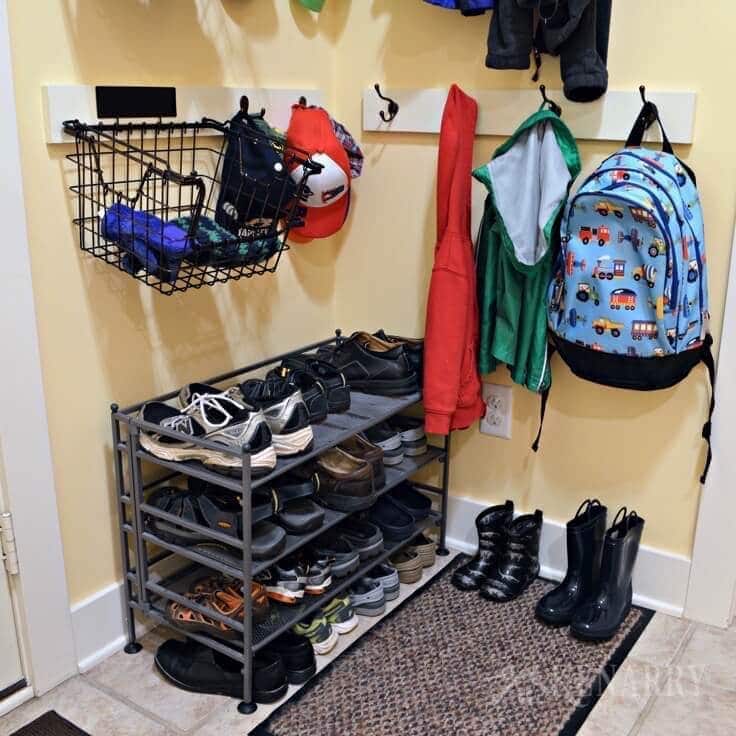
We put 4 of the Double Utility Hooks on the top row for Kent’s baseball caps so it can hold at least 8 of them. Each of the boys’ hat racks has 2 Double Utility Hooks so they can hang four baseball caps each. Next to the boys’ hat racks we attached the wire baskets using a metal sign that came with the baskets. The wire baskets are used for storing winter hats and mittens. The boys toss their winter gear in their basket when they get home from school and the wire design gives some air flow so they can drip dry.
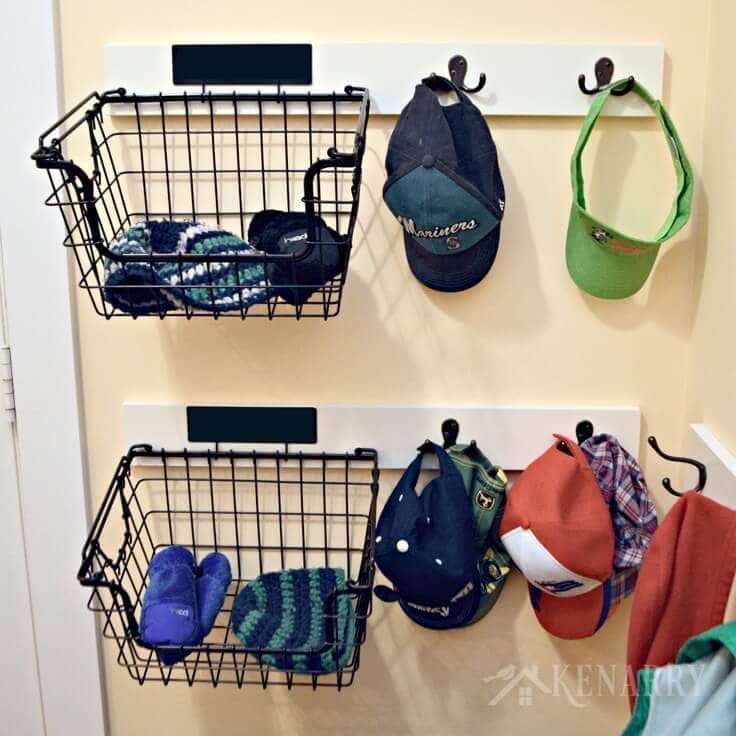
I love the simple style of the Double Utility Hooks. They sort of look like little octopuses, don’t you think?
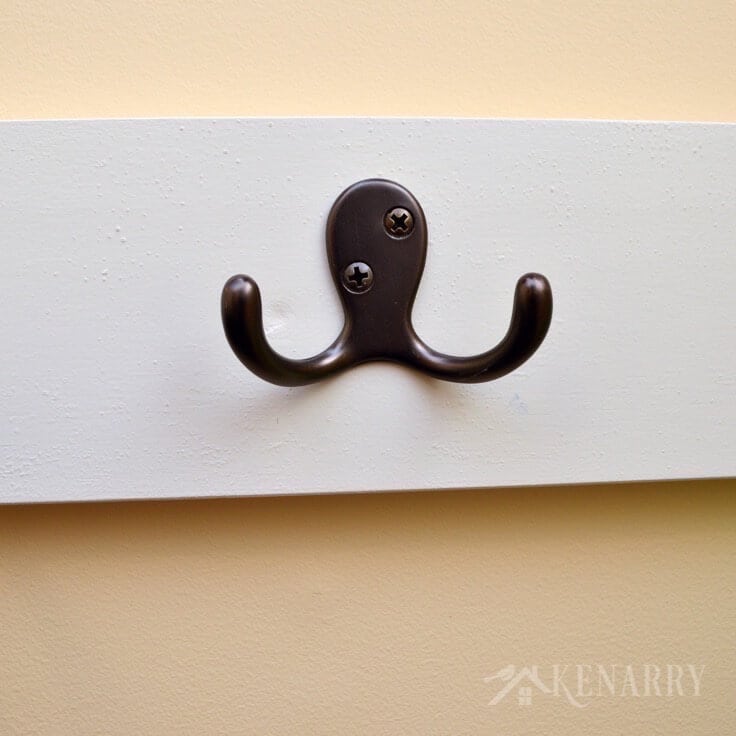
On the other wall, adjacent to the rows for the hat rack, we used the drill/impact driver to attach the 3-Inch Utility Hooks from Hickory Hardware to the remaining two boards. Those hooks work great for hanging coats, bags and backpacks.

Step 6: Organize Your Hats, Coats and Shoes
Once we were done attaching the new coat hooks and hat rack to the wall, the last step was to organize and straighten up all the jackets, umbrellas, bags, caps and shoes.
I would love to tell you it always looks this tidy now that we’ve installed the new coat hooks and hat rack.
But at least now when we walk in the back door after school or work, there’s actually a space for everything in our mudroom. I just need to get my boys into the routine of actually using it!
Love the ideas you see here on Ideas for the Home by Kenarry®? Subscribe today to get our weekly Ideas in Your Inbox newsletter plus other exclusive gifts and offers — all for FREE!
What’s Next?
While you’re here be sure to check out other organizing ideas on Ideas for the Home by Kenarry® –
- 10 Easy Ideas for Toy Organization
- DIY Ceiling Mounted Shelves for the Garage
- 22 Insanely Creative DIY Home Organization Hacks
If you like this idea for coat hooks, hat racks and organization for a mudroom, please share it with your friends or pin it for later:


Wow, I just love what you did! I just love those baskets, I definitely could use a few of those in my house. Thanks for the inspiration. I am glad I saw you on Share the Wealth Sunday. 🙂
Thank you so much, Tracy Lynn! Baskets make a world of difference in decluttering.
I love the hanging baskets!!
Thank you! They’re working great this winter!
The hanging baskets are such a great idea. They look neat and are easy for the little ones to throw small items in. Space looks great and well organized.
Thanks, Melissa! We’re finding those baskets are especially handy right now for collecting all the hats and mittens.
love the tips you share, one room in our house that gets trashed daily is the mud room gonna try your tips see if it will help
Hi Angie, I think that’s why they call the mud room, the mud room! It sure doesn’t collect a lot of mud and clutter, doesn’t it. Good luck organizing yours this season.
Thanks, Angie! I hope the tips help you with your mudroom.
Thanks for these organization tips. I needed them.
So glad the tips were helpful to you, Charlene! We love to hear that!
Looks lovely! We have those same shoe racks in our playroom. I love them!
Oh cool! How are you using the shoe racks in your playroom? Post a link if you’ve written about them on your blog. I’d love to see.
Looks great! I especially like the basket-racks. So handy!
Stopping by from this week’s Encouraging Hearts and Home blog hop.
The basket racks are my favorite too. They’re perfect for drying wet mittens and hats after the boys get in from playing in the snow.
You just reminded me why I don’t live in a wintery place. I have forgotten about the boots, extra coats and winter gear. The after looks great and I love those basket racks. Thank you for sharing at Dishing it and Digging it link party. I enjoyed seeing what you have been up too.
Ha ha ha! It’s so true, Vanessa! We often dream of moving somewhere warmer, but the summers are SO gorgeous here in Michigan. Maybe we just need to be like birds and go south for the winter?
I wish I had a mudroom!! They are so practical and useful, but not very common place where I live.
Thanks for linking up at #bloggerspotlight!
Thanks, Hil! They really are useful. Thankfully ours is separate from our front entrance way so it really does keep most of the mud out of view.
What a difference it makes to have this area organized well! I’m drooling over yours! 🙂 Lisa
Aww, thanks, Lisa! So glad you like it!
Your mud room organization project turned out great! Thanks for sharing your ideas at the #HomeMattersParty last week. Hope you will link up with us again at this Friday’s party.
Thank you, Nicole — and thanks for hosting a wonderful party!
Awesome ideas here. Solves a lot of space and organization problems. I also appreciate your “reality” before shots.
LOL! Those reality photos can sometimes be reality even with all the great organization hooks in our mudroom, but at least we have a place where it can all go now when we tidy up.
WOW! Love it. I love what you did it which is giving me ideas! I pinned this for future reference! #FuntasticFriday
Thank you, Joyce! We really appreciate that you pinned our post.