• About Us
    • Contact Us
    • Work With Us
    • The Creative Team
    • Disclosures
  • Subscribe
  • Shop Our Products
  • My Account
  • Cart
  • Nav Social Menu

    • Facebook
    • Instagram
    • Pinterest
    • Twitter
  • DIY & Decor â–¾
    • Crafts
    • Home Decor
    • Home Improvement
    • Technology
  • Recipes â–¾
    • Breakfast
    • Appetizers
    • Side Dishes
    • Easy Dinner Ideas
    • Slow Cooker
    • Fun Food
    • Desserts
  • Clean/Organize
  • Kid Ideas â–¾
    • Birthdays
    • Castle Playroom
    • Outer Space Bedroom
    • Teacher Appreciation
    • Travel Tips
  • Free Printables
  • Holidays â–¾
    • Valentine’s Day
    • St. Patrick’s Day
    • Easter
    • Cinco de Mayo
    • Mother’s Day
    • Memorial Day
    • Father’s Day
    • Independence Day
    • Halloween
    • Thanksgiving
    • Christmas
    • New Year’s
    • Gift Ideas

Ideas for the Home

You are here: Home / Cleaning and Organizing Ideas / Washi Tape and Sticky Note DIY Calendar

By Keri Houchin on August 6, 2020 Leave a Comment

Washi Tape and Sticky Note DIY Calendar

Cleaning and Organizing Ideas· Kid Ideas

  • Share
  • Tweet
Washi Tape and Sticky Note DIY Calendar

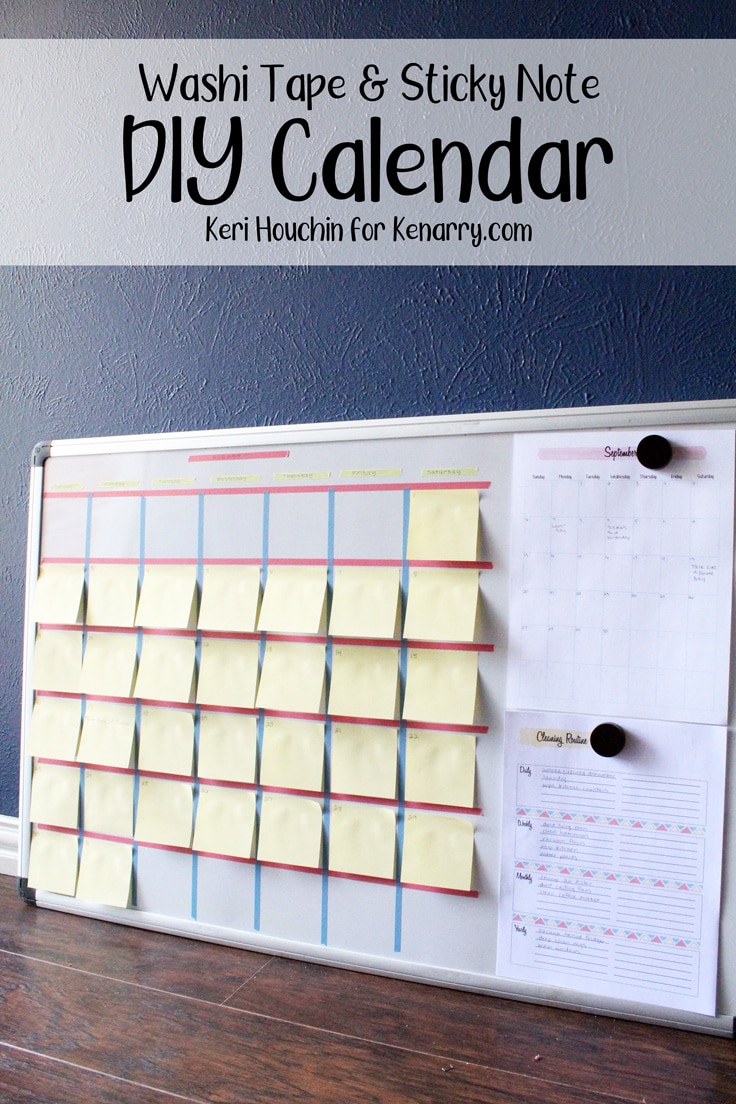
This simple DIY calendar is made with washi tape and sticky notes. It’s easy to make and is such a cute way to organize your family’s schedule.

I’m Keri from One Mama’s Daily Drama. I always use the back to school season as an excuse to get organized. It’s almost like a second new year. With two parents, two teens, and a dog, juggling our family’s schedule takes some creativity. My love of pretty pastels and washi tape inspired this DIY calendar, and you can make it in any color combo.

DIY calendar made from washi tape and sticky notes on a dry erase board

I’ve tried a lot of different options for keeping up with work, school, and appointments. When you throw in housekeeping and meal planning, it’s quite a juggling act. One thing I’ve learned is that the only way to keep up with everything is to write it all down in one place.

I used a dry erase marker board for a while, but honestly, I didn’t like it. The markers were messy and they either dried out or stuck to the board, so I was constantly cleaning it. I decided it was time to repurpose it into something that’s a kind of hybrid version of my paper calendars. Best of all, it’s really flexible and I can rearrange our schedule or rewrite several days if I need to.

How to Make a DIY Calendar

My dry erase board is 24×36-inches. If you don’t have a dry erase board, this would also work with a large picture frame with plastic, such as a poster frame.

What you need: 

Disclosure: This blog post contains affiliate links for products or services we think you’ll like. This means if you make a purchase from one of these links, Ideas for the Home by Kenarry® will make a small commission at no additional cost to you so we can keep the great ideas for the home coming your way. All opinions expressed are derived from personal experience.

Supplies Needed: 

  • Large dry erase marker board
  • Washi tape
  • Sticky notes
  • Printable planning pages
  • Magnets, optional

Instructions:

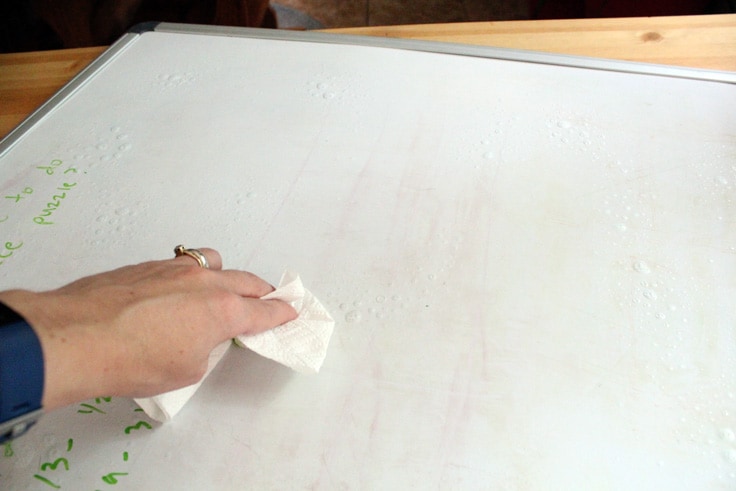
1. Clean the dry erase board.

If you’re using a brand new marker board, you can probably skip this step. I used an old dry erase board, so it had a lot of random ghost marks on it. I used Windex (actually, a generic store brand glass cleaner) and a few paper towels to get it really clean.

a hand wiping down a white marker board with a paper towel to clean it

2. Plan your DIY calendar layout.

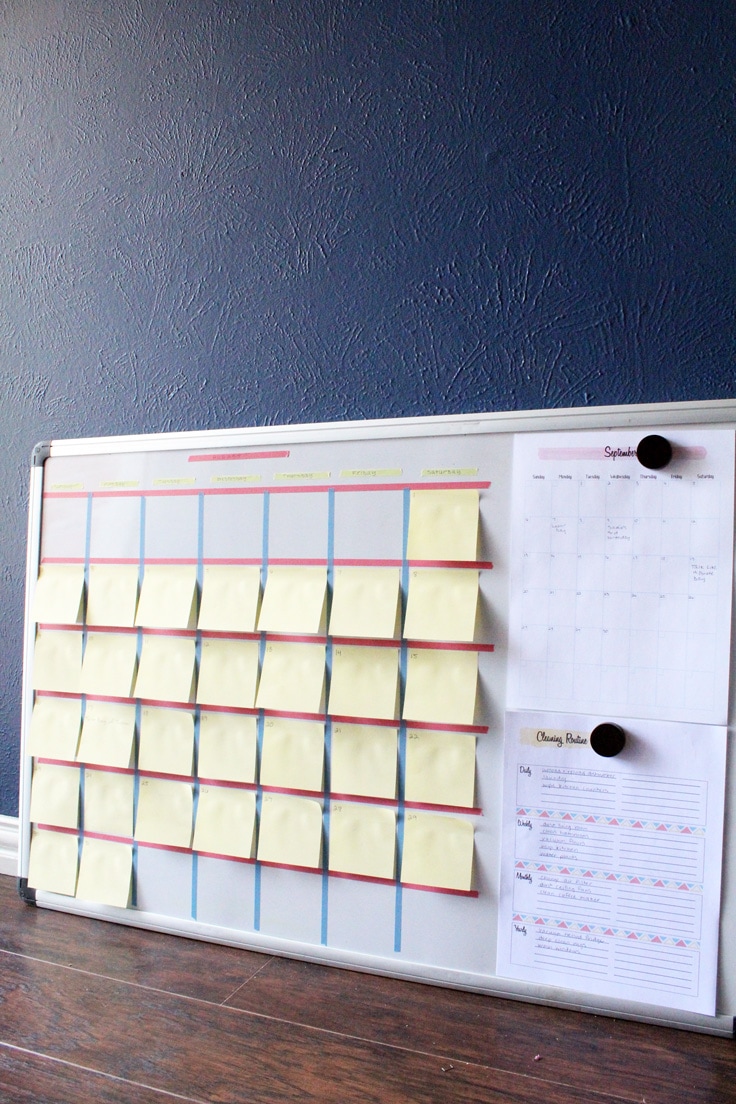
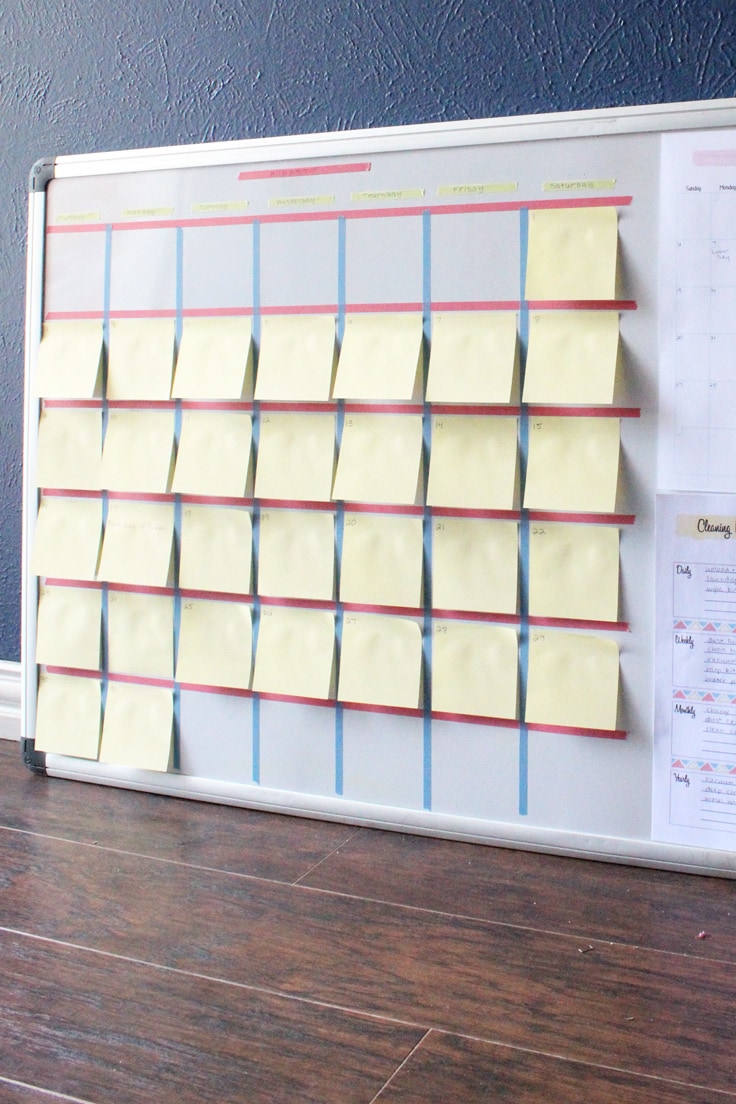
In addition to my washi tape calendar, I wanted to include a few other printable planner pages that help me stay organized every day. For this blog post, I used the undated monthly calendar and cleaning routine from my shop, Keri Houchin Design. You can also find several free printables here on Kenarry.

A white dry-erase board and a printed calendar

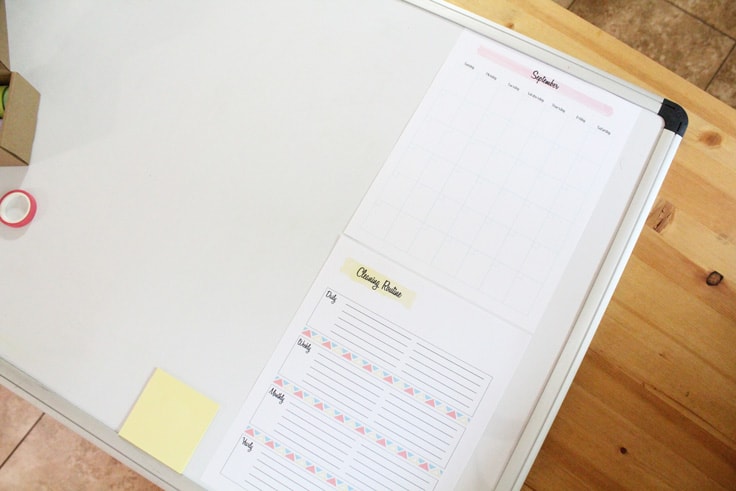
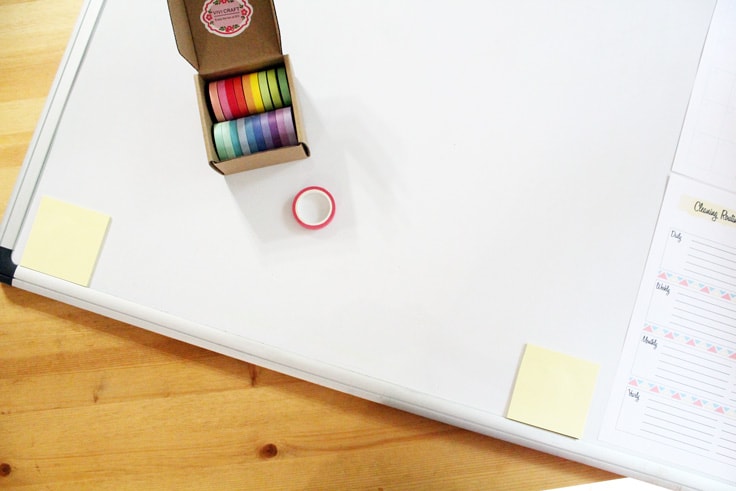
The current month is the main calendar, but I wanted to have the next month handy so I can jot things down as they come up. Once I decided where my printed pages would go, I use the sticky notes to eyeball how big my washi tape calendar needed to be.

collage of DIY calendar photos showing different angles

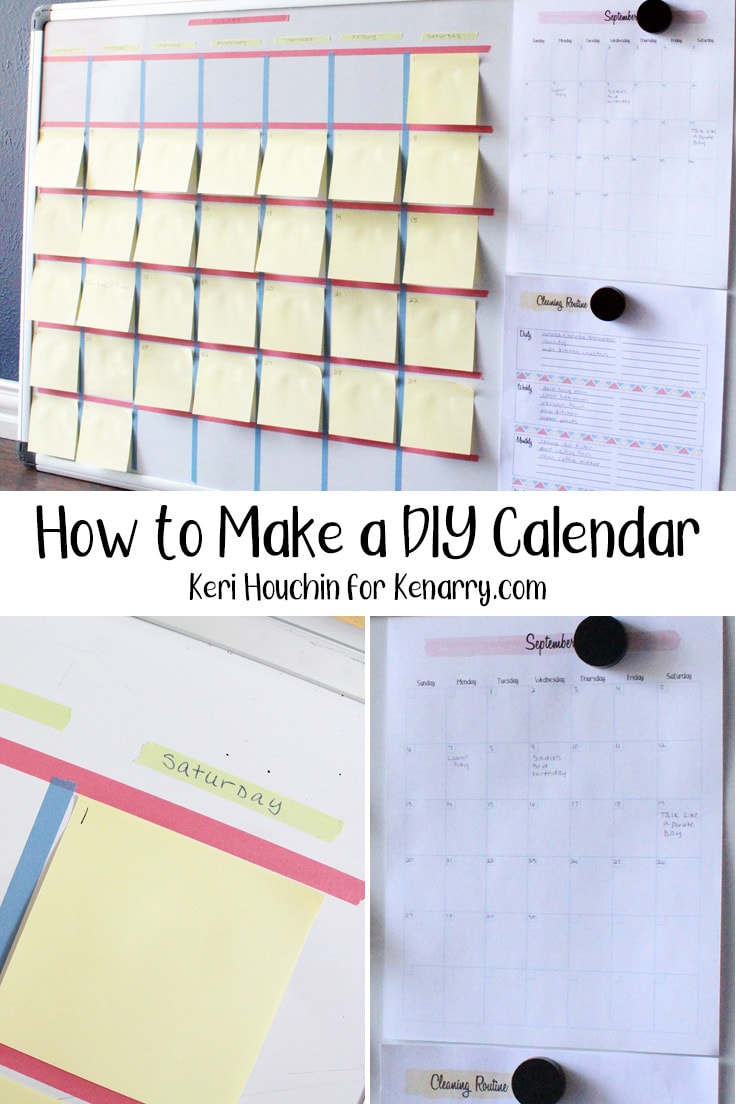
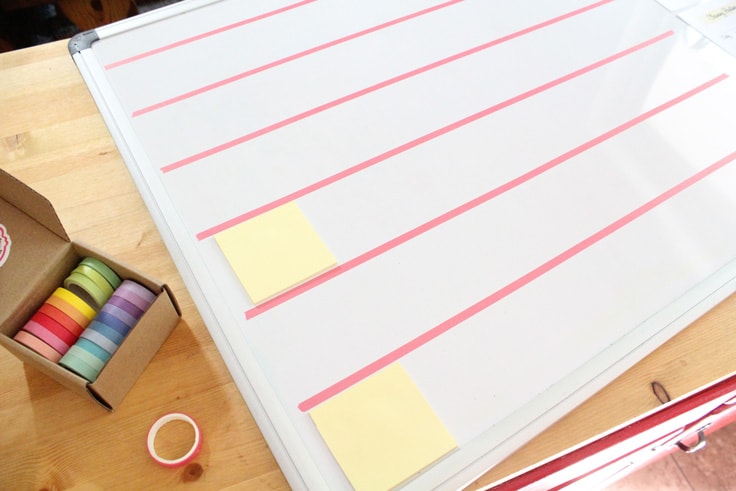
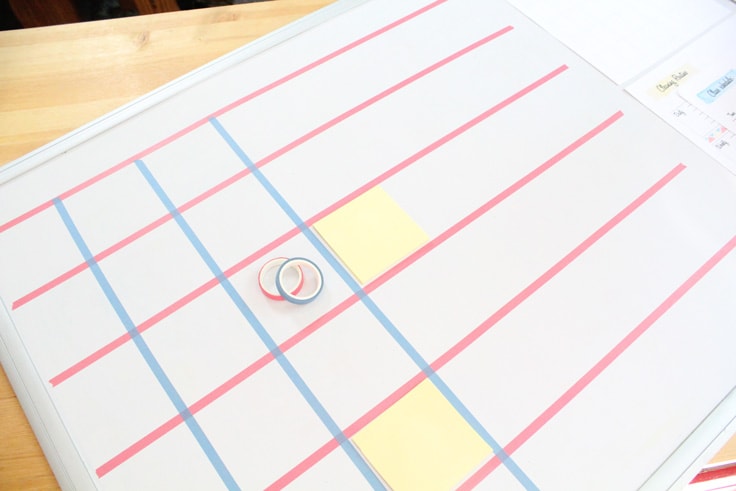
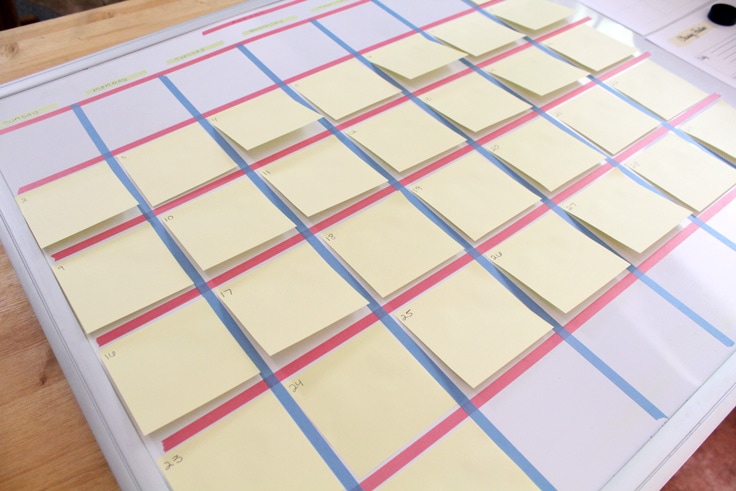
3. Make the horizontal washi tape rows.

Start at the bottom left corner of the dry erase board. Use your sticky notes as a guide and tape off the bottom row.

box of washi tape sitting on a blank white dry erase board beside 2 sticky note pads
one line of pink washi tape stuck to a dry erase board above 2 sticky notes

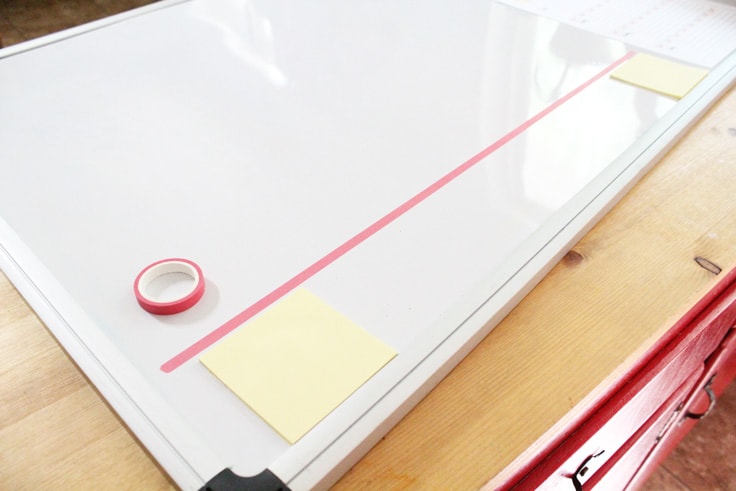
Move the sticky notes up above the first row of tape, then add a second row above them.

2 rows of washi tape on a dry erase board with a sticky note between them

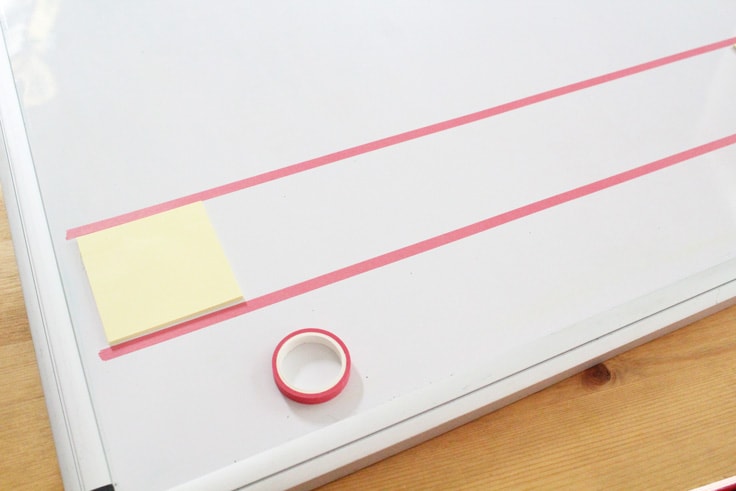
Repeat the process, moving the sticky note blocks up the board until you have six rows.

dry erase board with 6 rows of washi tape

4. Make the vertical washi tape columns.

Use the same technique to create the columns. Start on the left side and add pieces of washi tape, spaced by the sticky notes, until there are seven columns across.

blue vertical tape crossing the pink horizontal tape on a dry erase board

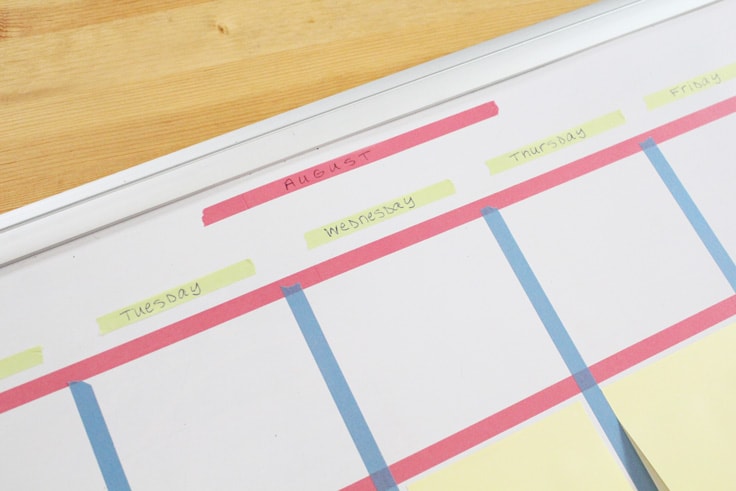
5. Add the days of the week and the month.

Use smaller pieces of washi tape to label the days of the week on the calendar. I tore the strips of tape, then stuck them to a piece of paper to write the days before sticking them to the dry erase board.

green washi tape strips with the days of the week at the top of the calendar

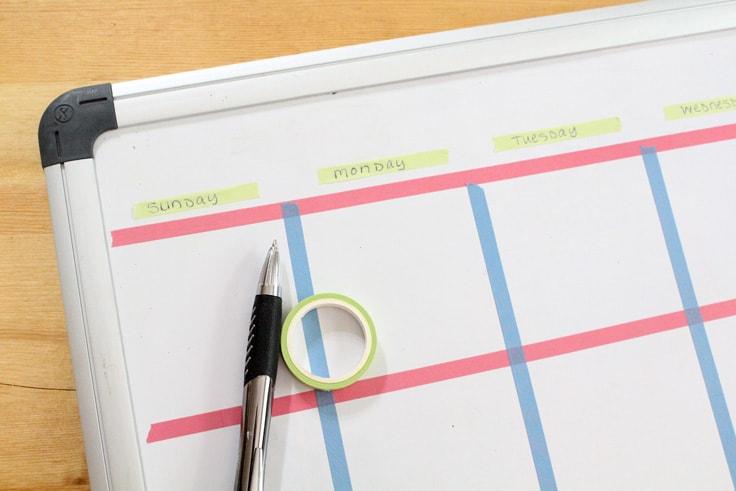
Then do the same thing with the month. You’ll only need to replace this piece of tape every month. Alternatively, you could write the month on a piece of paper.

pink washi tape with

6. Add the sticky note days.

For each day of the month, add a sticky note with the date written in the corner. As you have events or activities scheduled, write them in on the calendar note.

a yellow sticky note square on each day on the calendar
washi tape calendar filled with yellow sticky notes

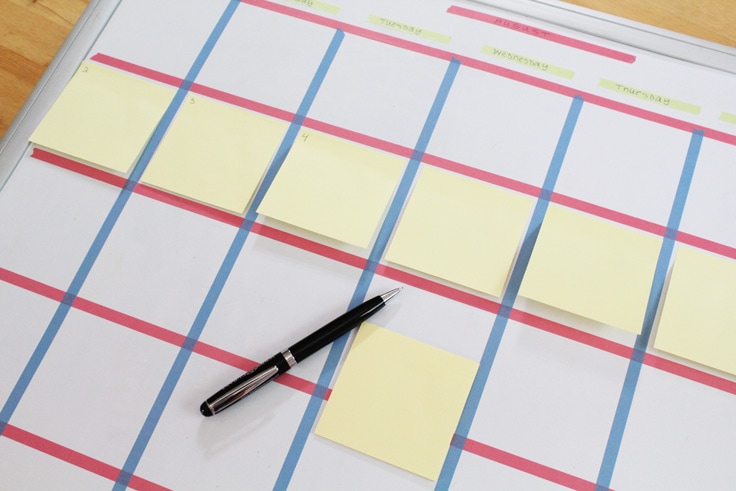
At the end of the month, you can recycle the paper squares and refill the boxes for the next month.

7. Display the calendar where you’ll see it daily.

Finally, hang the calendar up in your kitchen, lean it against the wall in your kids’ study area, or put it somewhere the whole family will see it and use it.

DIY calendar made from washi tape and sticky notes on a white board leaning against a blue wall
closeup of sticky notes on a washi tape calendar

What’s Next? 

If you enjoyed this DIY calendar then you’ll enjoy these back to school organizing ideas too.

6 Things to Put in a Family Command Center

6 Things to Put in a Family Command Center

Kids’ Desk Organizer and Portable Homework Station

Kids Desk Organizer and Portable Homework Station

10 Ways to Help Your Tween/Teen Get Organized for School

Help Your Teen Get Organized for School

You may also enjoy these printables on Ideas for the Home by Kenarry® –

  • Free Printable Chore Chart
  • Home Organization Printables
  • 2020 Printable Monthly Calendar
  • Share
  • Tweet

Cleaning and Organizing Ideas· Kid Ideas

About Keri Houchin

Keri is a writer, graphic designer, wife and mom of two from Texas. She began One Mama's Daily Drama when her teens were little as a way to help parents navigate the chaos of family life. She is passionate about planning, organizing and helping other parents find practical solutions to everyday challenges.

As an independent contractor, Keri also serves as our graphic designer creating images for both Ideas for the Home by Kenarry and Clutter Keeper, our home organization blog.

Keri has been sharing her great ideas on Ideas for the Home by Kenarry® since October 2018. Follow Keri on Facebook, Pinterest, Instagram and Twitter.

In this ultimate guide, you'll learn how to make a burlap wreath with ribbon for your home. The FREE eBook includes easy step-by-step instructions plus inspiring craft and decor ideas to make wreaths for fall, Christmas, Easter and other holidays.

Subscribe today to get ideas in your inbox plus FREE exclusives only for Idea Insiders!

Almost there! Now just check your email to confirm your e-mail address and get your free eBook.

There was an error submitting your subscription. Please try again.

You're already signed up! YAY! As an Idea Insider you have instant access to our Kenarry Idea Insider Resource Library with exclusive printables, offers and other freebies as soon as you confirm your subscription.
Previous Post: « Classic Oatmeal Cookies
Next Post: Free Hand Sanitizer Printable Label »

Reader Interactions

Leave a Reply Cancel reply

Your email address will not be published. Required fields are marked *

Recipe Rating


This site uses Akismet to reduce spam. Learn how your comment data is processed.

Primary Sidebar

Welcome

Carrie Ypma from Ideas for the Home by Kenarry®Hello, I'm Carrie! Welcome to Ideas for the Home by Kenarry® where we want to help you create a home you love. We're glad you're here! Read more...

Sign Up and Get a Free Gift

Subscribe to become an Idea Insider. You'll get our weekly newsletter plus special deals and other resources that are only for subscribers -- all for FREE!

Almost there! Now just check your email to confirm your e-mail address and get your free eBook.

There was an error submitting your subscription. Please try again.

You're already signed up! YAY! As an Idea Insider you have instant access to our Kenarry Idea Insider Resource Library with exclusive printables, offers and other freebies as soon as you confirm your subscription.
In this ultimate guide, you'll learn how to make a burlap wreath with ribbon for your home. The FREE eBook includes easy step-by-step instructions plus inspiring craft and decor ideas to make wreaths for fall, Christmas, Easter and other holidays.
  • About Us
  • Subscribe
  • Shop Our Products
  • My Account
  • Cart

Footer

Disclosure: Posts may include affiliate links for your convenience. As an Amazon Associate I earn from qualifying purchases. All opinions are our own. You are reading and following advice from Kenarry, LLC at your own risk. Always use safety precautions. You should read and follow manufacturer’s directions for the products and tools you use. Read more.


Privacy Policy: The privacy of your personal information is important. We make every effort to safeguard your information and will never sell it to third parties. Read more.

Terms of Use: You are welcome to link to this site or use a single image and brief description to link back to any post. Republishing posts in their entirety is prohibited without permission. All images are property of Kenarry, LLC. Do not crop or remove watermark. Do not reproduce without link back or permission. If you do link to this site, please contact us to let us know. All free printables offered are for personal use only. Pinning is always welcome and appreciated. Thank you!

As it relates to comments and content posted on this blog by those other than the owners, any such content that contains the copyrighted and/or proprietary work of others is expressly prohibited and will be removed. Repeated posting of such content by the same user may result in that user being banned from this site.

Copyright © 2021 Kenarry LLC · Powered by Captivating Theme on Genesis Framework · WordPress · Log in