• About Us
    • Contact Us
    • Work With Us
    • The Creative Team
    • Disclosures
  • Subscribe
  • Shop Our Products
  • My Account
  • Cart
  • Nav Social Menu

    • Facebook
    • Instagram
    • Pinterest
    • Twitter
  • DIY & Decor ▾
    • Crafts
    • Home Decor
    • Home Improvement
    • Technology
  • Recipes ▾
    • Breakfast
    • Appetizers
    • Side Dishes
    • Easy Dinner Ideas
    • Slow Cooker
    • Fun Food
    • Desserts
  • Clean/Organize
  • Kid Ideas ▾
    • Birthdays
    • Castle Playroom
    • Outer Space Bedroom
    • Teacher Appreciation
    • Travel Tips
  • Free Printables
  • Holidays ▾
    • New Year’s
    • Valentine’s Day
    • St. Patrick’s Day
    • Easter
    • Cinco de Mayo
    • Mother’s Day
    • Memorial Day
    • Father’s Day
    • Independence Day
    • Halloween
    • Thanksgiving
    • Christmas
    • Gift Ideas

Ideas for the Home

You are here: Home / Craft Ideas / Handmade Rainbow Washi Tape Card Tutorial

By Keri Houchin on July 2, 2020 Leave a Comment

Handmade Rainbow Washi Tape Card Tutorial

Craft Ideas

  • Share
  • Tweet

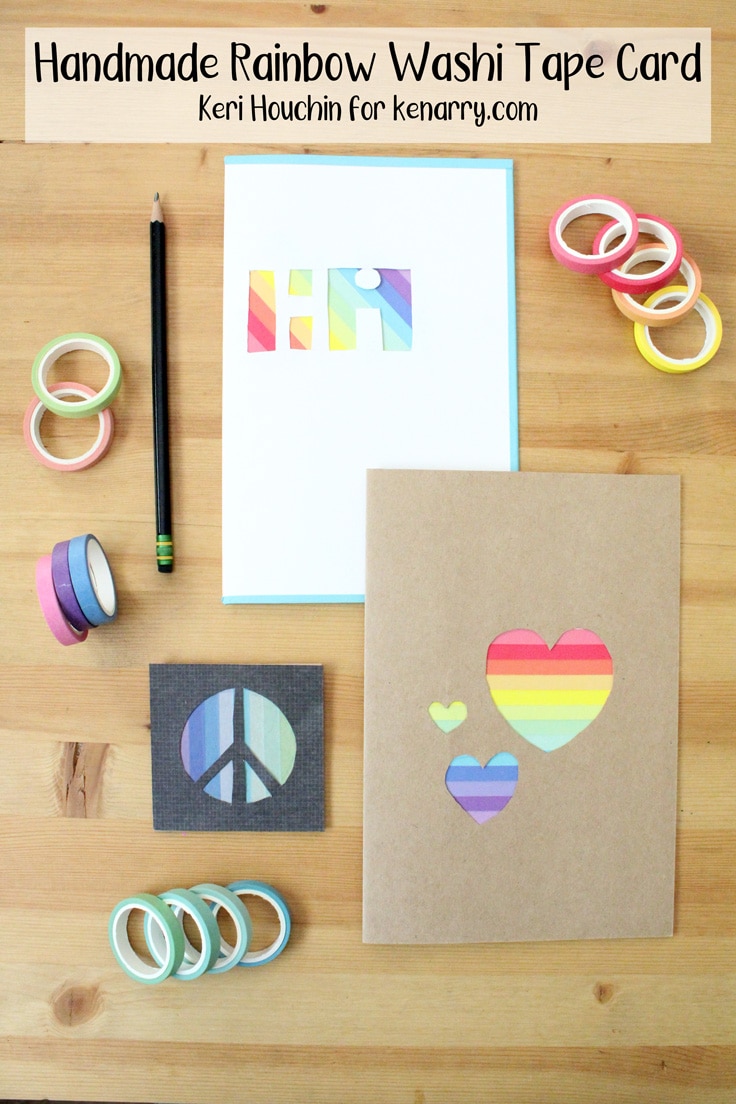
Sending handmade cards is a simple way to show someone you care. This rainbow washi tape card is easy to make and turns out so pretty.

I’m Keri from One Mama’s Daily Drama. If you’ve seen many of the crafts I’ve shared here on Ideas for the Home by Kenarry or my own blog, you might have noticed that I love color! These handmade rainbow washi tape cards that I’m sharing today are the perfect example of that, and they’re a great way to put a little cheer in someone’s mailbox.

handmade washi tape card in 3 designs with rainbow colored stripes

When I was 9, I had a penpal through school. She lived in England, which seemed like a completely different world to me in Texas. Mostly she wrote about being a 9-year-old, and sometimes she drew a picture or put in a photo or stickers. I looked forward to her letter every few weeks, knowing that it would be the most exciting thing in the mailbox.

Even as an adult, I love finding personal mail hiding in among the bills and junk. Sure, connecting with my friends and family by texting is easier, but getting a card in the mail still feels special.

If you’re looking for a fun way to stay connected with friends and family, sending handmade cards is fun and easy for kids and adults. You can start with this simple tutorial for washi tape cards. If you’ve never worked with washi tape before, you might be pleasantly surprised.

Washi tape is light and delicate, like paper. It tears easily by hand and can be removed and re-stuck somewhere a few times. It’s very forgiving if you’re the kind of person who likes to rearrange a few times to make sure something is perfect. And it looks pretty cute whether you get it “perfect” or not!

How to Make a washi tape card

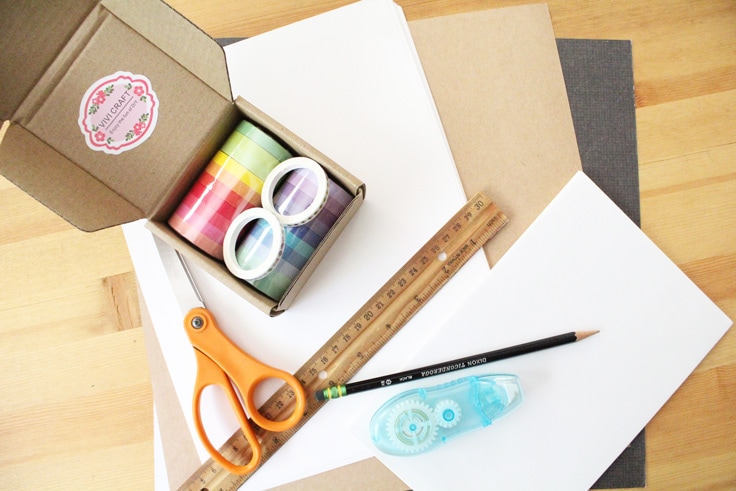
My washi tape stash is pretty big, but most of it is patterned. I ordered this set from Amazon just for this project. I got a lot of tape for what I spent and will be able to use these for a lot more crafts too.

What you need: 

Disclosure: This blog post contains affiliate links for products or services we think you’ll like. This means if you make a purchase from one of these links, Ideas for the Home by Kenarry® will make a small commission at no additional cost to you so we can keep the great ideas for the home coming your way. All opinions expressed are derived from personal experience.

Craft Tools Needed:

  • Scissors
  • Pencil
  • Ruler

Supplies Needed: 

  • Rainbow washi tape (mine is 5mm)
  • Double-sided adhesive runner
  • White card stock
  • Brown Kraft paper
  • Black or other assorted scrapbook paper
  • Envelopes
stack of supplies including paper, washi tape, scissors, a ruler, a pencil, and a double-sided adhesive runner

Instructions:

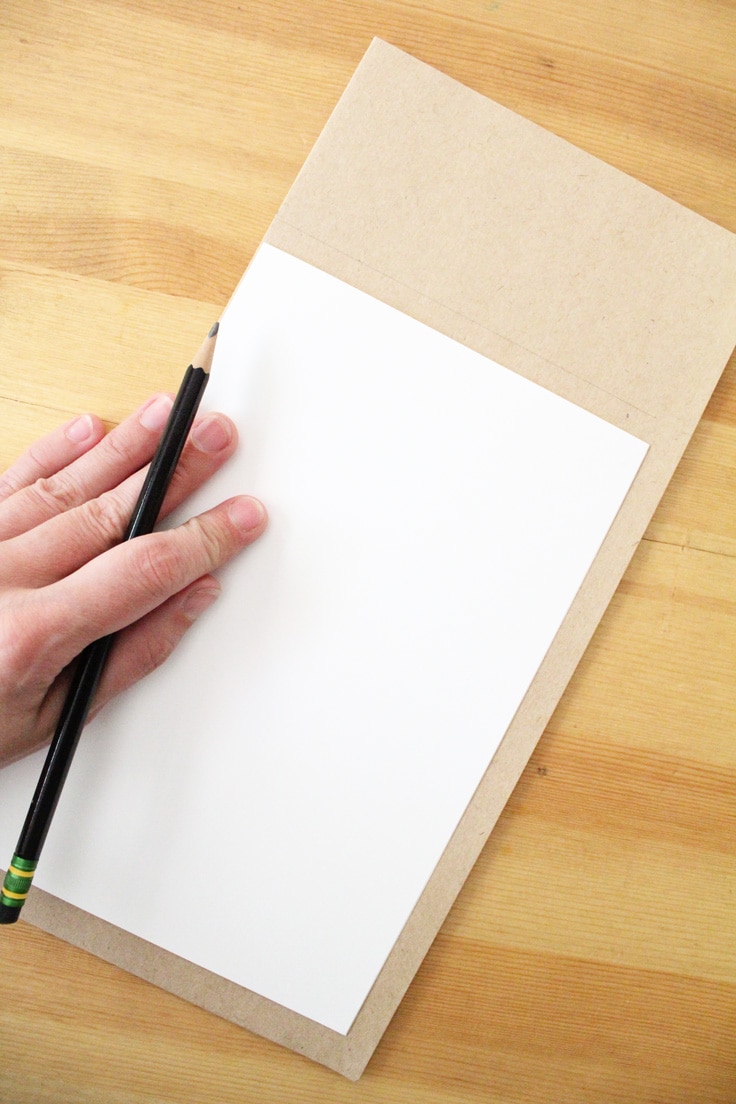
1. Cut the handmade card outside and inside pieces.

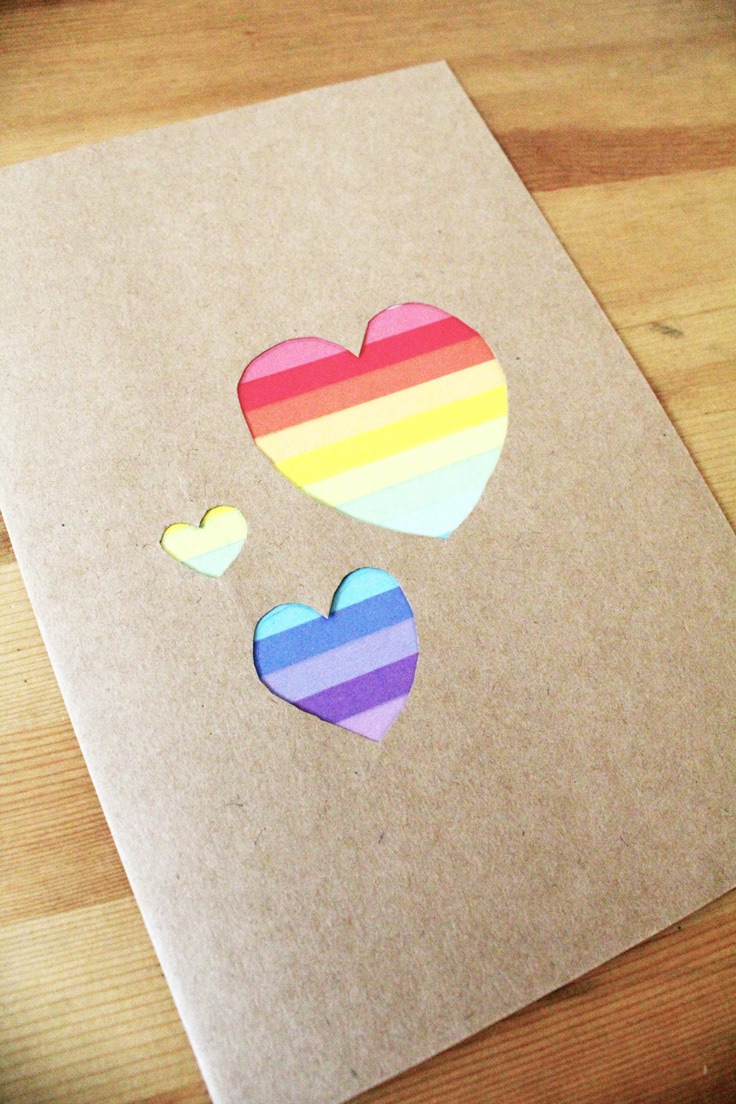
Decide the size for your card and cut a piece of card stock for the outside and inside. They can be the same size or the outside one can be bigger. For this one, the brown Kraft paper is slightly larger than the white card stock.

I used a ruler to crease the edges really smoothly.

a hand holds a pencil and traces white paper against kraft brown paper

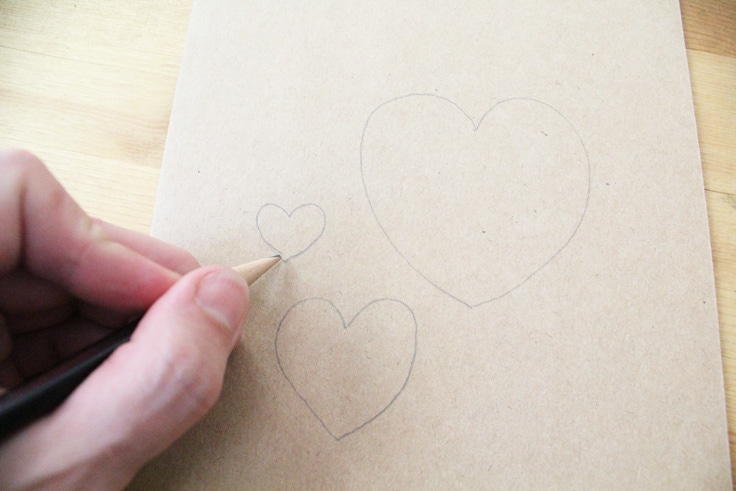
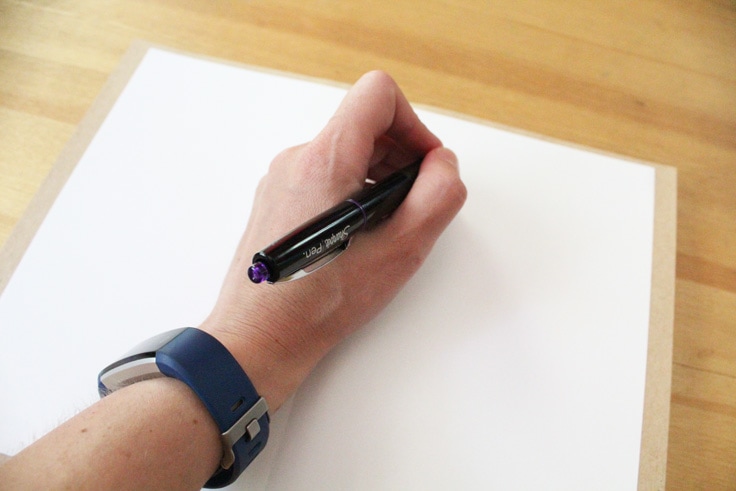
2. Draw the cutout shapes on the outside card.

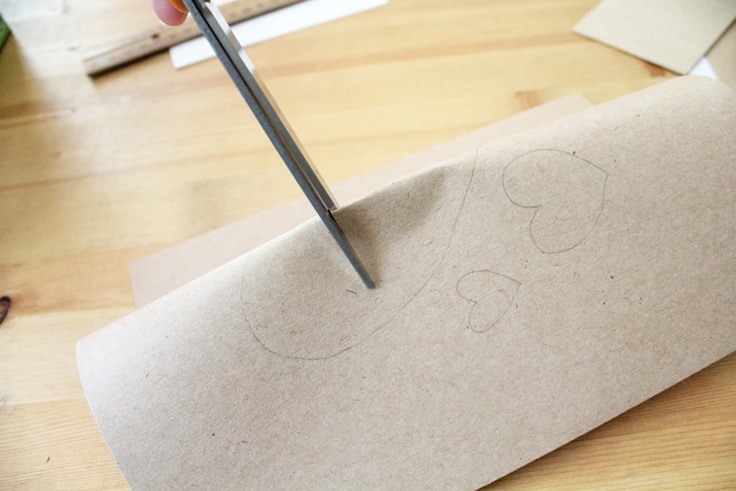
Using a pencil, lightly draw the design you want for the cutout section on the outside piece. Make sure the lines are not too close to the edge or to each other. I drew 3 hearts for this card.

Simple designs work best if you’re using scissors, but more detailed shapes could be cut with an x-acto knife. You could even cut out a design on your Cricut/Silhouette if you have one.

a hand draws three hearts on kraft paper

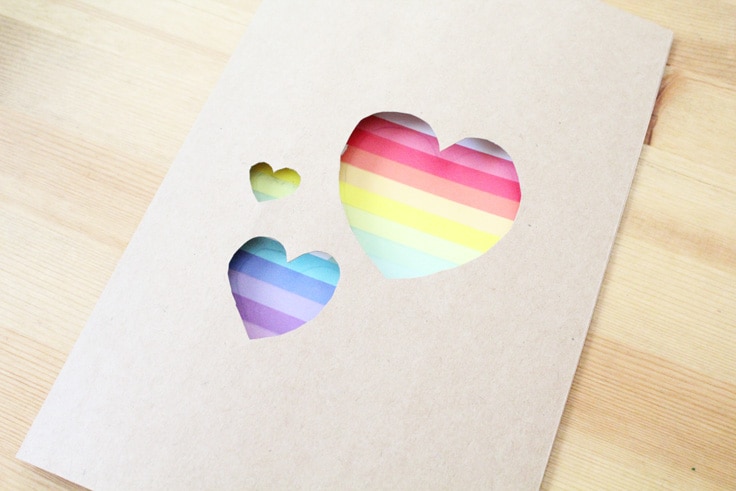
3. Cut out the card shapes.

Carefully bend the paper and make a cut with the scissors, then cut out the shapes.

scissors cut into a bent piece of craft paper
three hearts cut out of kraft paper show the white paper beneath

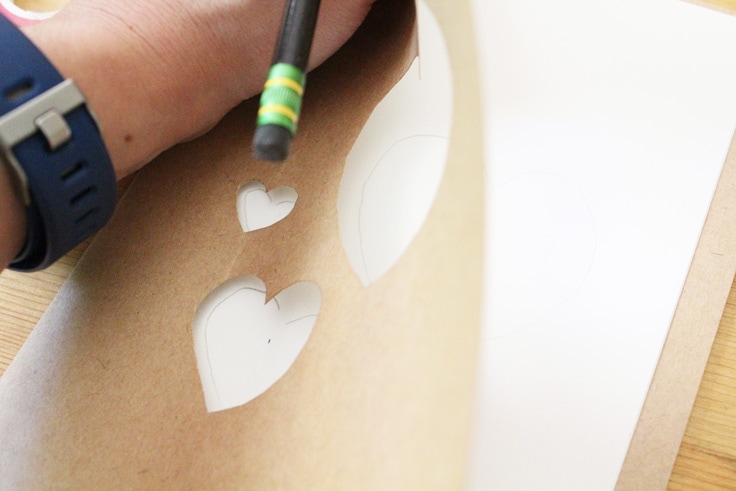
4. Mark the designs on the inside card.

Now you need to know where to stick the washi tape. Lightly trace the shape onto the white inside paper. You don’t want it to show through the tape, but you need a guide. You can erase the pencil marks as you apply the tape if you prefer.

a pencil marks where the hearts match up on the white paper

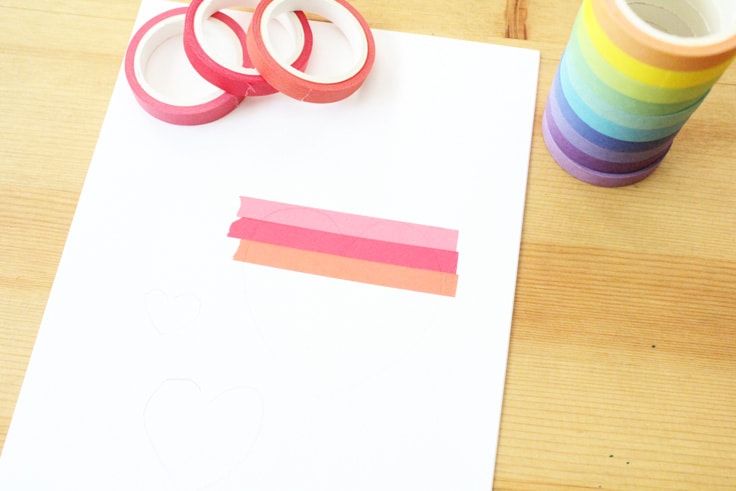
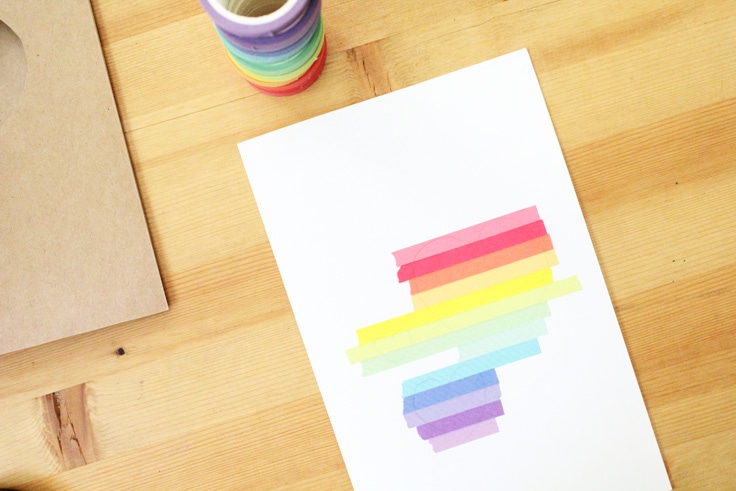
5. Apply the washi tape.

Decide which tape colors you’ll use and make sure you have enough to cover the cutout section.

13 rolls of washi tape in solid colors line up to create a rainbow

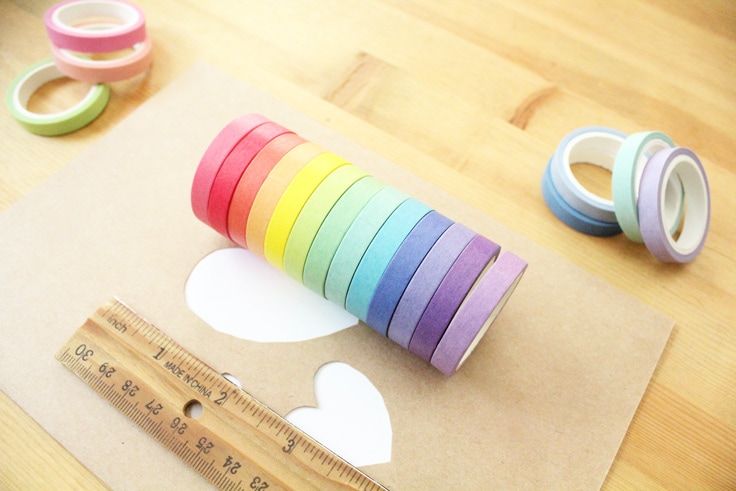
Using your lines as a guide, start layering the washi tape onto the white inside card. You can pull up the washi tape and move it quite a few times if you need to.

three strips of washi tape in shades of pink are stuck to white card stock
13 strips of washi tape are stuck to white card stock to cover the hearts

6. Attach the two handmade card pieces.

Once you’re happy with the washi tape card design, use the double-sided adhesive runner to attach the two card pieces. I just run lines around the outside edges and add a few in the middle.

a hand pulls the adhesive roller across the edge of the card

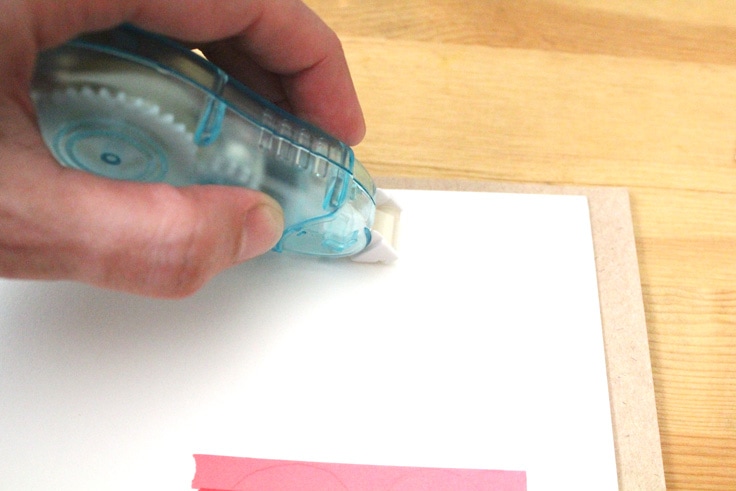
Alternatively, you can use glue to attach the two sections, but because glue is wet, I’ve noticed that it tends to warp the paper just a bit.

When your card is complete, you can write a message inside and send it to someone special.

a left hand holding a pen writes inside the white pages of a card
the finished washi tape card shows three heart cutouts with rainbow colors behind

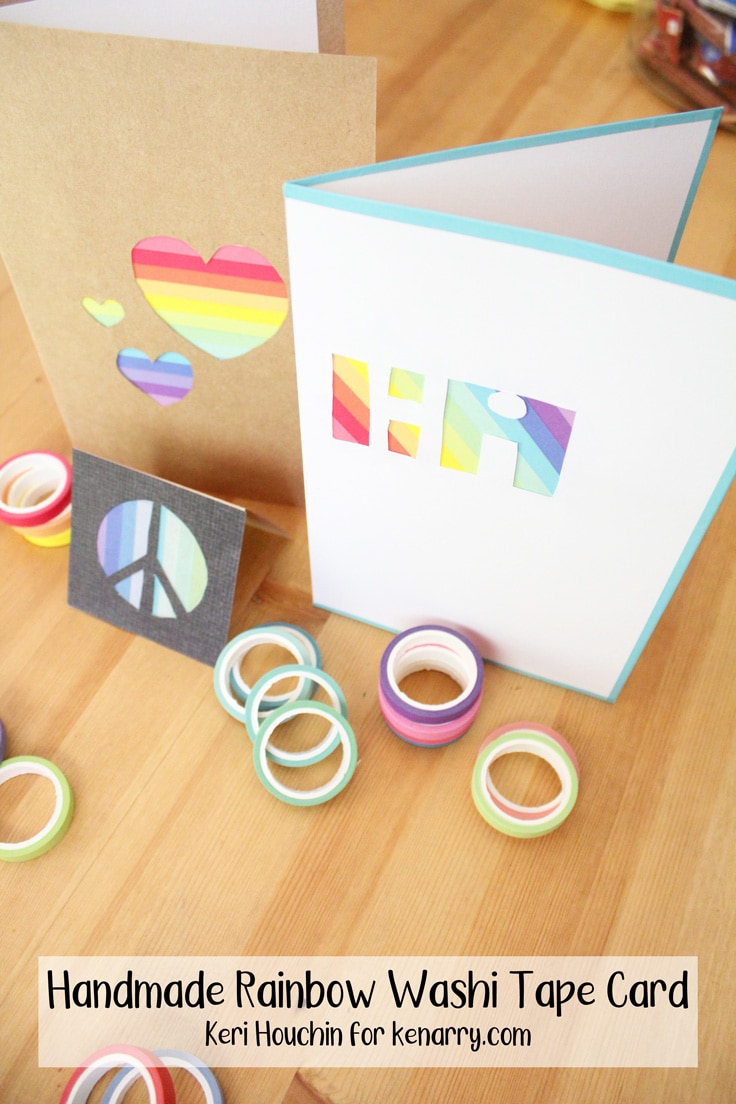
Handmade Card Variations

There are tons of ways to personalize your washi tape card by changing up the shapes, colors, and paper. Use more color or less. Cut your paper to different sizes or shapes. Or make your card flat instead of folded.

Cutout letter card

For this card, I drew a box and then the block outline of the letters to say “Hi.” It’s important for the letters to attach to the rest of the card at the top and bottom. Then just cut out the background behind the letters.

a card with

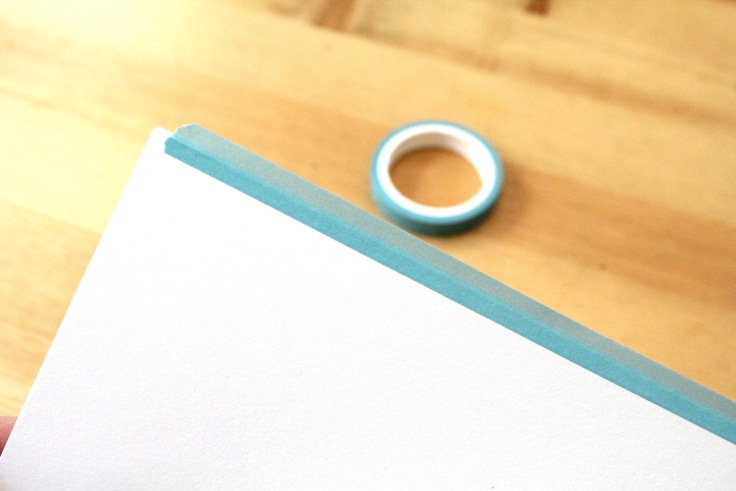
To add more color, I folded washi tape over the edges of the card too.

closeup of a white card with blue washi tape hanging over the edge

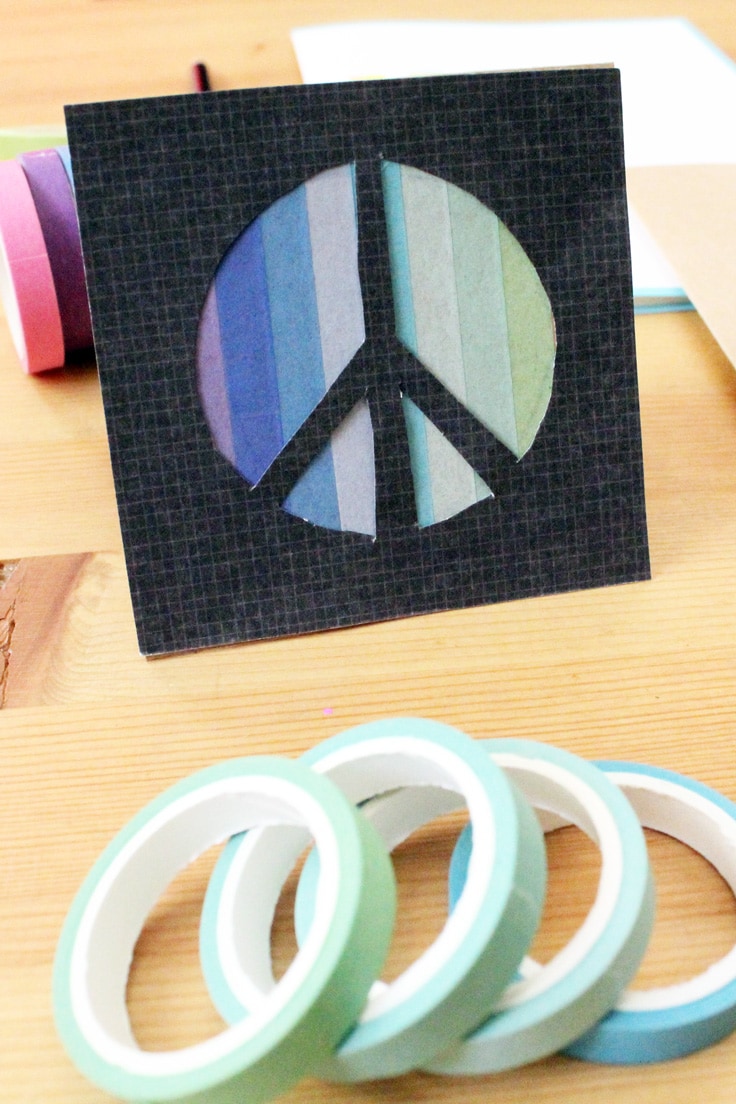
Mini washi tape card

Of course, you can make handmade cards in any size. I made this one small, about 3 inches square, and only cut out the black paper for the front of the card.

I picked washi tape colors in the same family to create an ombre effect.

a black card with a peace sign cut out shows blue ombre washi tape behind

Washi tape envelope

I added some washi tape to the envelope for the white card. If you’re sending it through the mail, write the address directly on the envelope (not on the tape, even though that would be cute) just in case it comes off on its trip through the post office.

pink, orange, green, and blue washi tape adorn the corner of a white envelope
3 hearts on a kraft brown card are cutout to show the rainbow washi tape behind
3 handmade rainbow washi tape cards sit on a wooden counter with rolls of colorful tape

What’s Next? 

If you enjoyed this handmade washi tape card then you’ll enjoy these colorful printable cards too.

Summer Postcard

Happy Summer postcard surrounded by sea shells

Watercolor Notecards

purple watercolor postcard with text Hello

Watermelon Sticky Notes

watermelon sticky note that says

You may also enjoy these crafts using tape on Ideas for the Home by Kenarry® –

  • DIY Paper Drawer Organizer for Planner Supplies
  • DIY Custom Notebook with Mod Podge
  • Washi Tape Bookmarks: A Simple Craft for Kids
  • Share
  • Tweet

Craft Ideas

About Keri Houchin

Keri is a writer, graphic designer, wife and mom of two from Texas. She began One Mama's Daily Drama when her teens were little as a way to help parents navigate the chaos of family life. She is passionate about planning, organizing and helping other parents find practical solutions to everyday challenges.

As an independent contractor, Keri also serves as our graphic designer creating images for both Ideas for the Home by Kenarry and Clutter Keeper, our home organization blog.

Keri has been sharing her great ideas on Ideas for the Home by Kenarry® since October 2018. Follow Keri on Facebook, Pinterest, Instagram and Twitter.

In this ultimate guide, you'll learn how to make a burlap wreath with ribbon for your home. The FREE eBook includes easy step-by-step instructions plus inspiring craft and decor ideas to make wreaths for fall, Christmas, Easter and other holidays.

Subscribe today to get ideas in your inbox plus FREE exclusives only for Idea Insiders!

Almost there! Now just check your email to confirm your e-mail address and get your free eBook.

There was an error submitting your subscription. Please try again.

You're already signed up! YAY! As an Idea Insider you have instant access to our Kenarry Idea Insider Resource Library with exclusive printables, offers and other freebies as soon as you confirm your subscription.
Previous Post: « Easy Greek-Style Frappe Recipe: Iced Coffee Drink
Next Post: DIY Lavender Linen Spray »

Reader Interactions

Leave a Reply Cancel reply

Your email address will not be published. Required fields are marked *

Recipe Rating


This site uses Akismet to reduce spam. Learn how your comment data is processed.

Primary Sidebar

Welcome

Carrie Ypma from Ideas for the Home by Kenarry®Hello, I'm Carrie! Welcome to Ideas for the Home by Kenarry® where we want to help you create a home you love. We're glad you're here! Read more...

Sign Up and Get a Free Gift

Subscribe to become an Idea Insider. You'll get our weekly newsletter plus special deals and other resources that are only for subscribers -- all for FREE!

Almost there! Now just check your email to confirm your e-mail address and get your free eBook.

There was an error submitting your subscription. Please try again.

You're already signed up! YAY! As an Idea Insider you have instant access to our Kenarry Idea Insider Resource Library with exclusive printables, offers and other freebies as soon as you confirm your subscription.
In this ultimate guide, you'll learn how to make a burlap wreath with ribbon for your home. The FREE eBook includes easy step-by-step instructions plus inspiring craft and decor ideas to make wreaths for fall, Christmas, Easter and other holidays.
  • About Us
  • Subscribe
  • Shop Our Products
  • My Account
  • Cart

Footer

Disclosure: Posts may include affiliate links for your convenience. As an Amazon Associate I earn from qualifying purchases. All opinions are our own. You are reading and following advice from Kenarry, LLC at your own risk. Always use safety precautions. You should read and follow manufacturer’s directions for the products and tools you use. Read more.


Privacy Policy: The privacy of your personal information is important. We make every effort to safeguard your information and will never sell it to third parties. Read more.

Terms of Use: You are welcome to link to this site or use a single image and brief description to link back to any post. Republishing posts in their entirety is prohibited without permission. All images are property of Kenarry, LLC. Do not crop or remove watermark. Do not reproduce without link back or permission. If you do link to this site, please contact us to let us know. All free printables offered are for personal use only. Pinning is always welcome and appreciated. Thank you!

As it relates to comments and content posted on this blog by those other than the owners, any such content that contains the copyrighted and/or proprietary work of others is expressly prohibited and will be removed. Repeated posting of such content by the same user may result in that user being banned from this site.

Copyright © 2021 Kenarry LLC Powered by Captivating Theme on Genesis Framework WordPress Log in