Nautical Wreath: Easy Summer Decor With Sisal Rope
THIS POST MAY CONTAIN AFFILIATE LINKS. PLEASE SEE OUR FULL DISCLOSURE POLICY FOR DETAILS.
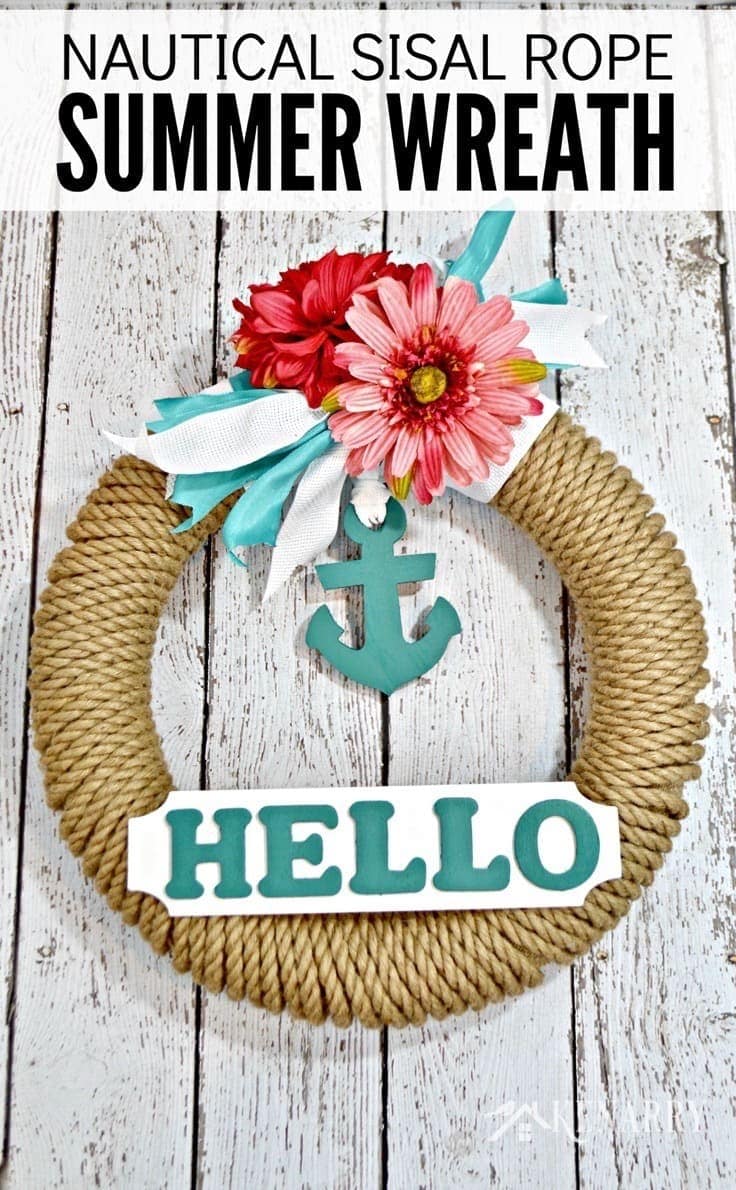
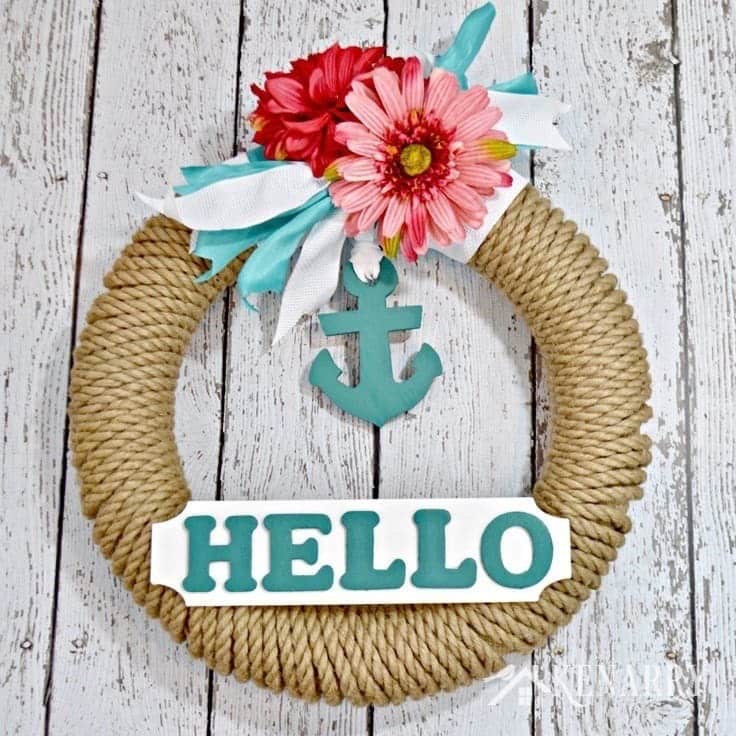
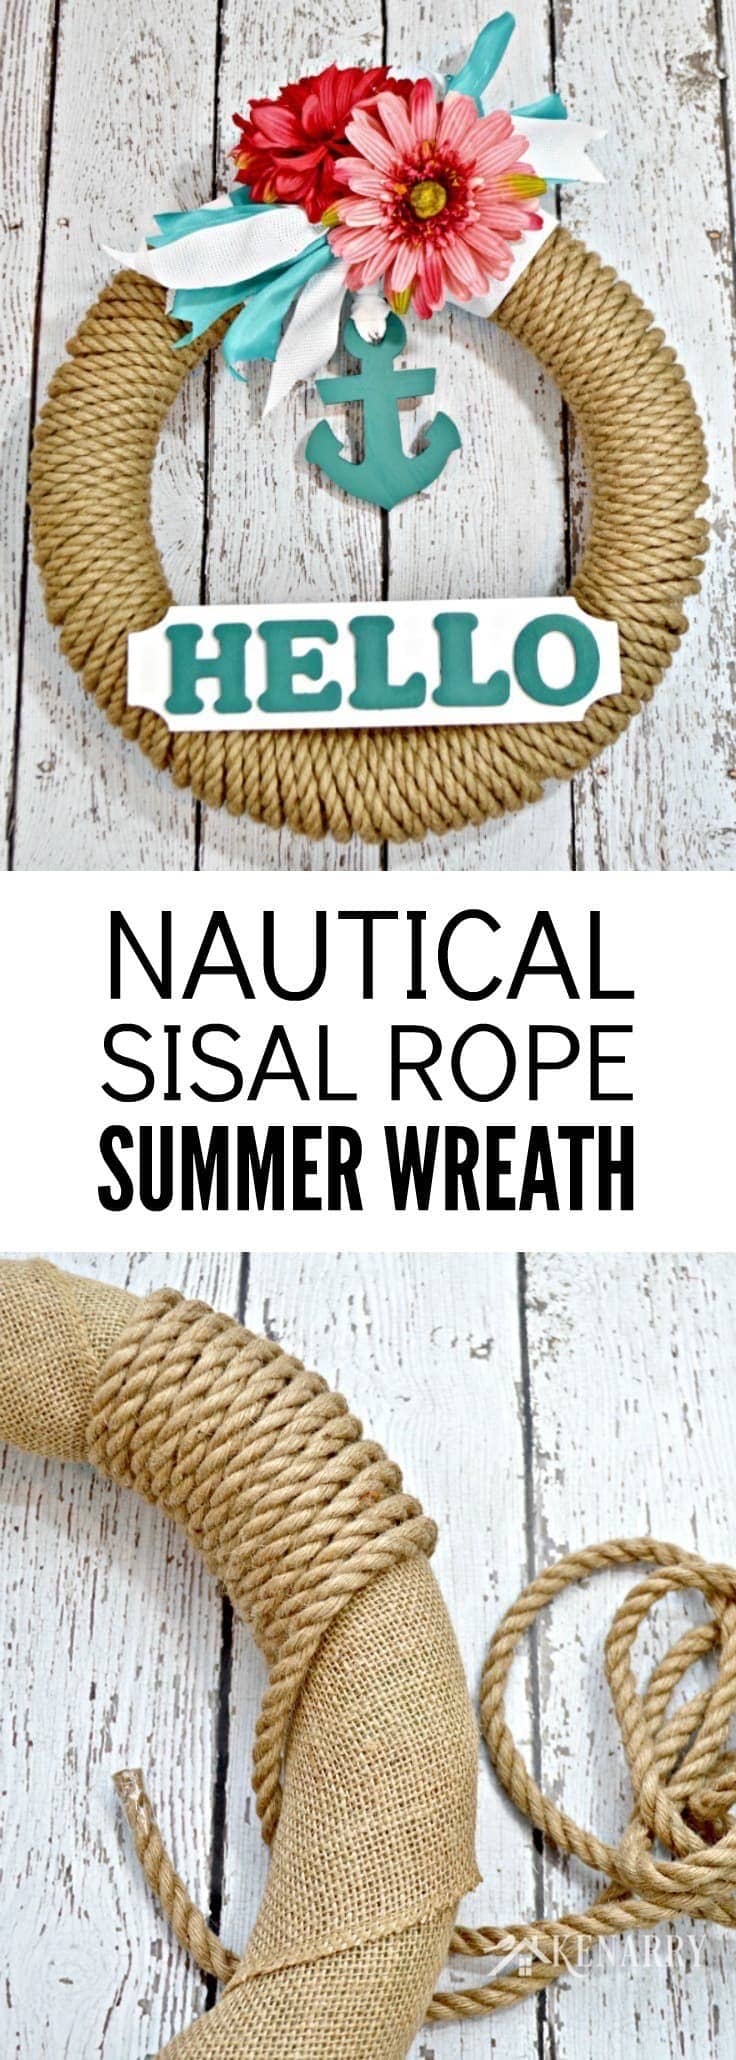
Make a nautical wreath for summer with sisal rope, a teal anchor and flowers. It’s an easy craft idea if you love coastal or beach home decor.
Hey there! Are you starting to decorate your house for summer? Today I’m going to show you how to make a Nautical Wreath for your front door or entryway using sisal rope, a small wooden anchor and bright flowers. This wreath is the perfect craft idea for anyone who loves coastal or beach home decor.
Freshen Your Home With a new wreath
Throughout the year, I like to swap out just a few pieces of our home decor as the seasons change. Changing just a few things each season is a really quick and easy way to freshen up your decor.
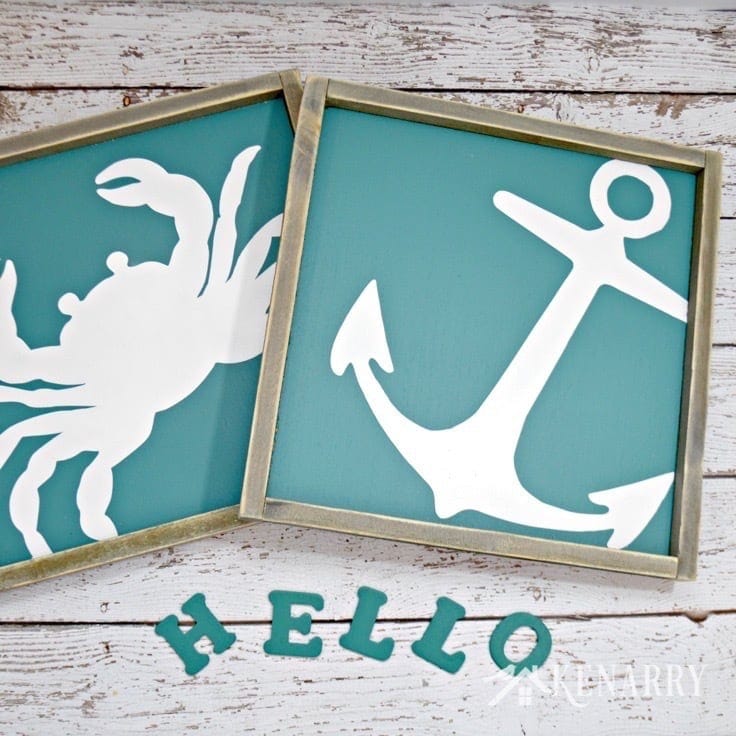
For example, on our fireplace mantel, we have a few white decor pieces that stay consistent each season. Then for our summer mantel decor, we just change to teal blue candles, hot pink flowers, beach grass and add a jaunty little pelican. In our dining room, I also display two square paintings that I change seasonally. In the summer, one is a white anchor and the other is a white crab both on a teal background.

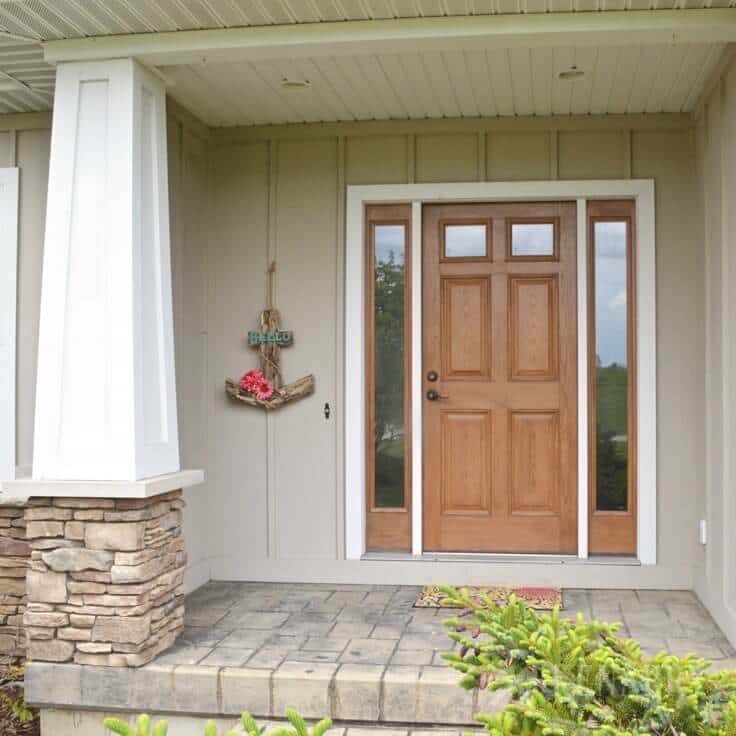
Outside our front door in the summer, I hang a large driftwood anchor like a wreath. It has teal letters that spell “Hello” and large hot pink flowers.
Summer nautical decor
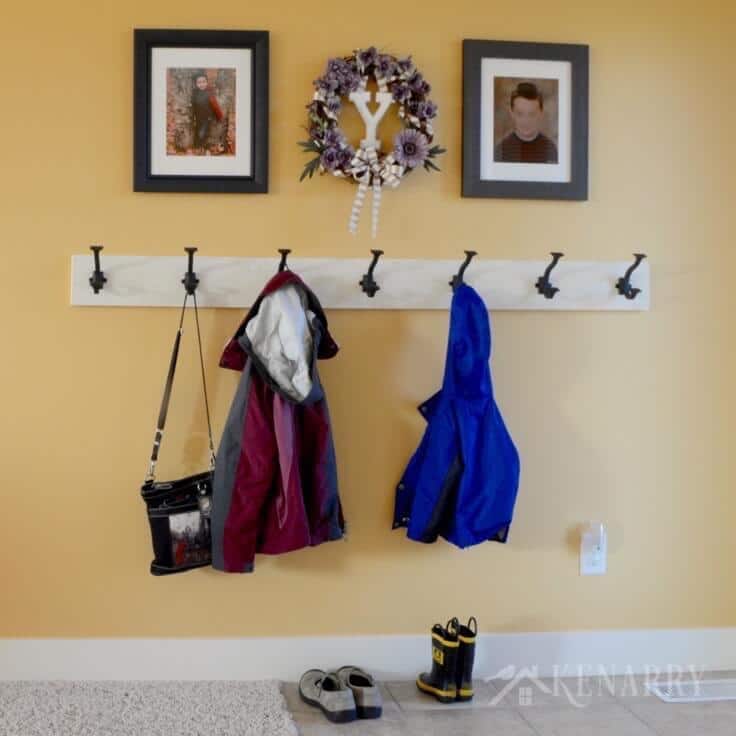
All of our summer decor is hot pink and teal blue with a coastal or beachy look. So next I needed to make a nautical wreath with those same colors to hang above the DIY coat rack we made for our front entryway. On the wall above the coat rack, I hang our boys’ school pictures. I intentionally left a big spot on the wall between the photos so I could hang a new wreath there with each new holiday or season.
In the fall, we have a burlap wreath made with sentimental ribbon leftover from our wedding. During the holidays, I hang a scrap fabric wreath I made from Christmas jammie pants we’ve exchanged over the years. In the winter, we display a fuzzy yarn wreath with a penguin on it. Then most recently this spring, we had a green and purple floral grapevine wreath in that spot.
For the summer, I knew the wreath in our entry way needed to be nautical with teal and hot pink elements. I really wanted it to coordinate with the other summer decor in our house. I thought what could be more appropriate for a nautical wreath than sisal rope? I love how it turned out and wanted to show you today how easy it is to make one.
Get our e-book The Ultimate Guide to Making a Burlap Wreath when you subscribe to be an Idea Insider. It’s totally FREE!
Your privacy is important to us. We promise not to spam you or share your information. You can opt-out at any time. See our privacy policy for more information.
How to Make a Nautical Wreath with Sisal Rope
Disclosure: This blog post contains affiliate links for products or services we think you’ll like. This means if you make a purchase from one of these links, Ideas for the Home by Kenarry® will make a small commission at no additional cost to you so we can keep the great ideas for the home coming your way. All opinions expressed are derived from personal experience.
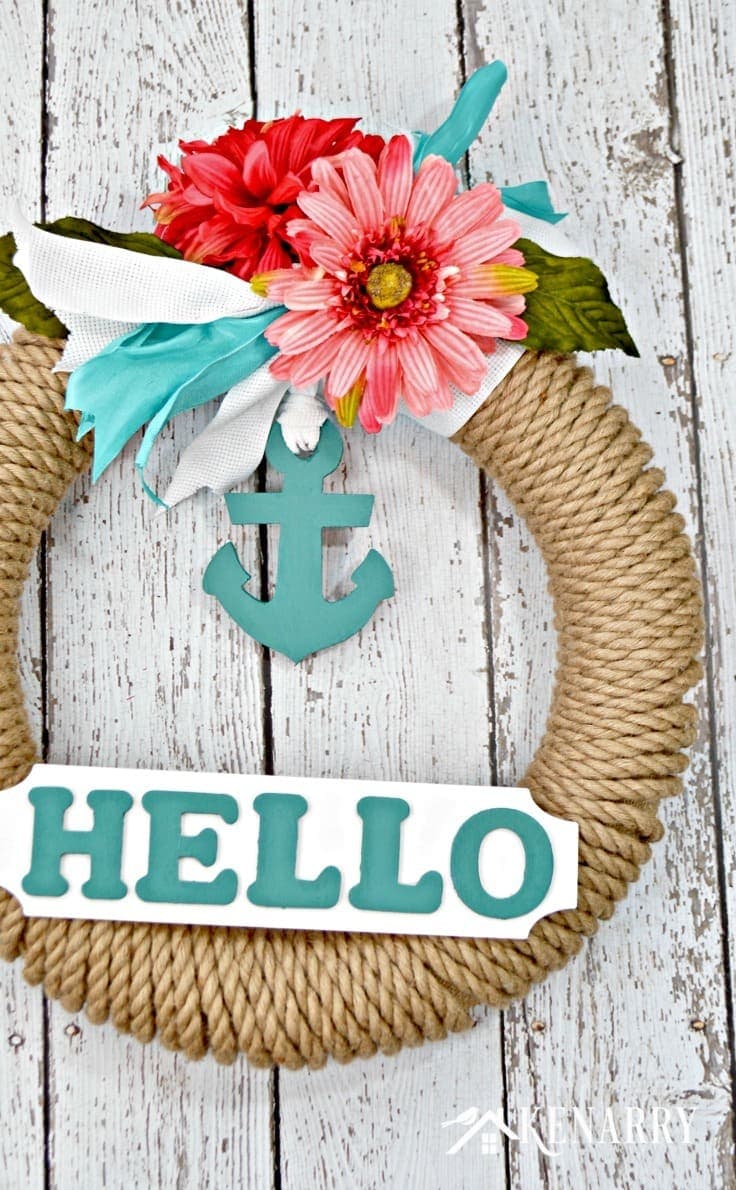
This nautical wreath is wrapped with burlap and sisal rope. It’s accented with ribbons, flowers and an anchor to give it a fun beachy or coastal appearance for summer. With this step-by-step tutorial you can easily make one for your home too.
What You Need:
- Styrofoam wreath frame
- 5″ wide burlap ribbon
- Hot glue gun and glue sticks
- Sisal rope
- Transparent tape
- Small wood anchor
- Small wood banner
- Small wood letters – Ours came as a four pack of 1.75 inch tall letters, but you can also find similar unfinished wood craft letters on Amazon.
- DecoArt Americana Multi-Surface Satin Acrylic Paints
- Craft paint brush
- White woven ribbon
- Teal wired ribbon
- Scissors
- 2 artificial flowers
- Wire cutters
- 1 inch metal binder ring
Instructions:
Step 1: Wrap the Wreath With Burlap Ribbon
The styrofoam wreath frame I chose for this craft project was green. I was really concerned the color might show through the sisal rope so I decided to cover it with loose weave burlap ribbon first.
Use a little hot glue to attach the burlap ribbon to the back of the nautical wreath. Then wrap the burlap ribbon around and around the styrofoam to cover it. Overlap the burlap ribbon slightly each time you wrap it so you can’t see any of the styrofoam wreath frame.
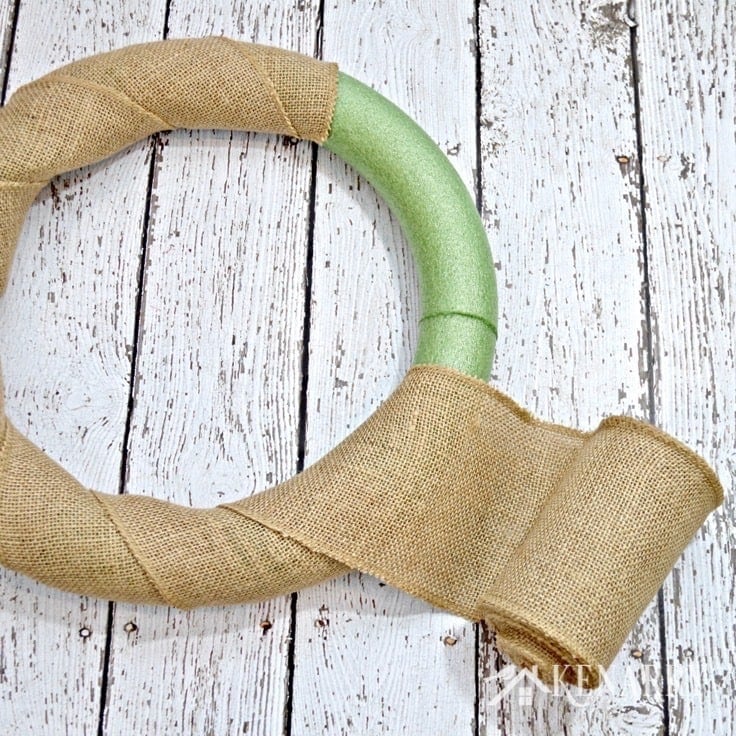
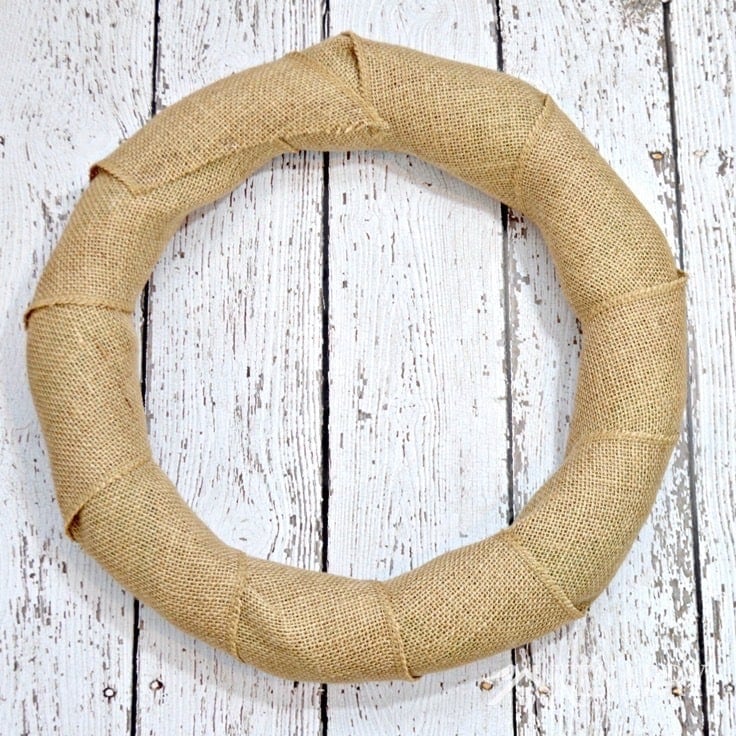
Keep going until the entire nautical wreath is covered with burlap. Then hot glue the end of the burlap ribbon to the back of the wreath frame to secure it in place.
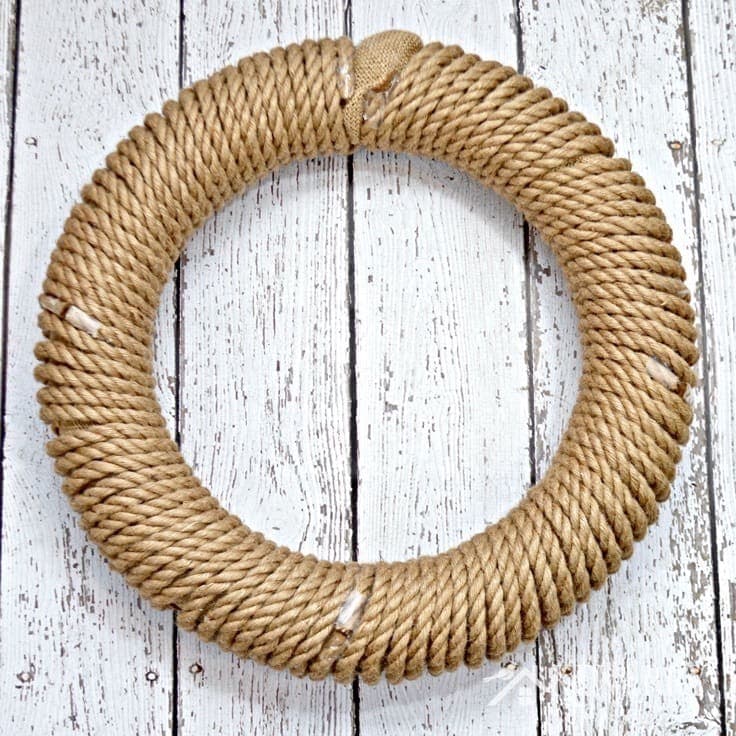
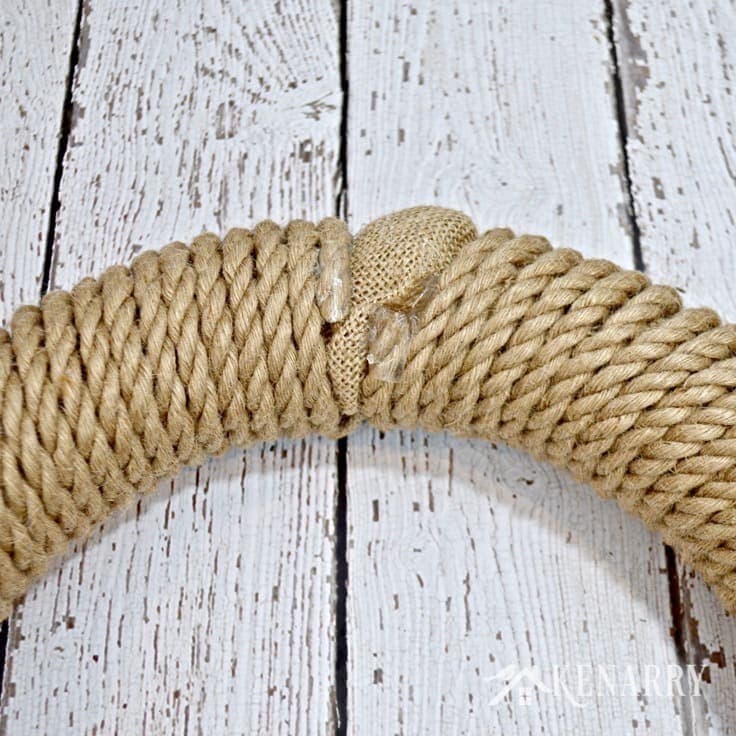
Step 2: Wrap the Nautical Wreath with Sisal Rope
Put a small piece of transparent tape around the end of the sisal rope to help prevent it from unraveling over time. Then use hot glue to attach the end of the sisal rope to the back of the nautical wreath.
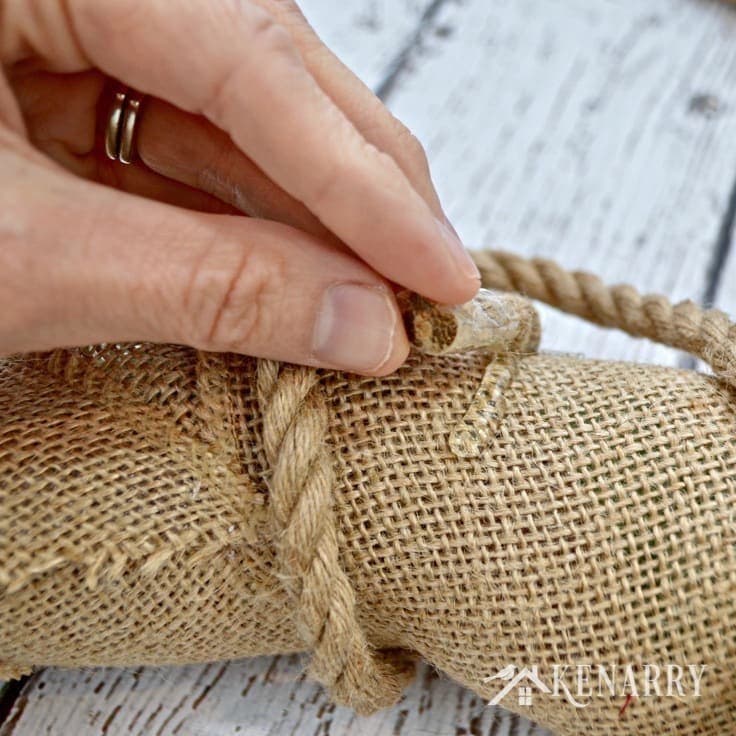
Next wrap the sisal rope around and around the nautical wreath as you did with the burlap ribbon.
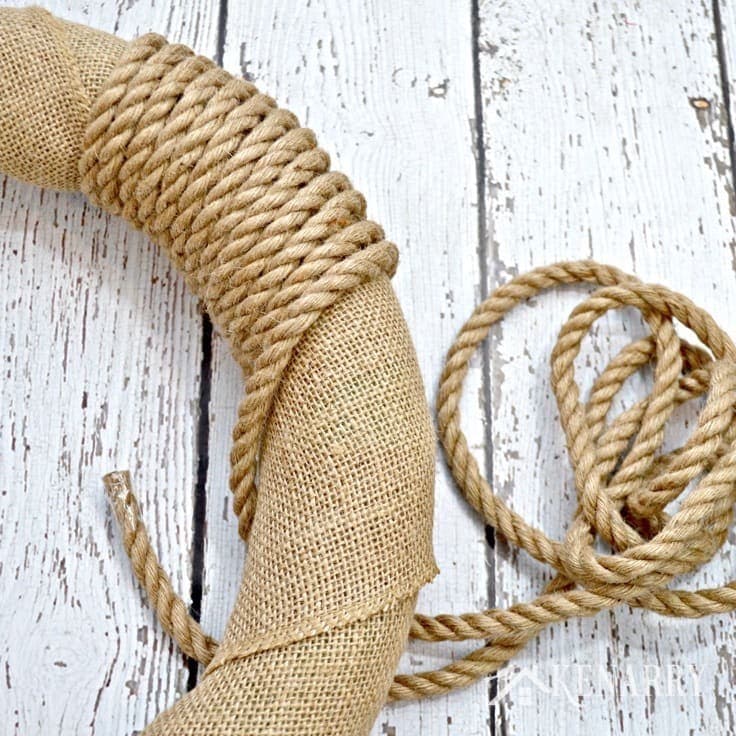
I had to use several different pieces of sisal rope to get all the way around the nautical wreath. The photo below shows the back of the nautical wreath when I was done. You can see that I always hot glued the ends of the sisal rope pieces to the backside so they won’t show on the front of the nautical wreath.
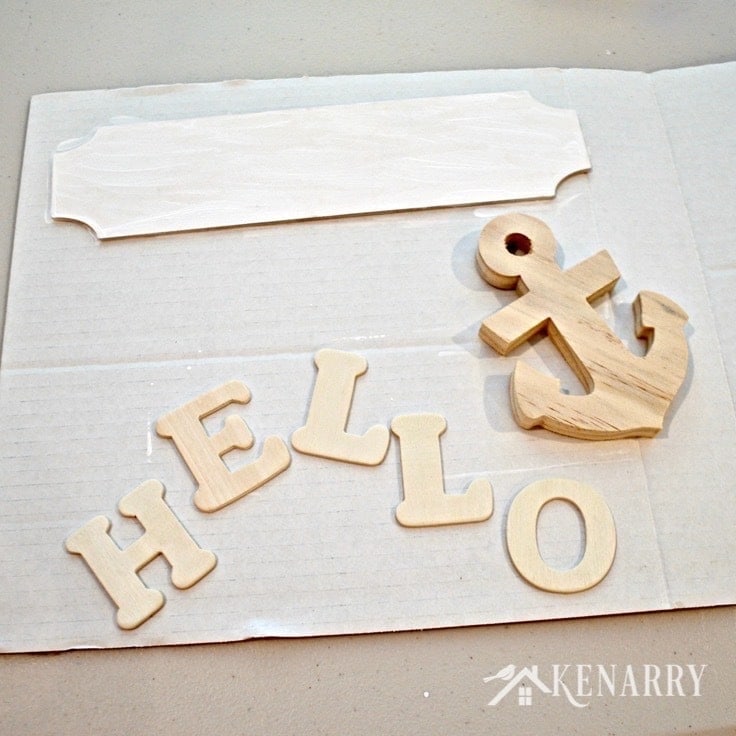
Step 3: Paint the Nautical Accent Pieces
For the nautical wreath, I had 7 different wood pieces that needed to be painted. One was an anchor to tie in with the coastal look of our other summer decor. Another was a banner to go across the bottom of the wreath. The remaining five were the letters to go on that banner. I wanted them to spell “hello” just like the anchor wreath outside our front door.
First, I painted the banner piece with white craft paint. Next, I mixed blue craft paint with a little bit of white and yellow to create teal.
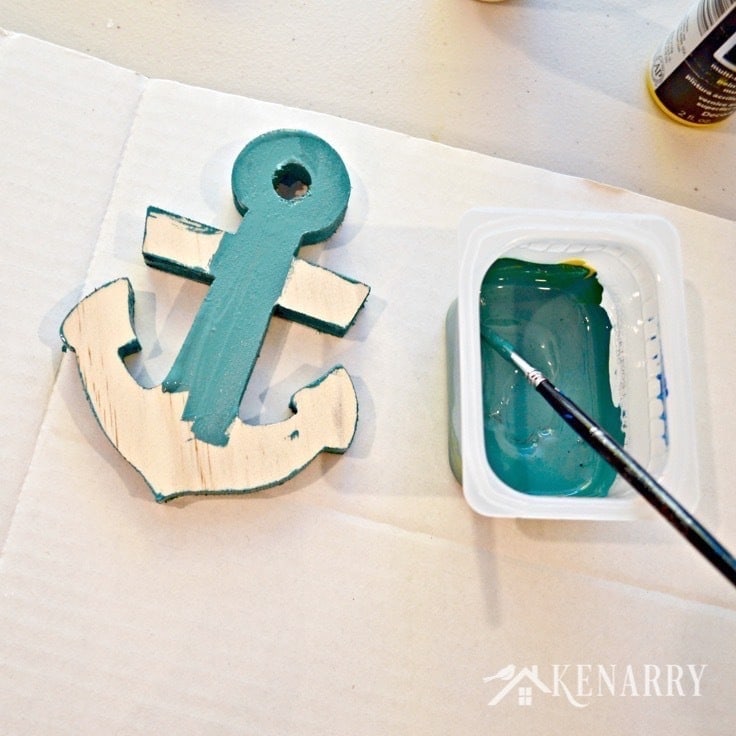
I really wanted the teal for the anchor and the H-E-L-L-O letters to match the teal in the crab and anchor paintings I have in my dining room. I got these paintings from The Summery Umbrella. LZ at The Summery Umbrella doesn’t publicly offer them in teal, but just message her. I’m sure if you tell her you want yours colored like mine she would be happy to custom make them for you.
Once the paint dries, hot glue the H-E-L-L-O letters to the white banner.
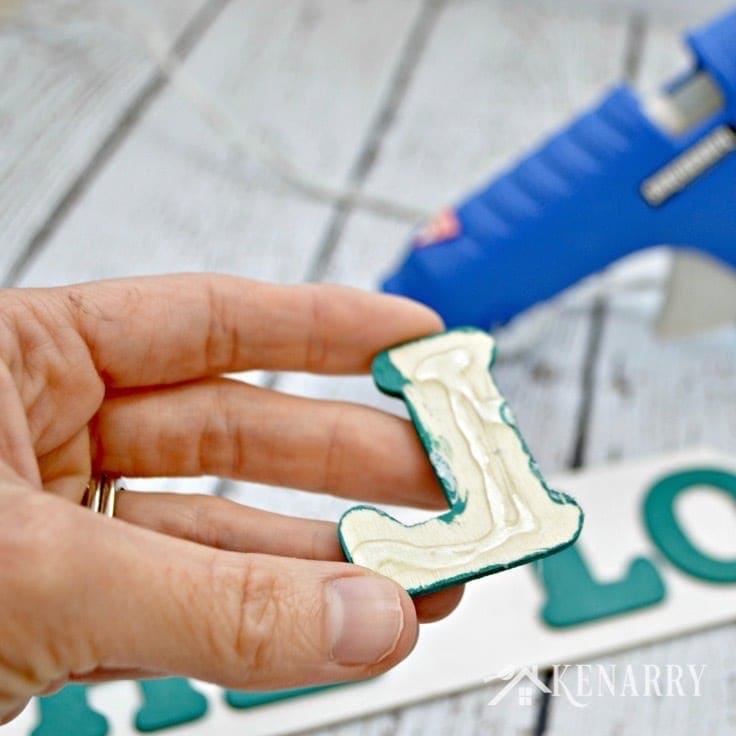
I didn’t bother measuring. Instead I just glued the “L” in the center first. Then I eyeballed it to create even spacing between the rest of the letters.

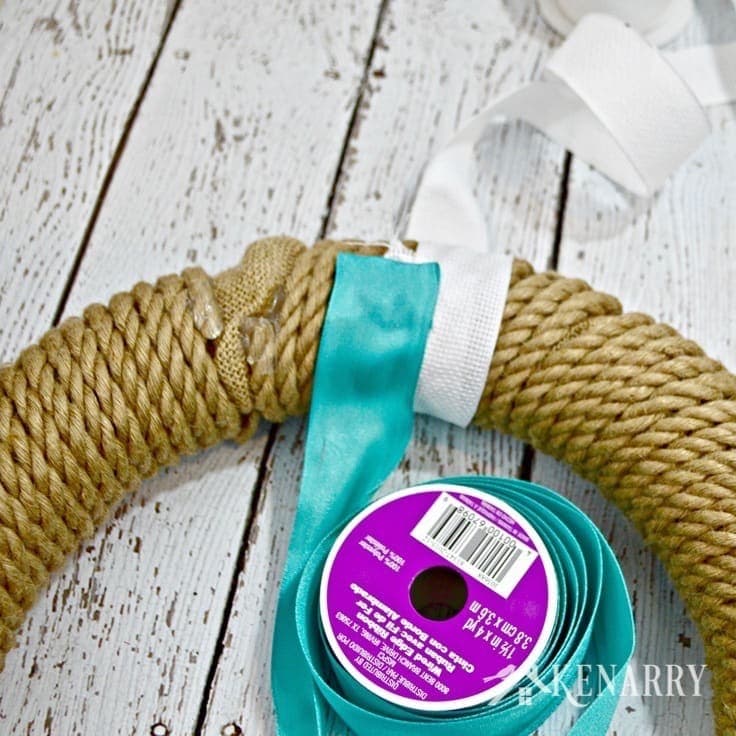
Step 4: Wrap Ribbon Around the Top of the Nautical Wreath
Back in Step 2, you may have noticed that when I finished wrapping the nautical wreath with sisal rope I had an awkward gap left. The burlap ribbon was showing but it didn’t make sense to just put a tiny piece of sisal rope there to cover it.
Instead I saw it as an opportunity to incorporate more teal blue into the nautical wreath! I covered it with a combination of a 1.5-inch wide white woven ribbon and a teal satin wired ribbon.
To get the same look for your nautical wreath, use hot glue to attach the ribbons to the back of the wreath about three inches away from the gap. Overlap them slightly so that both ribbons will show. Then wrap the ribbons around and around the top of the wreath until you get about three inches past the gap on the other side.
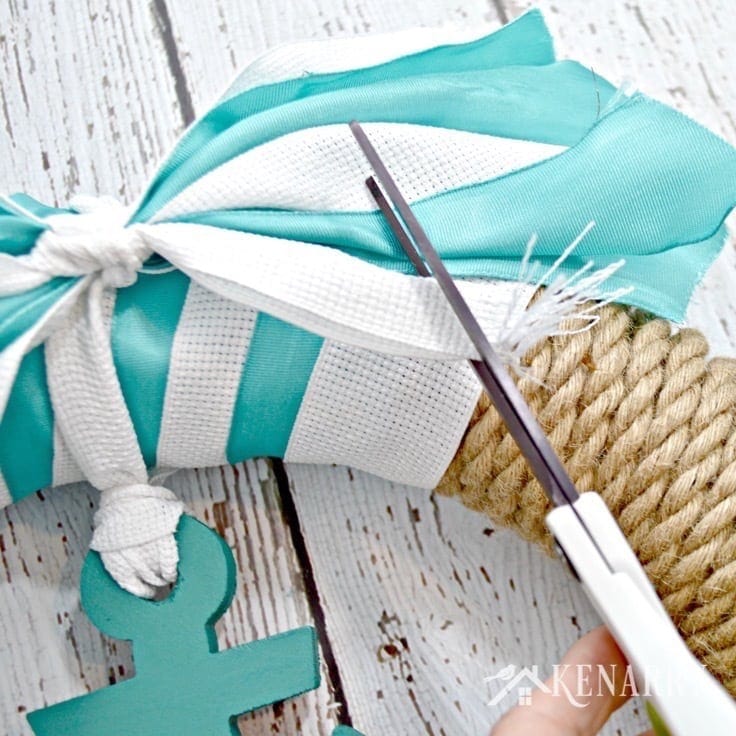
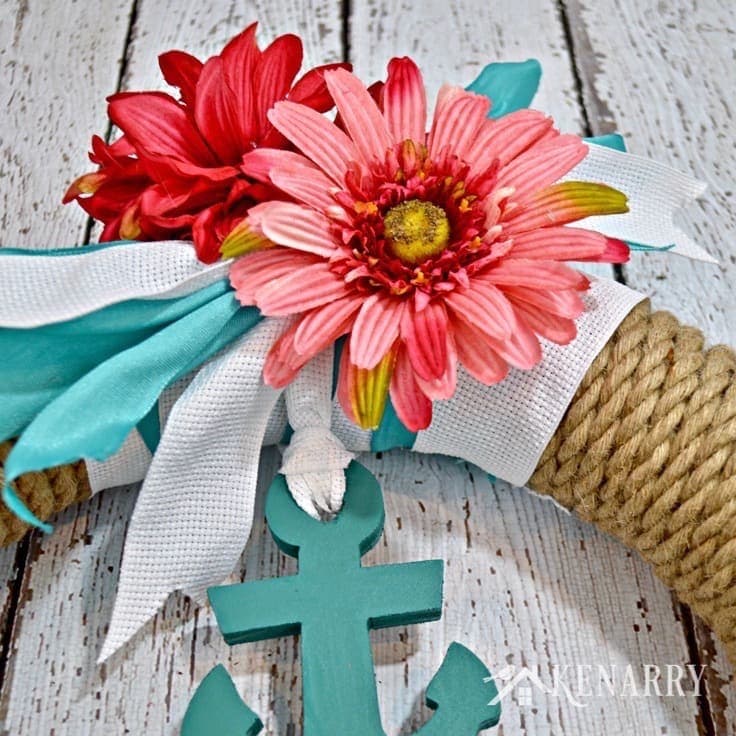
Next, I used a piece of white ribbon to tie the anchor to the top center of the wreath. I didn’t have enough teal and white ribbon left to create a big loopy bow for the top. Instead I cut 10-12 roughly equal lengths of white and teal ribbon and tied them together in the center.

I folded the ends of each ribbon in half lengthwise and trimmed them with scissors at an angle. This creates a little V-shaped notch to give each ribbon a prettier or more finished edge.
Step 5: Add Artificial Flowers
The knotted ribbons at the top of the nautical wreath looked sort of bare on their own so I decided to add a few artificial flowers. That also gave me a way to tie some pink into the wreath to coordinate with the rest of our summer decor.

Cut the artificial flowers from their stems using wire cutters. Apply a liberal amount of hot glue to the back of each flower.
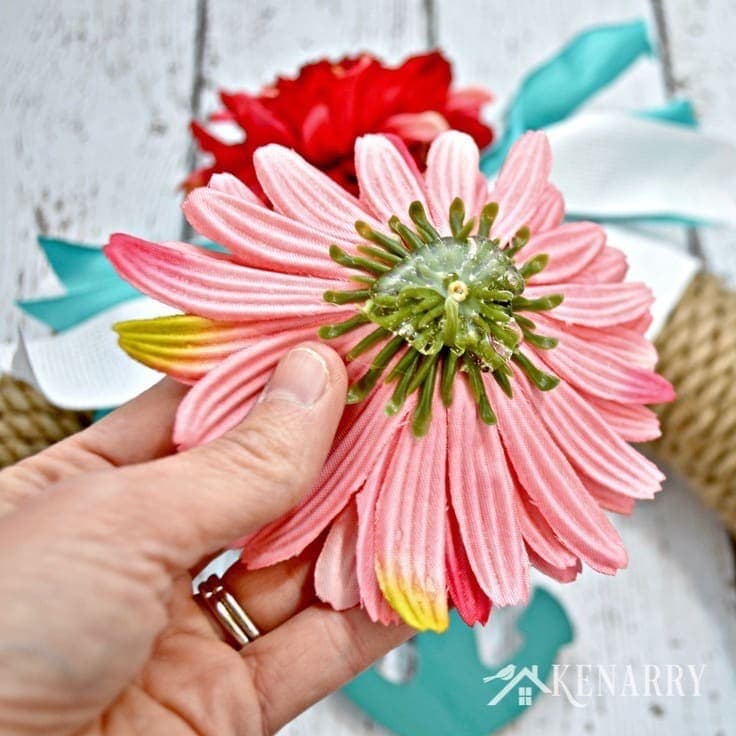
Then press the flowers down firmly on either side of the knot. Hold the flowers in place for just a minute or two until the hot glue dries.
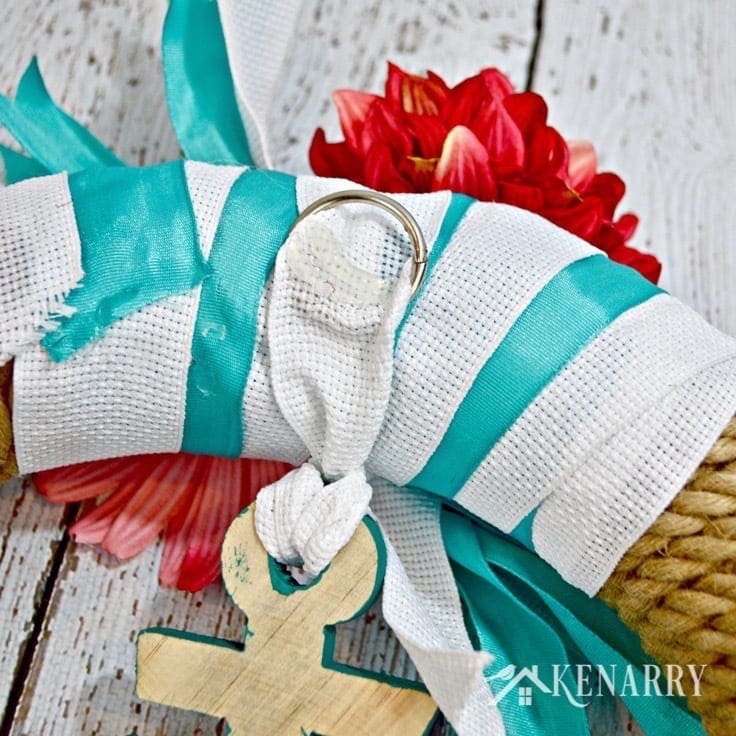
Step 6: Attach a Metal Ring
By this point in the craft project, I started wondering how I would actually hang the nautical wreath on our wall. I just have a regular nail in the wall above the coat rack. To solve the problem I put a metal binder ring through the back of the white ribbon that holds the anchor on the wreath. Then I used a bunch of hot glue to hold the metal ring in place so it won’t slide up and down the ribbon.
Step 7: Say “Hello” to Your New Nautical Wreath
Finally, use hot glue to attach the “Hello” banner across the bottom of the wreath. Then stand back and enjoy your beautiful new nautical wreath made with sisal rope! I love how bright and cheery it looks in the summer when people come over to visit us.
Love the ideas you see here on Ideas for the Home by Kenarry®? Subscribe today to get our FREE DIY & Craft Planning Calendar, plus our weekly Ideas in Your Inbox newsletter filled with creative tips and exclusive offers!
What’s Next
While you’re here, be sure to check out other summer ideas on Ideas for the Home by Kenarry® –
- Coastal Sunburst Mirror
- Faux Succulent Beach Terrarium
- Mosaic Wine Bottle Made with Tiles and Shells
If you enjoyed this Nautical Wreath idea, please share it with your friends or pin it for later:
This is a super cute summer wreath. I need to make a new wreath for my house. Thanks for the DIY. Drop by to share it at the party if you like. 😉
Thanks Theresa! I’m so glad you stopped by to say hello and check out our latest wreath. Can’t wait to see how yours turns out. Tag me @kenarrydideas if you post it on Facebook or Instagram so I can see how cute yours is.