Halloween Candy Bowl: A Glow-In-The-Dark Craft
THIS POST MAY CONTAIN AFFILIATE LINKS. PLEASE SEE OUR FULL DISCLOSURE POLICY FOR DETAILS.
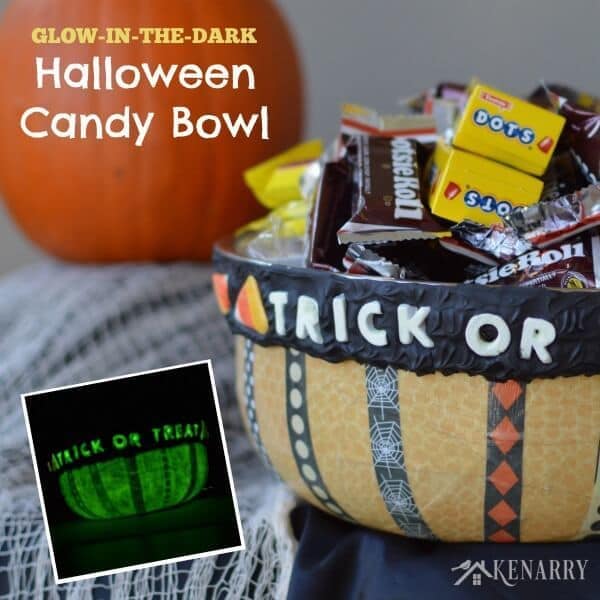
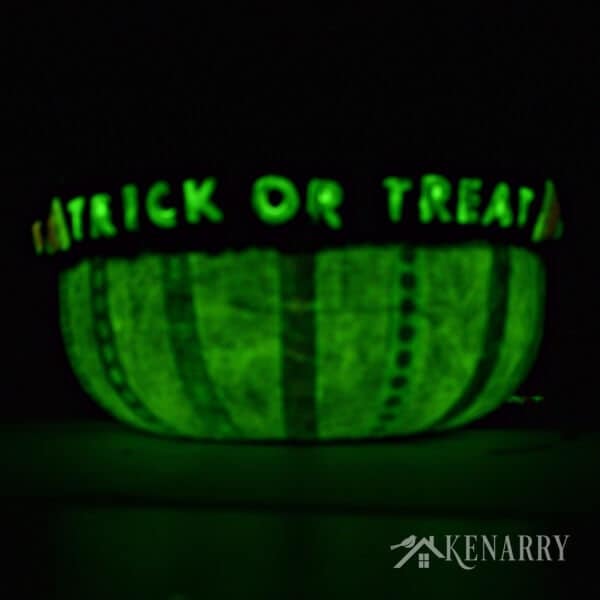
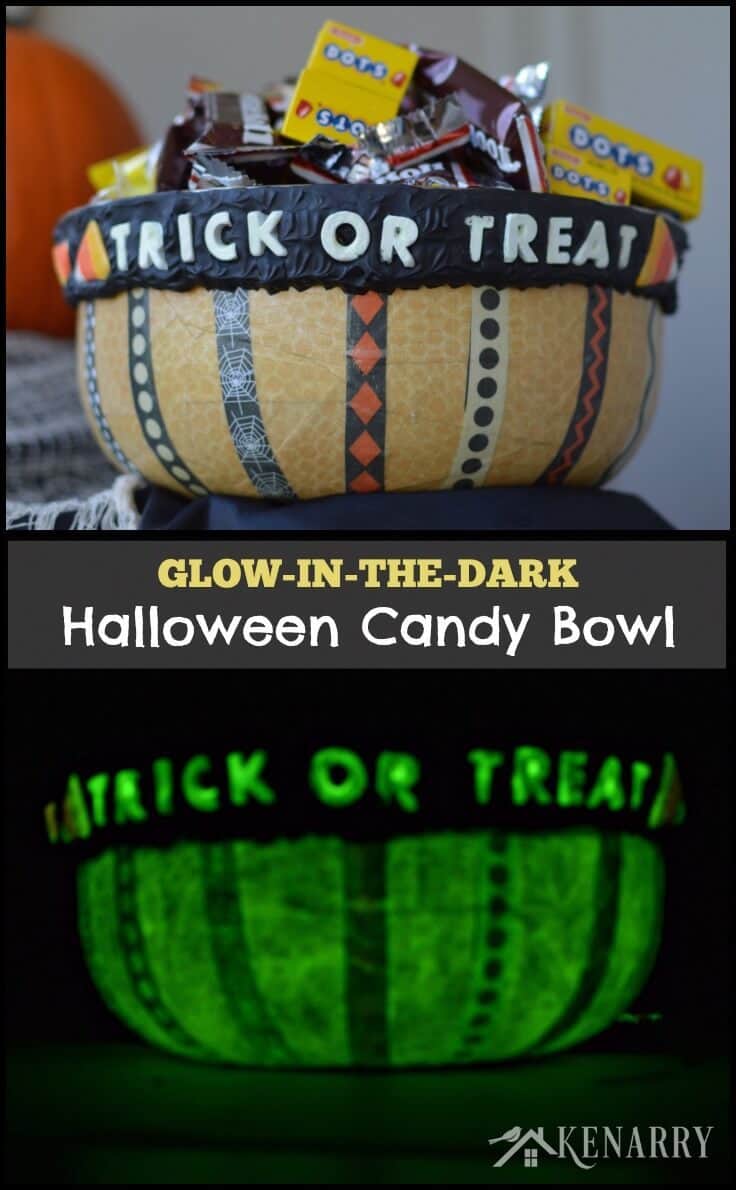
Decorate a bowl to create a Mod Podge Halloween Candy Bowl that glows in the dark and has a fun candy corn decoden border made with whipped clay.
Wouldn’t the kids in your neighborhood be surprised if you answered the door on October 31st with a Halloween Candy Bowl that glows-in-the-dark?! You can easily make one yourself using light colored scrapbook paper and Glow-in-the-Dark Mod Podge. I added a fun decoden border made by mixing black acrylic paint with whipped clay. I then adorned it with little plastic candy corn trinkets and letters that I made myself. The Halloween Candy Bowl looks cute as a home decoration by day, but turn off the lights and it really GLOWS!
Disclosure: We wrote this post as part of a paid campaign with Plaid Crafts and Blueprint Social. Campaigns like this help us keep the great ideas for the home coming your way. All ideas and opinions expressed are our own, derived from our personal experience.
My favorite part of Halloween is seeing children going door-to-door dressed as their favorite characters. When Mod Podge sent me a box of craft supplies to try, including Glow-in-the-Dark Mod Podge, I knew I wanted to share an idea for a Halloween Candy Bowl that would really stand out in a crowd of costumed kiddos!

How to Make a Glow-in-the-Dark Halloween Candy Bowl
What You Need:
- Large bowl
- 2 large pieces of scrapbook paper – the lighter the better, so it can glow!
- Mod Podge Halloween Podgeable Lightweight Papers
- Scissors
- Clear Mod Melts
- Mini Hot Glue Gun
- Silcone Alphabet Mod Mold
- Glow-In-The-Dark Mod Podge
- Mod Podge Silicone Craft Mat
- FolkArt Multi-Surface Paints in orange, yellow, white and black
- Mod Podge Collage Clay
- Cake Decorating Bag
- Small Cup or Bowl for mixing
- Spoon or Knife for stirring
Instructions:
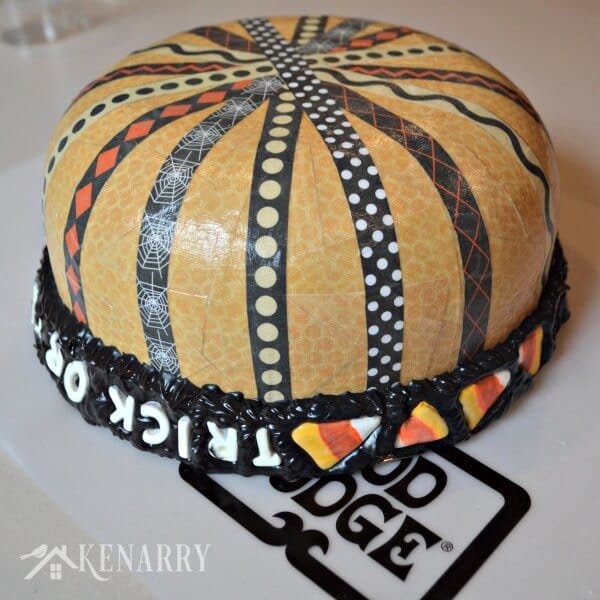
1. Cover the Halloween Candy Bowl
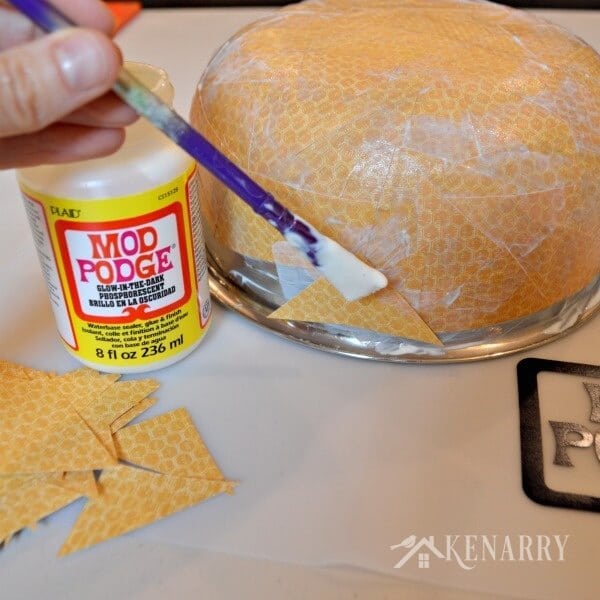
Cut scrapbook paper into large triangles. Use Glow-in-the-Dark Mod Podge to glue them to the Halloween Candy Bowl starting from the center of the bottom and working your way to the edges. If you’ve never worked with Mod Podge before, you want to work in small sections at a time because it dries quickly.

Use a brush to apply small amounts of Mod Podge to the bottom of the bowl. Press a paper triangle onto the Mod Podge then brush more Mod Podge on top of the paper. Repeat over and over again until the entire bowl is covered with scrapbook paper and Glow-in-the-Dark Mod Podge. Allow the bowl to thoroughly dry. Brush on a second layer of Mod Podge and let that dry too before proceeding to the next step.
2. Add paper embellishments to the Halloween Candy Bowl
I found some fabulous Halloween Lightweight Podgeable Papers at a local craft store to decorate the candy bowl. I cut the paper strips apart and applied them one at a time to the bottom of the bowl, criss-crossing as I went. Each time I applied a thin layer of Mod Podge, placed the paper strip. Then I applied a thin layer of Mod Podge over the paper strip to hold it in place.
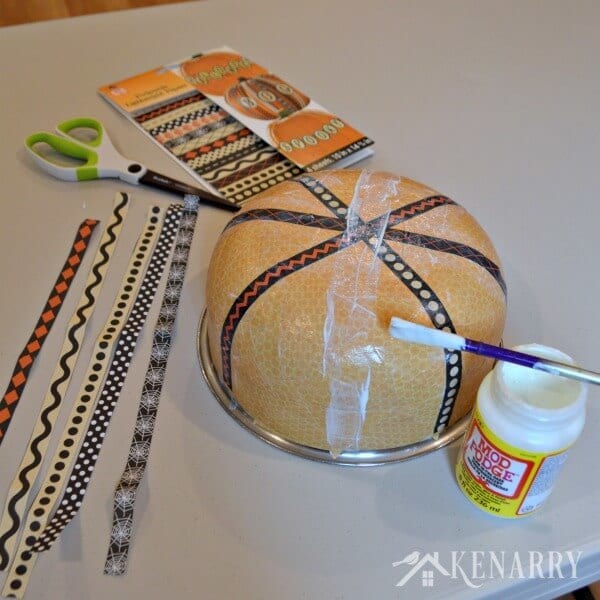
Immediately afterwards I covered the entire bottom of bowl with another coat of Mod Podge. Allow it to thoroughly dry. Then apply at least two more coats of Glow-in-the-Dark Mod Podge to the bottom of the bowl, allowing at least 20 minutes between coats. The more coats you use, the more the Halloween Candy Bowl will glow-in-the-dark.
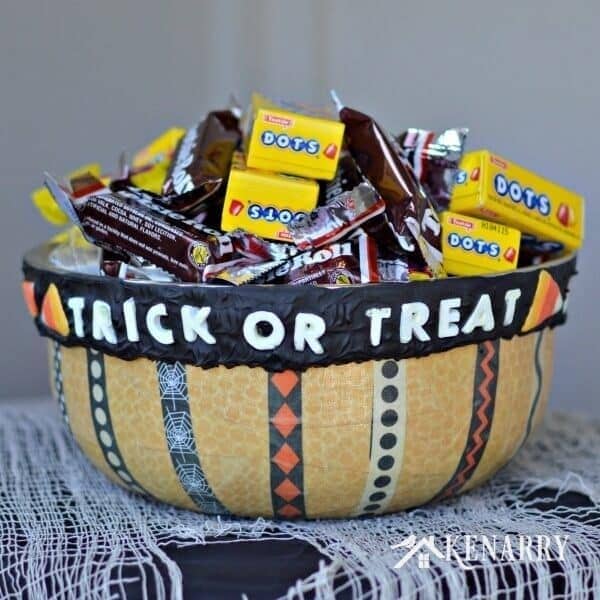
3. Create trinkets to decorate the rim of the Halloween Candy Bowl
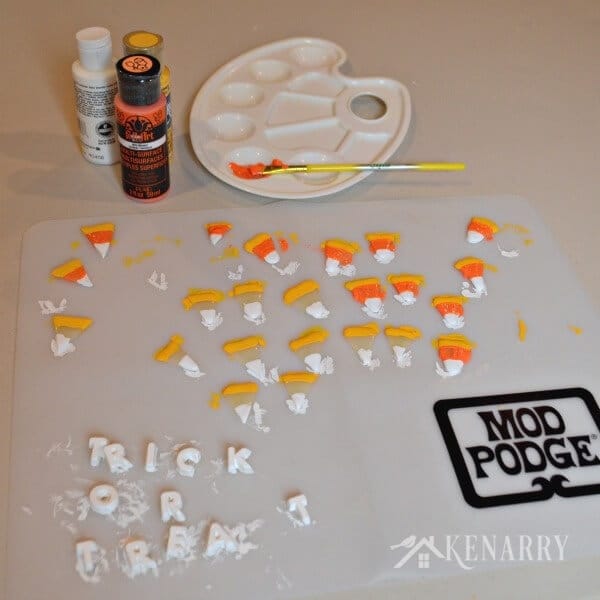
First, I used the silicone alphabet Mod Mold to create letters to spell “TRICK OR TREAT”. You just put a Mod Melt in a mini hot glue gun and then fill the letters you need in the Mod Mold. After just 10 minutes, you can easily pop the letters out of the Mod Mold. If you over filled the Mod Mold, it’s really easy to trim your letters with scissors. Repeat until you have all the letters you need.
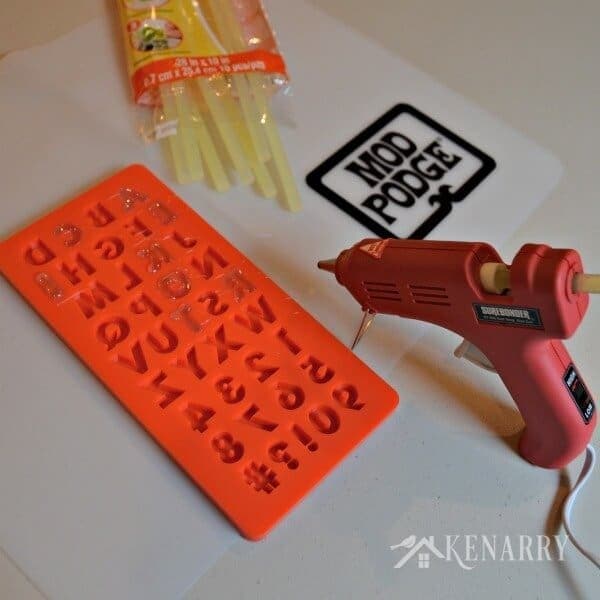
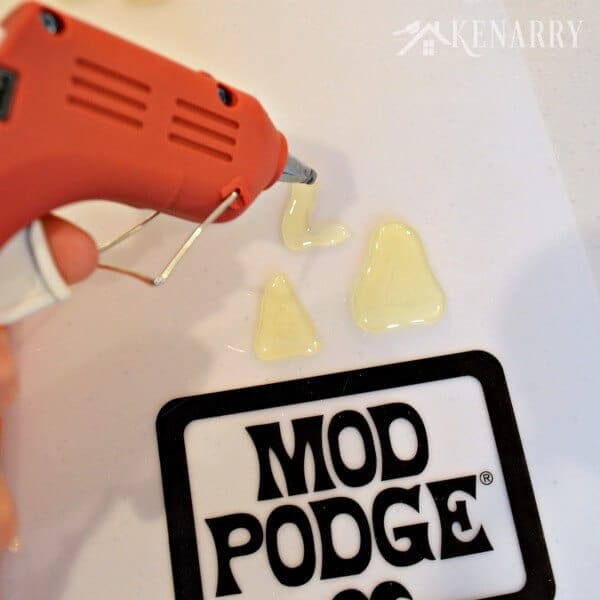
I also wanted to create triangular candy corns for the Halloween Candy Bowl, so I made 20 of those freehand by applying the Mod Melts directly on the Mod Podge Silicone Mat. After 10 minutes, the plastic candy corns easily popped right off the silicone mat.
4. Paint the embellishments
Use acrylic craft paint to add color to the letters and candy corns. I wanted the TRICK OR TREAT letters to stand out, so I used a few coats of white paint on each letter. For the candy corns, I did a few coats on the white and yellow ends first. After those were dry, I did a few coats to create the orange centers.
Once the paint was dry on the candy corn and letter embellishments, I covered them with several coats of Glow-in-the-Dark Mod Podge so they would really stand out on Halloween night. When I was done, I was able to get all of my messy paint and Mod Podge off the silicone mat easily with soap and water. It looks good as new for my next craft project.

5. Create a Decoden Border on the Rim of the Halloween Candy Bowl
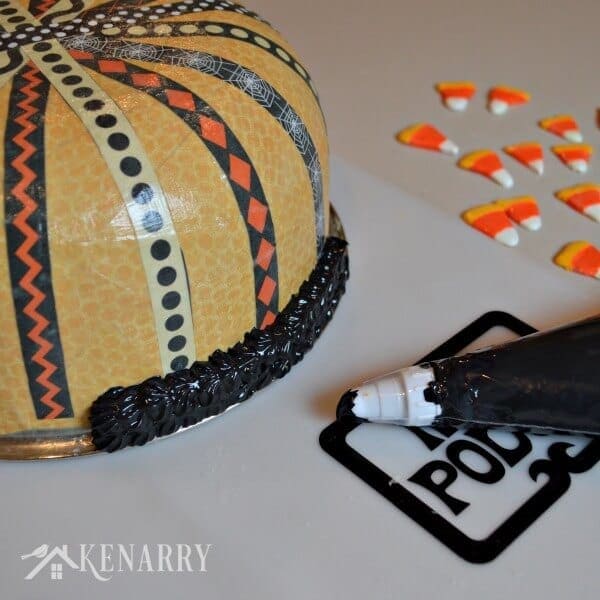
If the term “decoden” is new to you, it’s the Japanese art of decorating anything with doodads and trinkets. To see what I mean, check out Plaid Craft’s Decoden Pinterest Board for numerous examples. Mod Podge Collage Clay is a lightweight whipped clay and is perfect for creating decoden projects. It comes in white or pink, but I wanted a black border around the rim of my bowl. I found it was really easy to tint the collage clay by mixing it with black acrylic craft paint in a small cup or bowl.

The collage clay comes with several different decorating tips. I put one of the plastic tips in the end of a cake decorating bag and filled it with the black collage clay. I flipped the Halloween Candy Bowl upside down and applied the collage clay around the rim like I was frosting a cake.
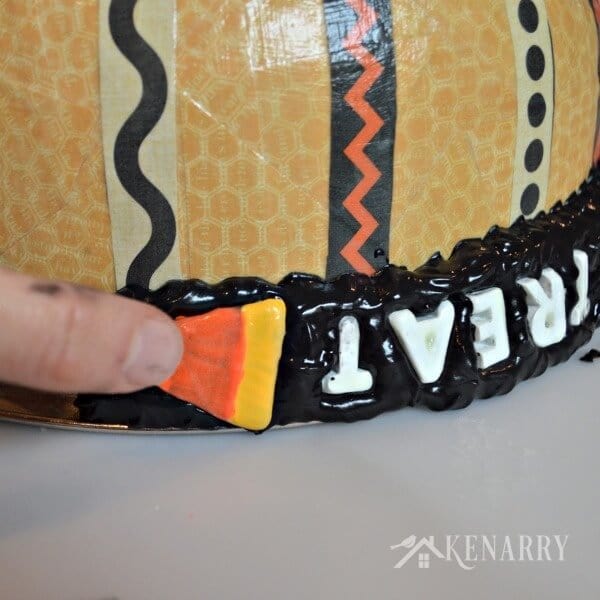
As I worked my way around the bottom of the bowl, I gently pressed the TRICK OR TREAT letters and candy corn embellishments into the black collage clay. I did little sections at a time, so the collage clay wouldn’t dry too quickly.
Once you’ve created the decoden border around the bowl, allow several days for it to dry. The instructions on the box say it can take 1-5 days to fully set. The border on my Halloween Candy Bowl was pretty thick, so it took about four days to fully harden.
6. Fill the Halloween Candy Bowl and enjoy
Once the collage clay has hardened, you’re ready to fill the bowl with your favorite candy and greet all the costumed children who come to your door on Halloween night.
And better yet – once it gets dark, the Halloween Candy Bowl really shines!
If you liked this idea, please share it with your friends or pin it for later:
How to Use These Mod Podge Products
As I was preparing to make the Glow-in-the-Dark Halloween Candy Bowl, I found these videos to be incredibly helpful to learn how to use the Mod Podge products I mentioned in this post:
- DIY Faux Sugar Skulls with Collage Clay by Mod Podge
- 3 DIY Decoden Cell Phone Cases with Mod Podge + Dollar Store Jewelry
- Plaid Blog – Introducing Mod Podge Modeling Clay
- Mod Melt Spider Webs
Love the ideas you see here on Ideas for the Home by Kenarry®? Subscribe today to get our FREE DIY & Craft Planning Calendar, plus our weekly Ideas in Your Inbox newsletter filled with creative tips and exclusive offers!
Other Halloween Mod Podge Ideas
For more great craft ideas, tutorials and special coupons, you can follow Plaid Crafts:
Blog / Newsletter / YouTube / Pinterest / Facebook / Instagram / Twitter
You may also like these other Halloween ideas on Kenarry:
How fun, Carrie! I had no idea that there was glow-in-the-dark Mod Podge. I’m always learning new stuff on your blog, LOL! Your candy bowl turned out spooktacular!
There sure is, Sarah! And it’s so much fun. Now I can’t wait to see what Spooktacular ideas you come up with for next year now that you know about this great product!
I bet the trick or treaters will LOVE this
Thanks, Heather!
WOW! I love the way the bowl turned out and the fact that it glows in the dark! I love that you created the letters and the candy corn! Looks like a lot of work, but it’s worth it when you end up with a great looking candy bowl! Pinning#
Navy Wifey Peters @ USS Crafty
Thanks, T’onna! It was one of those projects that wasn’t a huge amount of work – just a bunch of little amounts of work, waiting for layers of paint or Mod Podge to dry! We love how much it glows, though, so all those layers were worth it.