How to Age Galvanized Metal
THIS POST MAY CONTAIN AFFILIATE LINKS. PLEASE SEE OUR FULL DISCLOSURE POLICY FOR DETAILS.
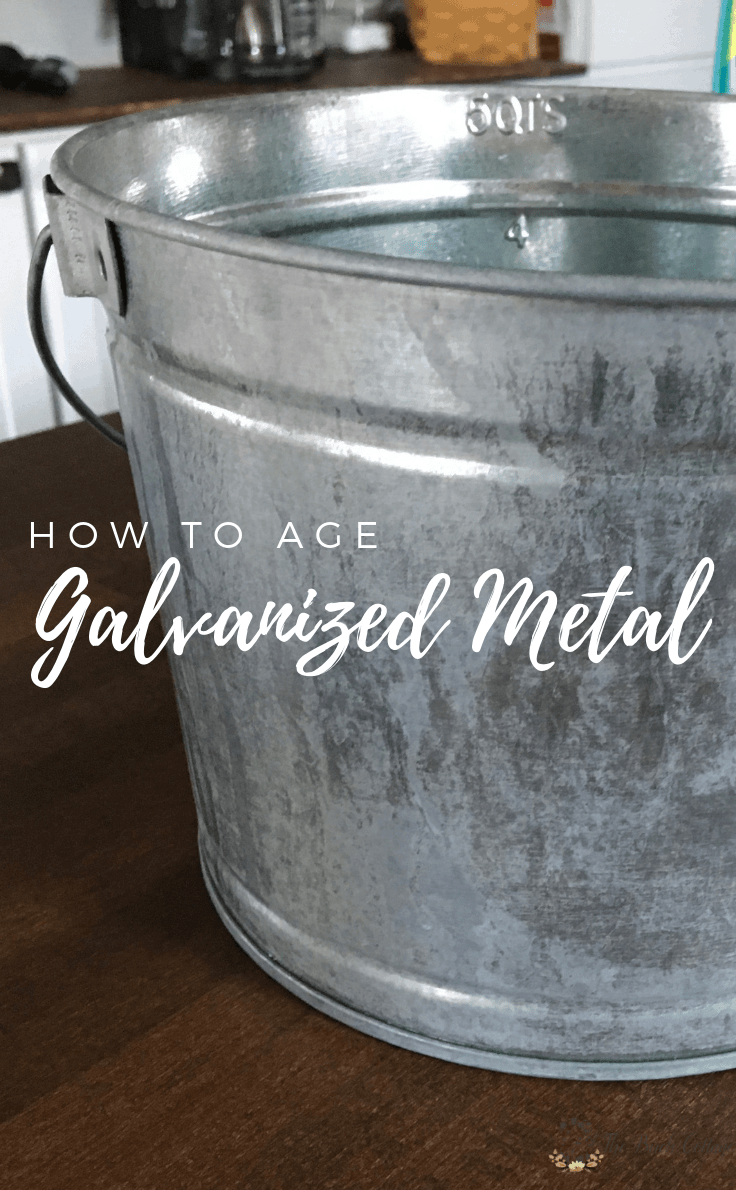
Learn how to age galvanized metal using bathroom cleaner, steel wool, and the sun to create an aged patina on galvanized pails, buckets, trays and more!
Hello, Kenarry readers! I’m Pam from The Birch Cottage and I’m back this month to share another easy DIY project with you. Hopefully, today you’ll learn how to age galvanized metal and a couple of bonuses!
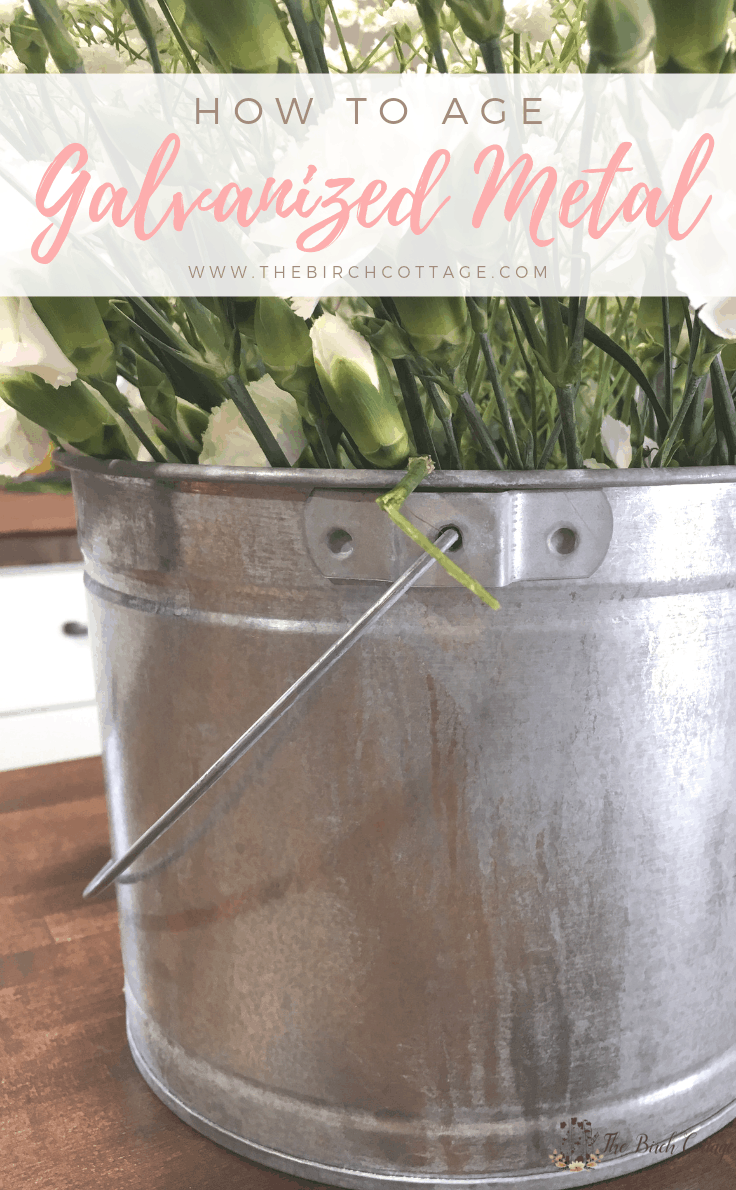
With today’s tutorial, we’re literally going to turn something bright and shiny into something that looks perfectly aged with all that antique patina goodness. This little project adds that perfect rustic touch that everyone seems to be craving these days. You could purchase aged or antique galvanized metal buckets and trays and pay a pretty penny for them. Or, you could do like I did, and age galvanized metal yourself.
By the way, you can use this aging technique on anything made of galvanized metal. It can be used to add that perfect farmhouse patina to buckets, trays, pails and so much more!
How to Age Galvanized Metal
How to Use Galvanized Metal Pails
Today, I want to specifically share with you how to age galvanized metal pails. You can use these pails for so many things around your home, including:
- Seasonal holiday décor
- Beverage tub
- Planters
- Herb containers
- Utensil holder
- Floral arrangements
- Table service caddy
- Individual serving containers
- Hanging planter
- Organize odds and ends
- Garden hose holder
- Kitchen storage
- Wedding reception décor
- Rustic light fixture
Now that I’ve given you some ideas and so many possible uses, let’s take a look at how to age galvanized metal pails.
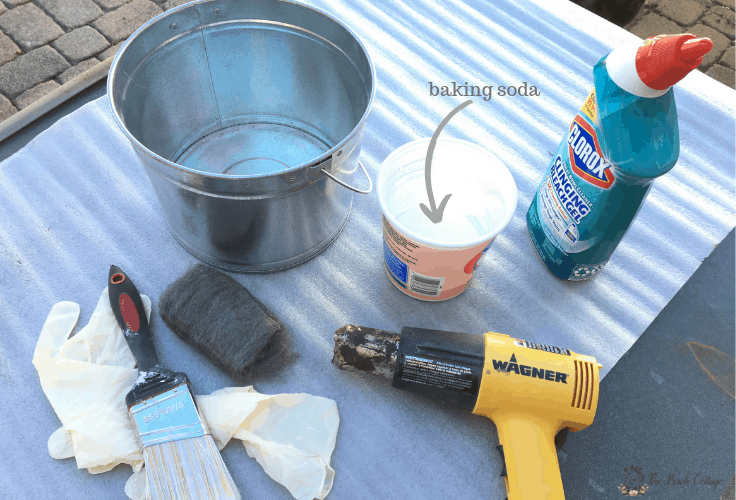
Supplies and Tools Needed to Age Galvanized Metal:
Want more ideas like this? Subscribe today to get our weekly Ideas in Your Inbox newsletter plus other exclusive gifts and offers — all for FREE!
Supplies and Tools:
- Clorox Toilet Bowl Cleaner Clinging Bleach Gel
- Baking soda
- Gloves
- Galvanized pail
- Steel wool
- Heat gun (optional)
- Water for clean up
- Dry rags
- Newspaper, cardboard box, plastic tote box, dropcloth or something to protect your work surface.
- Jar or plastic container
- Old paint brush
Instructions:

There are two things to keep in mind when aging galvanized metal.
One is that you want to leave the gel on the metal until it is completely dry.
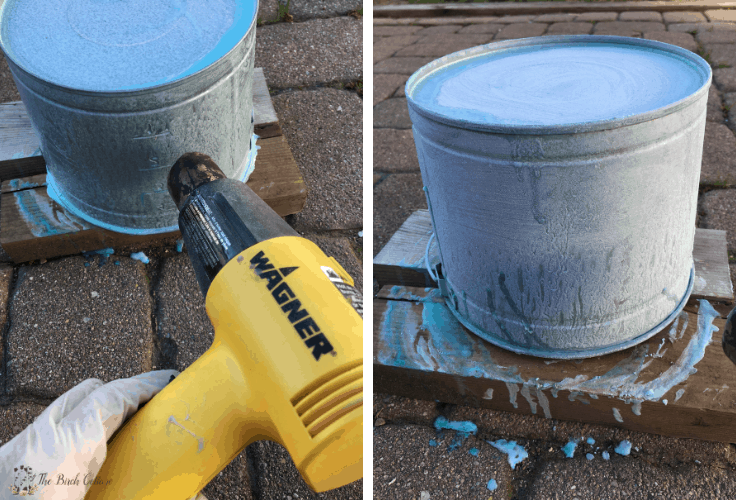
Secondly, heat is important. Use either direct sunlight or a heat gun to obtain the best results. Keep in mind, if you try this technique and your pail doesn’t have as much patina as you’d like, you can always repeat the process.
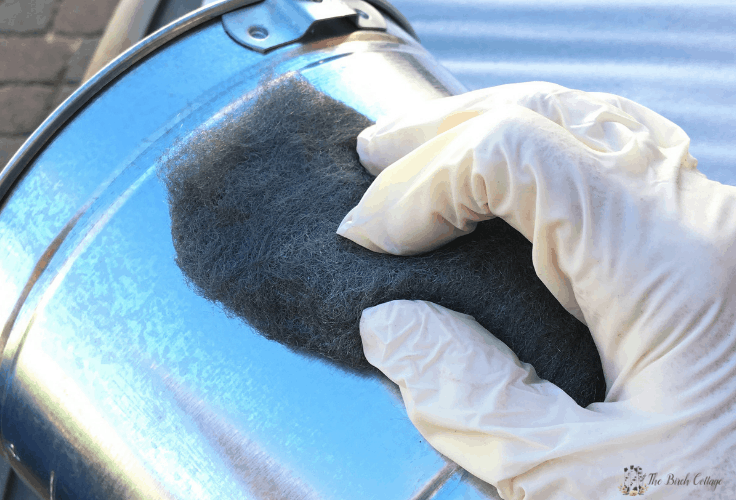
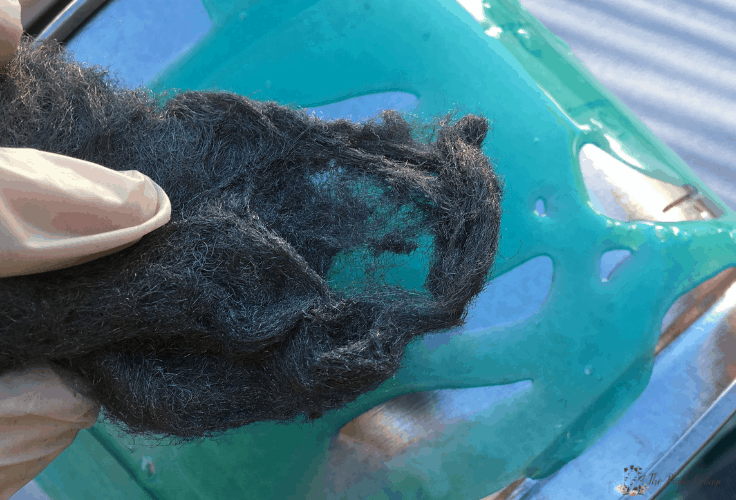
Step 1: Prepare the Galvanized Pail
First, make sure you’re wearing gloves that will protect your hands.
Then make sure the pail is free of dirt and debris.
Next, using the steel wool, lightly sand the surface of the galvanized metal to help remove the shiny surface. Removing this shiny finish will help to remove the protective coating and expose the galvanized metal so your chemicals don’t have to work as hard.
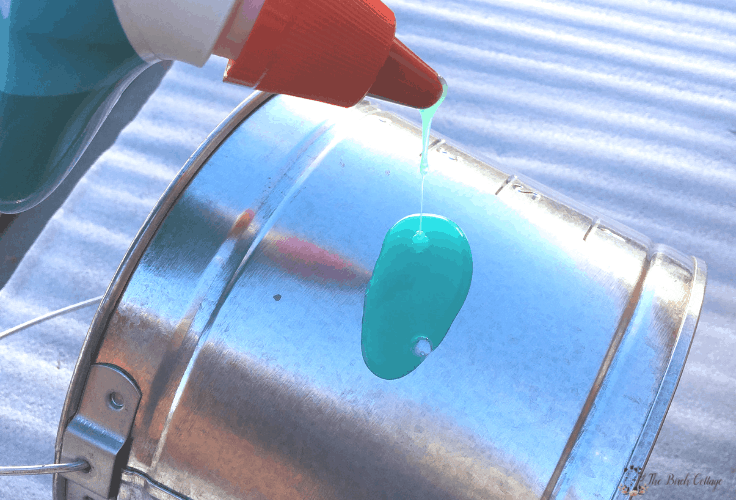
Step 2: Apply the Clorox Toilet Bowl Cleaner Clinging Bleach Gel
Be sure to protect your work surface before applying the Clorox Gel to the pail.
Squeeze out the Clorox Gel onto the entire outer surface of the pail. Use the steel wool to help spread the gel and work up a lather over the surface of the pail.
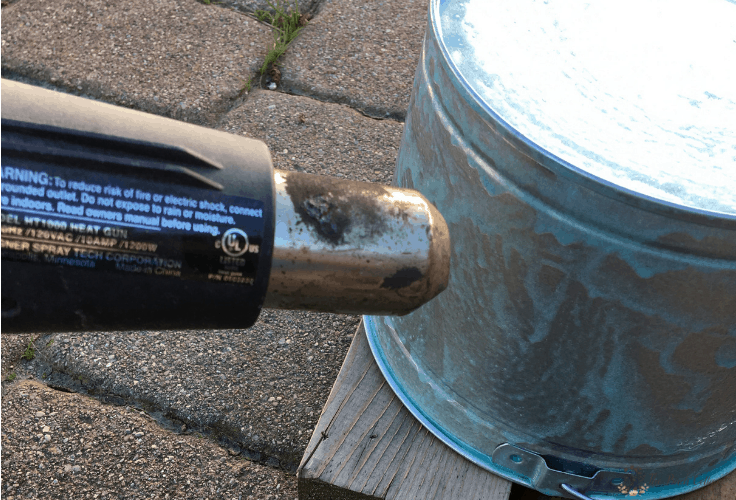
Step 3: Let It Dry
Once your pail is covered, allow to completely dry. Placing the pail in the direct sunlight or using a heat gun will help this process.
The heat not only helps the gel to dry faster but also helps with the chemical reaction. If drying in the sun, simply let dry for 2-3 hours before proceeding.
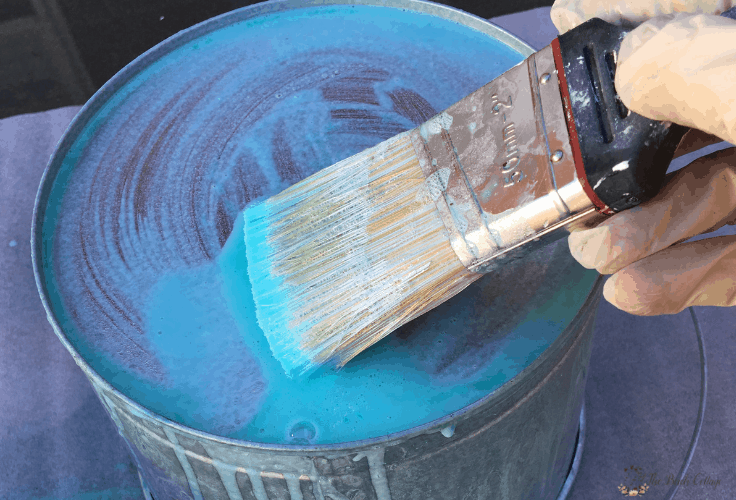
Step 4: Make Paste and Apply
Once the gel cleaner has completely dried, make a paste out of equal parts baking soda and Clorox Toilet Bowl Cleaner Clinging Bleach Gel.
Apply the paste to the pail with an old paint brush. You should have a nice thick-ish coat of paste on your pail. Allow to completely dry for 2-3 hours in the sun. You can also use your heat gun to aid in the drying process.
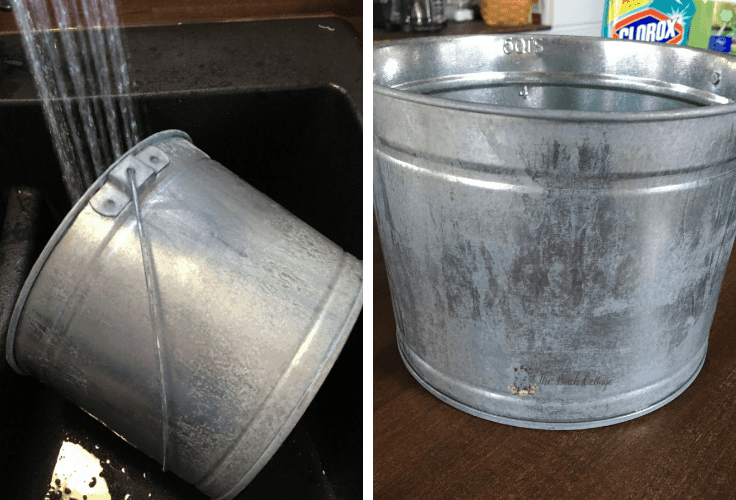
Step 5: Rinse
Once the gel has completely dried, it’s now time to rinse off the residue from the pail and reveal your beautifully aged galvanized metal masterpiece!
How to Add Rust to Aged Galvanized Metal
Maybe you’re happy with all that beautiful patina. Maybe, just maybe, you’d like to add some rust. You can do that! Although I didn’t add rust to my pail, I have done it in the past and it worked amazingly well. Here’s how:
Supplies to Add Rust to Aged Galvanized Metal:
- Plastic tub
- 32 oz hydrogen peroxide
- 4 teaspoons salt
- ½ cup white vinegar
- Dry rag
Instructions:
- Fill the bottom of a plastic tub with the peroxide, salt and vinegar. Stir until mixed.
- Place the pail in the solution so that it covers the bottom of the pail. Allow the pail to sit in the solution for 20 minutes. You should notice rust forming after about 5 minutes.
- Wipe the solution off the bottom of the pail with a dry rag. Flip the pail over and place it lip down into the solution in the tub. Allow to sit for 20 minutes.
How to Stencil a Galvanized Pail
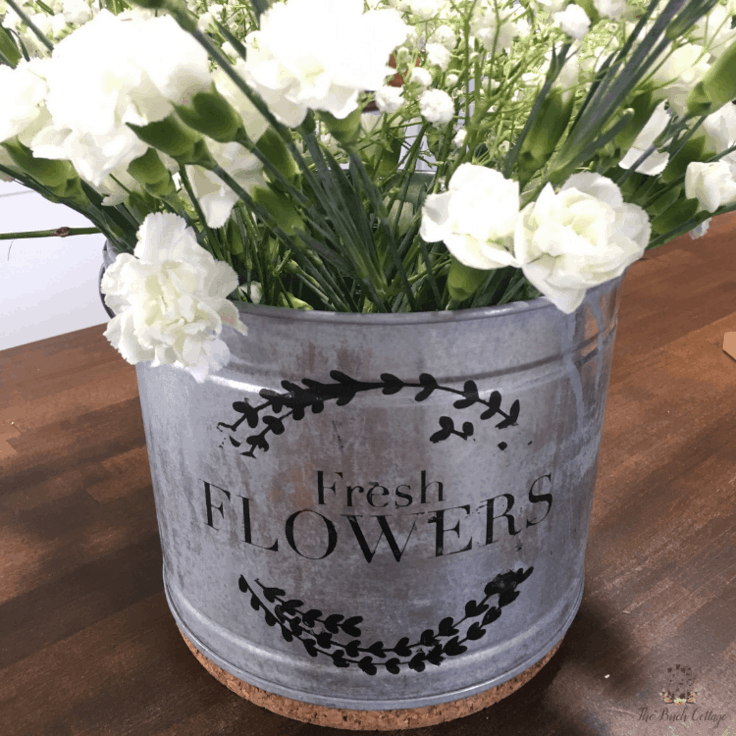
So, you’ve added beautiful patina to your galvanized metal pail and maybe even added some touches of rust, what’s next? Glad you asked! Now, you can add a touch of French flower market style to your aged galvanized metal pail using a stencil!
If you’re interested in learning how to stencil a galvanized pail, you’ll find the full step-by-step tutorial over on The Summery Umbrella. LZ is the creative behind The Summery Umbrella and you’ll find tons of SVG files, vectors and illustrations, not to mention hand lettered artwork! I used her Fresh Flowers SVG file to stencil one of my aged galvanized pails and I just love how it turned out.
More Ideas from The Birch Cottage
If you enjoyed today’s easy DIY aged galvanized metal pail, you might also like these fun and family friendly ideas from The Birch Cottage blog:
Spring Inspired Bunco Printables

Love the ideas you see here on Ideas for the Home by Kenarry®? Subscribe today to get our FREE DIY & Craft Planning Calendar, plus our weekly Ideas in Your Inbox newsletter filled with creative tips and exclusive offers!
These aged galvanized metal pails remind me of summertime, barbecues and everything outdoors. If you enjoyed this easy DIY aged galvanized metal pail project, you might also like these ideas right here on Ideas for the Home by Kenarry® –
That’s a good idea to get a heat gun to help you to age galvanized steel. I would think that would be a good way to make sure that you get the best results possible. I’ll have to consider trying that out if I decide to get some galvanized steel stuff for my kitchen and want to give it more of a rustic feel.
Hi, Tyler! I couldn’t agree more with your assessment on utilizing the heat gun to obtain the best results in aging galvanized metal. I have tried aging it just using the sun and time. The results are very good, but the heat gun allows you to accomplish the same results in much less time. And, like you said, if there are areas you want to age more than others, the heat gun is perfect for targeting those areas.
Funny story, my neighbor has a beautiful two story wood deck that overlooks our back yard. She recently set out a few shiny galvanized metal pails with herbs and I so want to tell her how to age her “herb pots.” But, I decided to simply keep an eye on the pails so I can see how long it takes Mother Nature to age the metal.
Anyway, please let us know if you try this technique. We’d love to hear about your results!
Pam Baker
The Birch Cottage