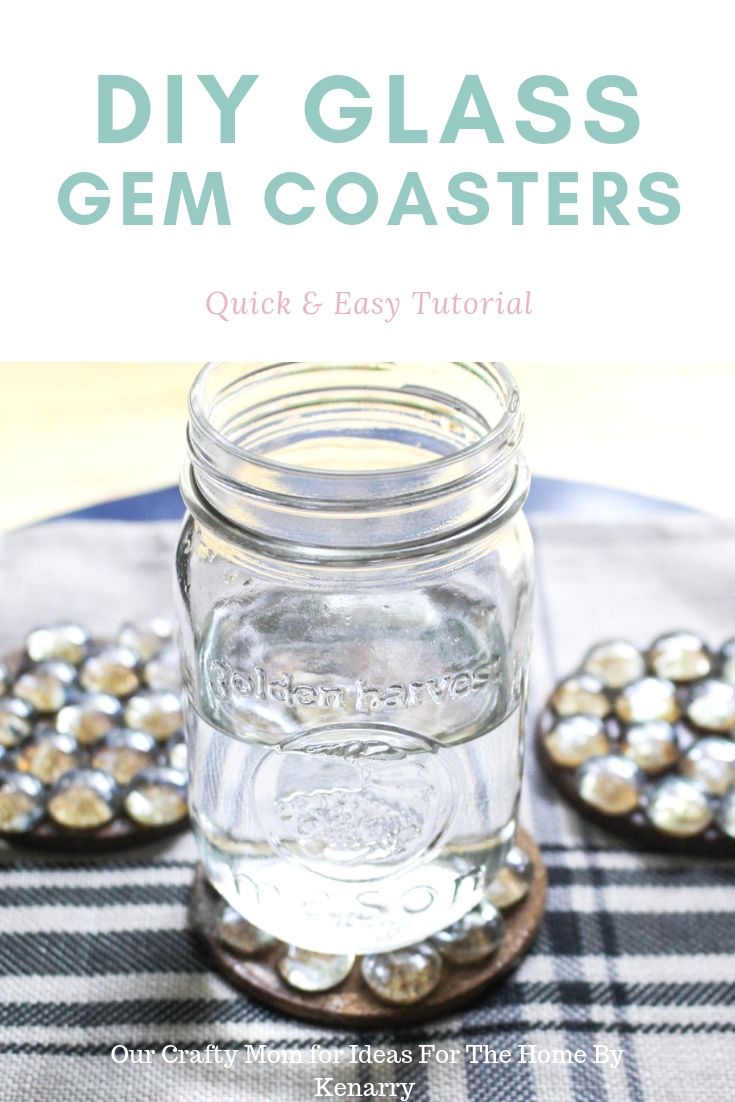
• About Us
    • Contact Us
    • Work With Us
    • The Creative Team
    • Disclosures
  • Subscribe
  • Shop Our Products
  • My Account
  • Cart
  • Nav Social Menu

    • Facebook
    • Instagram
    • Pinterest
    • Twitter
  • DIY & Decor â–¾
    • Crafts
    • Home Decor
    • Home Improvement
    • Technology
  • Recipes â–¾
    • Breakfast
    • Appetizers
    • Side Dishes
    • Easy Dinner Ideas
    • Slow Cooker
    • Fun Food
    • Desserts
  • Clean/Organize
  • Kid Ideas â–¾
    • Birthdays
    • Castle Playroom
    • Outer Space Bedroom
    • Teacher Appreciation
    • Travel Tips
  • Free Printables
  • Holidays â–¾
    • New Year’s
    • Valentine’s Day
    • St. Patrick’s Day
    • Easter
    • Cinco de Mayo
    • Mother’s Day
    • Memorial Day
    • Father’s Day
    • Independence Day
    • Halloween
    • Thanksgiving
    • Christmas
    • Gift Ideas

Ideas for the Home

You are here: Home / Craft Ideas / Quick and Easy Dollar Store Glass Gem Coasters

By Michelle James on July 4, 2019 2 Comments

Quick and Easy Dollar Store Glass Gem Coasters

Craft Ideas

  • Share
  • Tweet

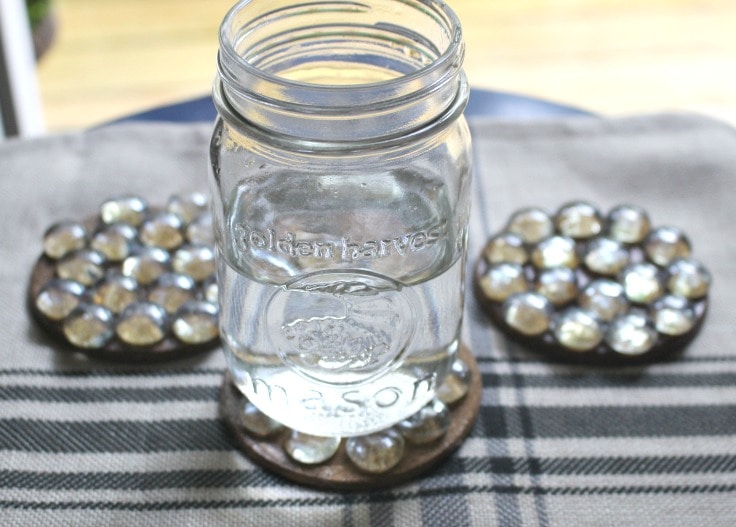
Today we will show you how to make quick and easy glass gem coasters with dollar store supplies. These would also make a great gift idea.

Hello friends! Michelle back from Our Crafty Mom sharing a quick and easy Dollar Store craft. These glass gem coasters would be a fun craft to make with the kids too. You can find these glass gems in several different colors as well.

How to make Dollar Store Gem Coasters

How to Make Glass Gem Coasters

I’m always looking for easy gift giving ideas, especially something that is useful like these coasters. These are super affordable with supplies from the dollar store and they look country chic.

You can give them as graduation gifts to someone going off on their own for the first time, wedding gifts, or they make a low-cost hostess gift for parties.

I’ll show you step-by-step how to make these shiny and impressive little coasters.

coasters with mason jar glass

What you need: 

Disclosure: This blog post contains affiliate links for products or services we think you’ll like. This means if you make a purchase from one of these links, Ideas for the Home by Kenarry® will make a small commission at no additional cost to you so we can keep the great ideas for the home coming your way. All opinions expressed are derived from personal experience.

Kitchen or Craft/DIY Tools Needed: 

  • Cordless Glue Gun

Supplies or Ingredients Needed: 

  • Glass Gems
  • Triple Thick Glaze 
  • Cork Coasters

Instructions:

placing glass gems on cork coasters

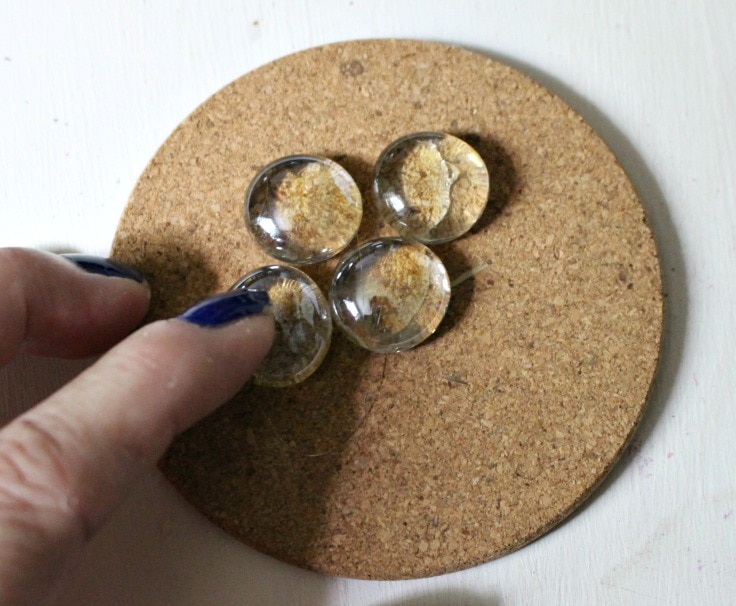
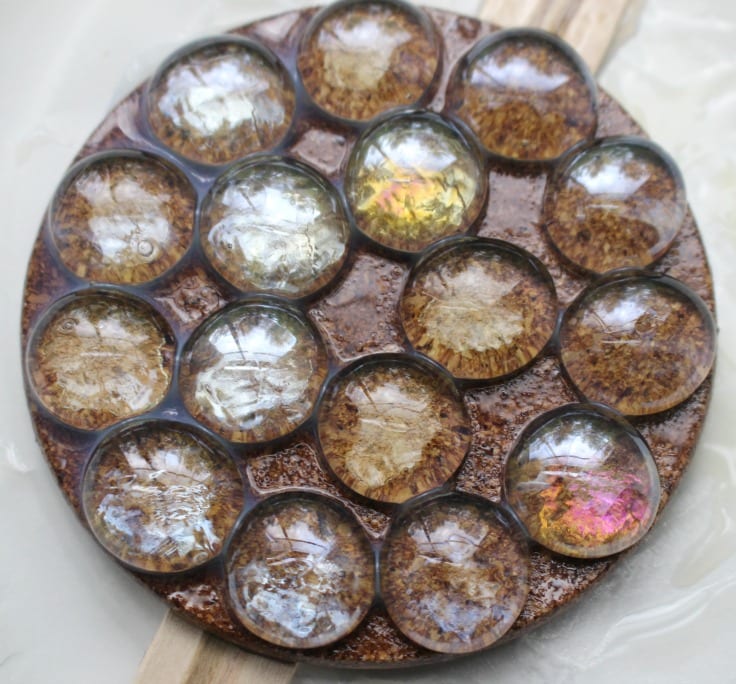
1. Lay the gems on the cork for placement.

First, it’s best to start by placing the gems on the cork for placement prior to hot gluing them. Otherwise, you might not get even placement. Ask me how I know!

2. Hot glue the glass gems.

glass gems hot glued on coasters

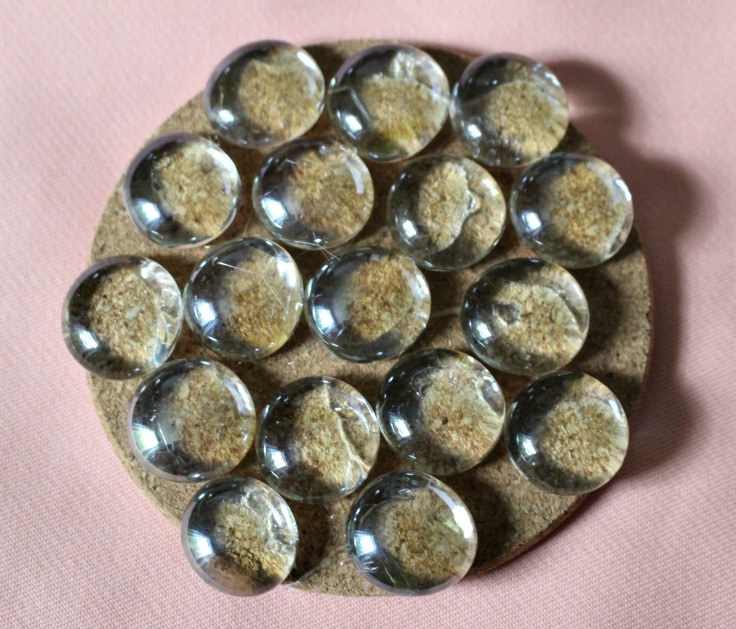
Use the hot glue gun to glue each glass gem to the cork coaster. It’s best to place the hot glue on the gem, but watch your fingers!

step 3. add the triple thick glaze.

What it looks like after adding triple thick glaze on cork coasters with glass gems glued on.

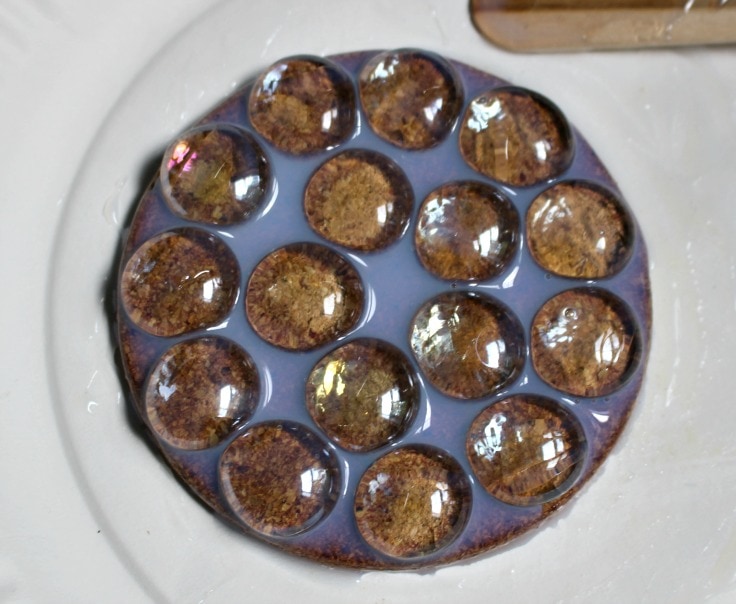
The triple thick glaze gives the cork extra protection from liquids and will make them last longer. It gives them a nice finish too!

Step 4. let dry overnight.

finished coasters with glaze

Let the coasters dry overnight and then the glass gem coasters are ready to use! You can layer them together and tie a pretty ribbon around them for gift giving, or use them in your own home.

How to personalize the glass gem coasters

While the simple clear glass gems and cork board are cute and go in almost any decor, you might want to personalize them before giving them as a gift.

Personalizing the coasters will make the gift stand out. It’ll tell the person how much you care and how much thought you put into them.

Try one of these creative ideas:

  • Add a photo before gluing the glass gems. You could hot glue a picture to the cork board before gluing the gems. Then you’ll be able to see the picture through the gems.
  • Use colored gems. Find some different-colored gems – like maybe colors from their school or favorite sports team.
  • Add a monogram beneath the gems. If you have a vinyl printer (like a Cricut) you can add a monogram to the cork board before gluing the gems.
DIY glass gem coasters - a quick and easy tutorial.

What’s Next? 

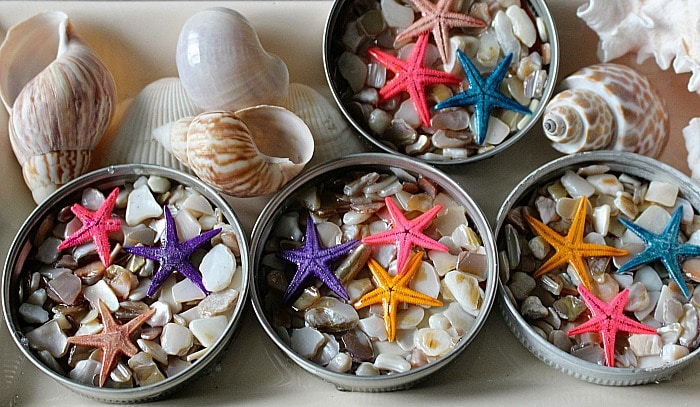
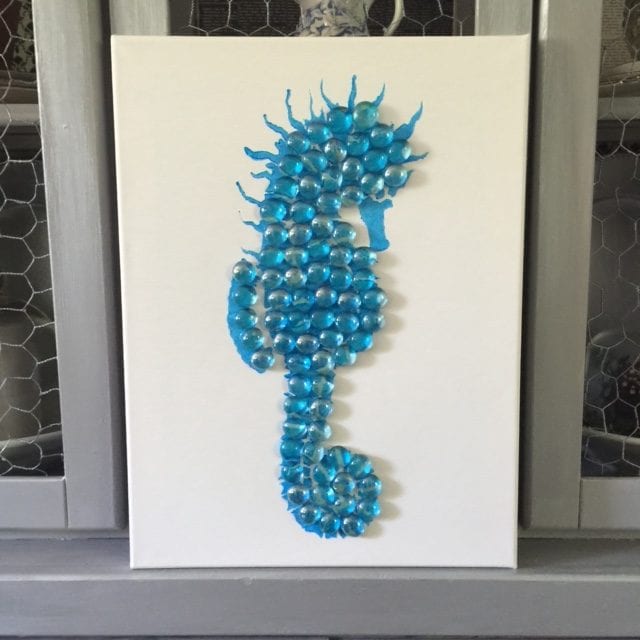
If you enjoyed these glass gem coasters, you may also like these ideas too.

Beach Themed Mason Jar Lid Coasters

beach coasters

Sea Horse Canvas With Dollar Store Gems

sea horse

Dollar Store Lantern

dollar store lantern

You may also enjoy these coaster ideas on Kenarry: 

  • Kintsugi Tile Coasters
  • Hand Lettered Drink Coasters
  • Coasters From Tiles
  • Share
  • Tweet

Craft Ideas

About Michelle James

Michelle is the founder and creator of Our Crafty Mom, a DIY blog focusing on crafts, home decorating, refinishing furniture and upcycling -- all done on a budget! She has two grown children, who inspired her blog name. Her Dad is her biggest blog supporter and very own "personal American Picker", finding most of the furniture pieces she refinishes. She has been featured on DIY Network, Craft Gawker, Dwelling Gawker and many popular DIY blogs. She loves thrift store shopping and flea markets.

Michelle has been sharing her great ideas on Ideas for the Home by Kenarry® since October 2018. Follow Michelle on Facebook, Pinterest, Instagram and Twitter.

In this ultimate guide, you'll learn how to make a burlap wreath with ribbon for your home. The FREE eBook includes easy step-by-step instructions plus inspiring craft and decor ideas to make wreaths for fall, Christmas, Easter and other holidays.

Subscribe today to get ideas in your inbox plus FREE exclusives only for Idea Insiders!

Almost there! Now just check your email to confirm your e-mail address and get your free eBook.

There was an error submitting your subscription. Please try again.

You're already signed up! YAY! As an Idea Insider you have instant access to our Kenarry Idea Insider Resource Library with exclusive printables, offers and other freebies as soon as you confirm your subscription.
Previous Post: « American Flag Cake: An Easy to Make Treat
Next Post: How to Transfer Photos to Stone: Simple Tutorial »

Reader Interactions

Comments

  1. Denise says

    November 10, 2019 at 3:39 pm

    I wanted to know if you pour the triple thick on the gems or use a brush to apply the triple thick on the gems?

    Reply
    • Michelle James says

      November 11, 2019 at 11:58 pm

      Hi Denise. I poured the triple thick glaze on and then went back and brushed some on the gems too. It is a little messy, so be sure to put something down under the coasters first. Hope that helps. 🙂

      Reply

Leave a Reply Cancel reply

Your email address will not be published. Required fields are marked *

Recipe Rating


This site uses Akismet to reduce spam. Learn how your comment data is processed.

Primary Sidebar

Welcome

Carrie Ypma from Ideas for the Home by Kenarry®Hello, I'm Carrie! I'd love to personally welcome you to Ideas for the Home by Kenarry® where we curate and share great ideas you can create at home. Whether you're cooking, crafting or creating for your family, you're bound to find inspiration. Please pour yourself some coffee and stay awhile. We're glad you're here! Read more...

Sign Up and Get a Free Gift

Subscribe to become an Idea Insider. You'll get our weekly newsletter plus special deals and other resources that are only for subscribers -- all for FREE!

Almost there! Now just check your email to confirm your e-mail address and get your free eBook.

There was an error submitting your subscription. Please try again.

You're already signed up! YAY! As an Idea Insider you have instant access to our Kenarry Idea Insider Resource Library with exclusive printables, offers and other freebies as soon as you confirm your subscription.
In this ultimate guide, you'll learn how to make a burlap wreath with ribbon for your home. The FREE eBook includes easy step-by-step instructions plus inspiring craft and decor ideas to make wreaths for fall, Christmas, Easter and other holidays.
  • About Us
  • Subscribe
  • Shop Our Products
  • My Account
  • Cart

Footer

Disclosure: Posts may include affiliate links for your convenience. As an Amazon Associate I earn from qualifying purchases. All opinions are our own. You are reading and following advice from Kenarry, LLC at your own risk. Always use safety precautions. You should read and follow manufacturer’s directions for the products and tools you use. Read more.


Privacy Policy: The privacy of your personal information is important. We make every effort to safeguard your information and will never sell it to third parties. Read more.

Terms of Use: You are welcome to link to this site or use a single image and brief description to link back to any post. Republishing posts in their entirety is prohibited without permission. All images are property of Kenarry, LLC. Do not crop or remove watermark. Do not reproduce without link back or permission. If you do link to this site, please contact us to let us know. All free printables offered are for personal use only. Pinning is always welcome and appreciated. Thank you!

As it relates to comments and content posted on this blog by those other than the owners, any such content that contains the copyrighted and/or proprietary work of others is expressly prohibited and will be removed. Repeated posting of such content by the same user may result in that user being banned from this site.

Copyright © 2021 Kenarry LLC · Powered by Captivating Theme on Genesis Framework · WordPress · Log in